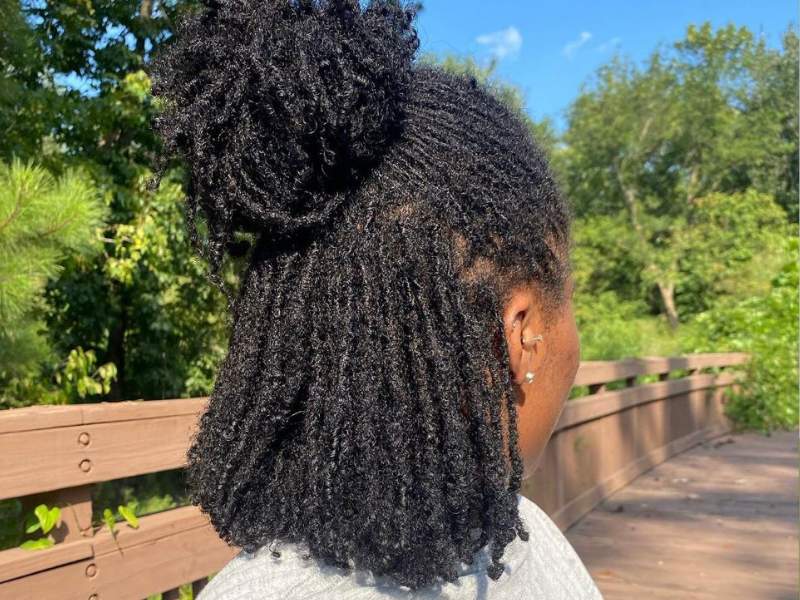
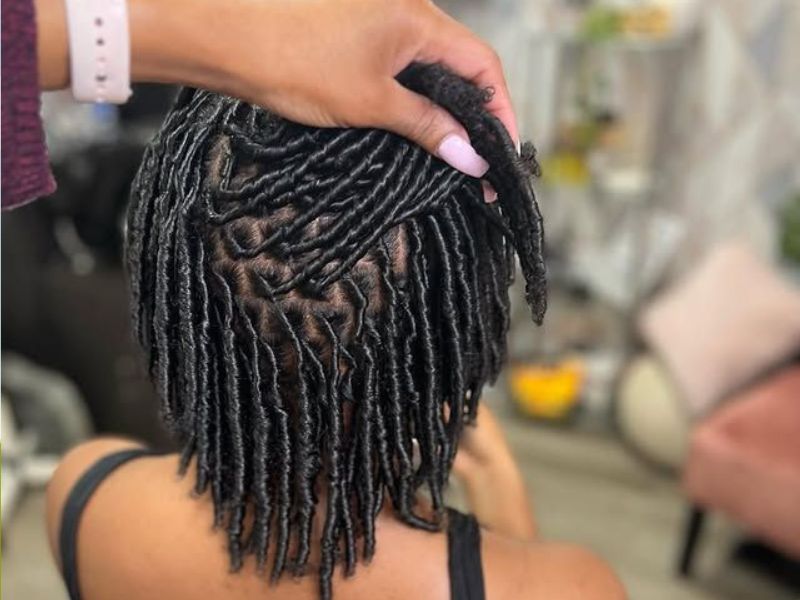
How to Start Comb Coils for Starter Locs on Short Hair: A Beginner’s Guide.
Starting your loc journey is an exciting decision, especially when you have short natural hair and want to see how your locs will develop over time. You might have saved pictures of beautiful mature locs, watched people share their loc journeys, or wondered how to achieve those neat little coils that gradually grow into beautiful, established locs.
One method you may want to consider is comb coils for starter locs.
Comb coils are a popular way to begin a loc journey because they create small, defined coils using a comb and natural hair. They can work well on short hair, making them an option for people who want to start their locs without waiting for their hair to reach a particular length. However, getting a good result involves more than twisting your hair with a comb. Your hair texture, length, section size, technique, and maintenance routine all play a role in how your starter locs develop.
If you are a beginner, you may have questions about how to create comb coils, how much hair you need, what products to use, and how to stop your coils from unraveling. You may also wonder how long it takes for comb coils to mature and what you should expect during the early stages of your loc journey.
In this guide, I will walk you through everything you need to know about how to start comb coils for starter locs on short hair, from preparing your hair to creating the coils and caring for them afterward.
Let’s get into it!
Have you been looking for beautiful loc styles to wear this Christmas? My guide on 15 Christmas Loc Styles That Will Have Everyone Asking Where You Got Your Hair Done is filled with gorgeous festive hairstyle ideas to help you stand out at Christmas parties, family gatherings, and end-of-year celebrations.
What Are Comb Coils for Starter Locs?
Comb coils are small, spiral-shaped sections of natural hair created by rotating a comb through each section of hair until it forms a defined coil.
The method is commonly used to start locs, particularly on natural hair that can hold a coil pattern. Once installed, the coils begin their own journey toward becoming established locs as the hair grows, tangles, and gradually develops a more compact structure.
Unlike two-strand twists, which involve wrapping two sections of hair around each other, comb coils are created by rotating a single section of hair around itself.
The result is a series of individual coils that can be left to develop into locs.

Comb coils are especially appealing to beginners because they allow you to create individual sections from the beginning. You can choose the approximate size of your locs, decide how you want them arranged across your scalp, and establish a parting pattern that suits your preferences.
However, the final appearance of your locs will depend on several factors, including your hair texture, density, section size, and maintenance habits.
One important thing to understand is that comb coils are starter locs, not fully mature locs. They may look neat and well-defined when first installed, but they need time to develop and become more established.
If your hair is short, you can still begin your loc journey with comb coils as long as your hair has enough length for the coils to hold securely. The exact length needed varies depending on your hair texture and the technique used.
If you have noticed your locs becoming thinner around the roots or along the length, my guide on How to Fix Thinning Locs and Prevent Them From Getting Worse shares helpful tips to protect your locs, reduce tension, and care for weak areas so your hair can stay healthy and strong.
Are Comb Coils Good for Starting Locs on Short Hair?
Yes, comb coils can be a good option for starting locs on short natural hair.
You do not necessarily need long hair before beginning your loc journey. Many people start with a short natural haircut and allow their locs to grow gradually.
Comb coils can be particularly useful when you want individual locs that follow a specific parting pattern from the beginning.
However, there are a few things to consider before choosing this method.
Starting your loc journey? My guide on Starter Locs: 15 Things Nobody Tells You Before Starting Your Journey shares important things to expect during the early stages, from unraveling and frizz to maintenance, patience, and learning how to care for your new locs.
1. Your Hair Must Be Long Enough to Hold a Coil
The first thing to consider is your current hair length.
If your hair is too short to wrap securely around a comb, the coils may unravel shortly after installation. Hair that is slightly longer may be easier to coil and manage, although the amount of length needed depends on your hair texture and the size of your sections.
Tightly coiled natural hair may hold the shape differently from hair with a looser curl pattern.
If your hair is very short, a loctician can assess whether comb coils are suitable or whether another starter loc method would work better for your current length.
Avoid pulling or twisting your hair excessively to compensate for insufficient length. Excessive tension can irritate your scalp and put unnecessary stress on your hair.
2. Your Hair Texture Matters
Comb coils are often used on tightly coiled natural hair because the hair can hold the coil pattern relatively well.
However, different hair textures can be started with coils, although the amount of shrinkage, coil definition, and tendency to unravel may vary.
If your hair has a looser curl pattern, you may need to pay closer attention to how securely the coils hold during the early stages.
This does not mean that one texture is better than another. It simply means that your installation technique and maintenance routine should suit your hair.
3. You Must Be Patient During the Early Stages
One thing many beginners underestimate is how delicate starter locs can be.
Your coils may look neat on installation day, but washing, excessive manipulation, friction, and frequent styling can cause them to loosen.
You may also notice frizz, loose hairs, or changes in the shape of your coils as your hair begins to grow.
These changes are part of the early loc journey and do not automatically mean that your installation has failed.
The goal is to allow your hair to develop while keeping your scalp clean and avoiding unnecessary manipulation.
Frizzy locs can be frustrating, especially when you want your hair to look neat without constantly retwisting it. My guide on How to Fix Frizzy Locs Without Retwisting Them shares simple ways to manage frizz, keep your locs looking tidy, and protect your hair while allowing your roots to grow naturally.
What You Need to Start Comb Coils on Short Hair
Before you begin, gather the items you need so you can work through the process without repeatedly stopping.
You do not need an entire collection of hair products to start your locs. In fact, using too many products can leave residue inside your coils.
Here are the basic items you may need.
If you are wondering how to tell when your locs are fully mature, my guide on What Do Mature Locs Look Like? 11 Signs Your Locs Are Fully Mature explains the changes to look for as your locs develop, from their texture and thickness to their shape and overall appearance.
A Rat-Tail Comb
A rat-tail comb helps you create clean partings and divide your hair into individual sections.
The pointed end is useful for separating the hair, while the teeth can help you smooth and prepare each section before coiling.
Choose a comb that feels comfortable in your hand and allows you to create sections of a consistent size.
Hair Clips
Hair clips help keep the sections you are not working on out of the way.
This makes it easier to focus on one section at a time and reduces the chance of mixing hair from neighboring sections.
A Spray Bottle
A spray bottle can be useful for lightly dampening your hair when needed.
Your hair should be in a condition that allows you to work through each section without unnecessary pulling. However, avoid soaking the hair immediately before installation if doing so makes it difficult for your chosen technique to hold.
The ideal moisture level depends on your hair and the products you use.
A Suitable Comb for Creating the Coils
A fine-toothed comb is commonly used for the comb-coil method.
The comb helps rotate each section into a spiral shape. It should be sturdy enough to handle your hair without catching, pulling, or breaking strands.
A Lightweight Product, If Needed
Some people use a small amount of a suitable styling product to help manage the hair during installation.
If you decide to use one, choose a product that does not leave heavy residue and avoid applying more than necessary.
Heavy creams, waxes, and thick butters can accumulate inside locs and become difficult to remove.
You do not need to coat every section with a large amount of product to create a coil.
A Clean Towel
Keep a clean towel nearby to remove excess moisture or product from your hands and hair tools.
Starting with clean hair and clean tools helps you prepare your scalp and hair for the installation process.
Beginner tip: Gather everything before you start. Creating comb coils takes concentration, especially when you are trying to keep your sections neat and consistent.
Knowing how often to retwist your locs can make a big difference in keeping them healthy and strong. My guide on How Often Should You Retwist Your Locs? Signs You’re Retwisting Too Often or Not Enough explains how to recognize when your locs need maintenance, spot the signs of over-retwisting, and find a retwisting routine that works for your hair.
How to Start Comb Coils for Starter Locs on Short Hair: Step-by-Step Guide
Now that you understand the basics, let’s look at how to create comb coils on short natural hair.
If this is your first time installing starter locs, work slowly. The goal is to create secure, comfortable coils with consistent sections, not to finish as quickly as possible.
If you are unsure about sectioning or your hair is too short to hold the coils, consider having a professional loctician install them.
Step 1: Clean Your Hair and Scalp
Start with clean hair.
Wash your hair using a shampoo that suits your scalp and hair needs. Massage your scalp gently with your fingertips, paying attention to areas where oil, sweat, or product residue may have accumulated.
Rinse thoroughly so that no shampoo remains in your hair.
If your hair has a lot of product buildup, you may need to address that before installation. However, avoid aggressive scrubbing or harsh cleansing treatments that could irritate your scalp.
You want your hair to be clean and ready for styling.
After washing, gently remove excess water with a clean towel.
Your hair should be manageable enough to section and coil without excessive pulling. Follow the installation technique appropriate for your hair texture and length.
Avoid applying heavy oils, thick conditioners, or large amounts of styling cream immediately before installing your coils. Product choice can affect how well the coils hold and may contribute to buildup later.
Why this step matters: Starting with clean hair gives you a better foundation for your loc journey and helps prevent unnecessary residue from being trapped inside newly installed coils.
Planning a wedding or looking for a gorgeous hairstyle for a special occasion? My guide on 10 Stunning Wedding Loc Styles That Always Impress features beautiful loc hairstyle ideas to help you look elegant and stand out, whether you are the bride, a bridesmaid, or a wedding guest.
Step 2: Decide on the Size of Your Locs
Before making your first part, decide how thick or thin you want your future locs to be.
Comb coils can develop into locs of different sizes, depending on the amount of hair in each section and how the locs mature.
Smaller sections generally create more individual locs, while larger sections produce fewer, thicker locs.
Neither option is automatically better. Your decision should depend on the appearance you want, your hair density, and how much maintenance you are comfortable managing.
For example, if you prefer a fuller look with many individual locs, you may want smaller sections.
If you prefer thicker locs, larger sections may be more suitable.
Remember that the final size will not be determined by section size alone. Shrinkage, hair density, and the natural locking process can influence how your locs look over time.
It is also important to consider your scalp. Very small sections may not be suitable for every person, especially if the hair is fine or fragile.
Avoid making your sections so small that the roots become weak or so large that the hair cannot hold the intended shape.
If you are uncertain, ask a loctician to help you choose a parting pattern that suits your hair.
Looking for a gorgeous protective hairstyle to try next? My guide on 15 Faux Locs Hairstyles for Women That Are Too Pretty to Ignore and Too Good Not to Try features stunning hairstyle ideas to inspire your next look, whether you love long, flowing faux locs, chic updos, or beautiful styles that make you stand out.
Step 3: Create Your Parting Pattern
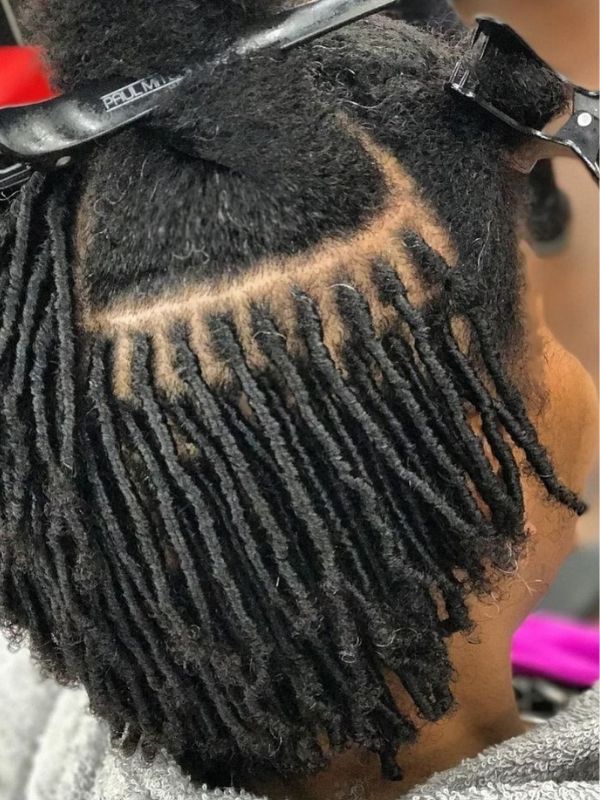
Once you have decided on the size of your locs, use your rat-tail comb to divide your hair into sections.
You can choose square, rectangular, diamond-shaped, or another suitable parting pattern.
The pattern affects how your locs sit on your scalp and how they appear when you style them.
Square parting is a popular choice because it can create a neat, organized appearance. Other patterns can also work well, depending on your preferences.
Start by creating a clean part, then separate the section you intend to coil.
Use hair clips to keep the remaining hair out of your way.
Try to keep the sections reasonably consistent in size. Uneven sections can lead to locs that develop at different thicknesses, although natural variations in hair density may still affect the final result.
Pay attention to the hairline, crown, and back of your head. These areas may have different growth patterns, so your sections may need slight adjustments.
Do not pull the hair tightly while parting it.
Your scalp should feel comfortable, and the roots should not be under unnecessary tension.
A helpful tip: If you are installing your own locs, use a mirror setup that lets you see the back of your head. You can also ask someone to help you check the sections you cannot see clearly.
Take your time with this step because your parting pattern will influence how your locs are arranged as they grow.
Step 4: Prepare One Section of Hair
After creating your parting pattern, choose one section to begin with.
Use your fingers or comb to remove tangles gently, making sure that the hair belongs to that section and has not become mixed with neighboring sections.
If your hair is too dry to work with comfortably, lightly dampen it as appropriate for your hair and installation method.
Avoid making the section excessively wet.
If you are using a styling product, apply only a small amount when needed. Spread it evenly through the section rather than concentrating a large amount at the roots.
The section should be manageable enough for you to rotate the comb through it without snagging or pulling.
Before moving on, check that the section is separated cleanly from the surrounding hair.
This helps prevent neighboring sections from joining unintentionally as your locs develop.
Step 5: Create the Comb Coil
This is the main step in the process.
Place your comb near the roots of the selected section, positioning it in a way that allows you to rotate the hair into a coil.
Gently rotate the comb through the section, allowing the hair to wrap around itself and form a spiral.
Continue working down the section with controlled movements until the hair forms a defined coil.
The exact hand movement may vary depending on your comb and hair texture, so you may need a little practice before you become comfortable with the technique.
The most important things are to maintain a consistent direction, avoid pulling excessively, and keep the hair within its designated section.
Do not force the comb through tangles. If the comb catches, stop and gently release the hair before continuing.
Also, avoid twisting the hair so tightly that your scalp begins to hurt.
A properly installed starter coil should not cause persistent pain, strong pulling, or excessive scalp tension.
If you notice these problems, loosen the tension or seek help from an experienced loctician.
Remember: You do not need to make the coil extremely tight for it to look neat. Excessive tension can cause unnecessary stress on your hair and scalp.
Step 6: Check the Coil and Move to the Next Section
After creating your first coil, check its appearance before continuing.
Look at the following:
- Is the section clearly separated from the neighboring hair?
- Does the coil have a reasonably consistent shape?
- Is the root comfortable rather than painfully tight?
- Is the coil holding together without excessive product?
- Does the section look similar in size to the surrounding sections?
If the coil looks uneven, you may be able to correct it gently before moving on.
Avoid repeatedly combing and re-coiling the same section. Excessive manipulation can make it harder for the hair to settle and may cause unnecessary breakage.
Once you are satisfied with the coil, move to the next section.
Repeat the process until you have completed the planned areas of your head.
Work in an organized order so that you do not accidentally skip sections.
You may find it easier to begin at the back and work toward the front, or start at the front and move backward. Choose the approach that gives you the best visibility and control.
Step 7: Allow Your Starter Locs to Settle
After installing your comb coils, give them time to settle into their new shape.
Avoid immediately pulling them into tight hairstyles or repeatedly touching them to check whether they are secure.
Follow your loctician’s instructions regarding any setting period, especially if you plan to wash your hair soon after installation.
Your coils may appear neat and defined at first, but their appearance can change as you go about your normal activities.
Some coils may become slightly frizzy, and some may loosen around the roots or ends.
This is not necessarily a sign that you did something wrong.
Starter locs are still developing, and they need appropriate care to remain healthy as they progress.
Avoid trying to make every coil look perfectly smooth at all times. Constantly manipulating the hair can interfere with the process and increase the risk of weakening the roots.
Step 8: Protect Your New Coils at Night
Your nighttime routine matters because friction from pillows, blankets, and movement can disturb newly installed coils.
Consider using a clean satin or silk bonnet, scarf, or pillowcase to reduce friction while you sleep.
Choose a covering that fits comfortably without pulling on your hairline or putting pressure on your locs.
If you use a bonnet, make sure it is not so tight that it causes discomfort.
You should also avoid sleeping with your hair trapped underneath your body in a way that repeatedly pulls on the coils.
Keeping your hair protected at night can help reduce unnecessary friction and disturbance during the early stages of your loc journey.
However, remember that nighttime protection will not prevent every coil from becoming frizzy or loosening. Some changes are normal as your hair grows.
Step 9: Establish a Maintenance Routine
Once your starter locs are installed, the next step is learning how to care for them.
Your routine should focus on scalp cleanliness, appropriate moisture, minimal unnecessary manipulation, and protecting your hair from excessive tension.
You do not need to retwist your hair every few days to keep your locs looking neat.
In fact, frequent manipulation can place unnecessary stress on your roots.
Follow a washing schedule suited to your scalp and hair needs, taking into account how securely your coils hold and the advice of your loctician.
When washing your hair, use a gentle technique that cleans your scalp without aggressively rubbing or pulling at the coils.
Rinse thoroughly and allow your hair to dry completely.
If you need to refresh your hair between washes, avoid applying heavy layers of oils, creams, or other products that may accumulate inside the locs.
Pay attention to how your scalp feels. Persistent itching, redness, soreness, or unusual flaking may indicate that your routine needs adjustment or that you should seek advice from a healthcare professional.
The goal is to support healthy hair and scalp conditions while allowing your locs to develop naturally.
How Long Should Your Hair Be for Comb Coil Starter Locs?
One of the most common questions beginners ask is how long their natural hair needs to be before they can start comb coils.
There is no single minimum length that works for everyone.
The suitable length depends on your hair texture, how tightly your hair holds a coil, the size of the sections, and the installation technique.
Hair that is extremely short may not wrap securely around the comb, making the coils more likely to unravel.
Slightly longer hair may be easier to work with because it gives the stylist more length to form and secure each coil.
However, you should not feel pressured to grow your hair to a particular length before exploring your options.
If your hair is very short, a professional loctician can examine its length and texture and help you decide whether comb coils are suitable.
Avoid forcing a coil into hair that cannot hold it comfortably.
It is better to choose a method that suits your current hair than to struggle with an installation that repeatedly unravels.
How Long Does It Take for Comb Coils to Turn Into Mature Locs?
Comb coils do not become mature locs immediately after installation.
The locking process happens gradually as the hair grows, tangles, and becomes more compact over time.
The exact timeline varies from person to person.
Hair texture, loc size, maintenance habits, and individual hair growth patterns can all influence how the locs develop.
During the early stages, your coils may appear neat and defined. As time passes, you may notice frizz, shrinkage, budding, and changes in the texture of your hair.
These changes can be part of the normal development process.
As the locs progress, they may become firmer and more established. However, different locs on the same head may develop at different rates.
For some people, the process takes many months; full maturity may take a year or longer, and some locs take considerably more time.
Do not judge your entire loc journey by how your hair looks a few weeks after installation.
Instead, pay attention to the overall health of your hair and scalp, and give your locs time to develop.
If you want to understand the different stages of loc development, you can also read my guide on What Do Mature Locs Look Like? 11 Signs Your Locs Are Fully Mature.
How to Keep Comb Coils From Unraveling
One of the biggest concerns for people starting locs with comb coils is unraveling.
You may spend hours installing your coils only to notice that some have loosened after washing or sleeping.
Although some unraveling can happen during the early stages, there are ways to reduce unnecessary disturbance.
Avoid Touching Your Coils Constantly
It can be tempting to run your fingers through your hair throughout the day, especially when your starter locs are new.
You may want to check their shape, smooth the frizz, or see whether they are still holding.
However, repeatedly twisting, pulling, and handling your coils can disturb them.
Try to leave your hair alone as much as possible between maintenance sessions.
You do not need to keep correcting every small change in appearance.
Protect Your Hair While Sleeping
Use a comfortable satin or silk bonnet, scarf, or pillowcase to reduce friction.
This can help limit unnecessary disturbance, especially if you move around frequently while sleeping.
Make sure your covering does not pull tightly on the roots.
Be Gentle When Washing
Washing is important for scalp health, but the technique matters.
Avoid scrubbing the coils aggressively or rubbing them against each other.
Clean your scalp gently, use a shampoo suited to your needs, and rinse thoroughly.
Your washing method may need to be adjusted during the early stages to account for how securely your coils hold.
If your coils repeatedly unravel during washing, ask your loctician to demonstrate a suitable washing technique for your hair.
Do not avoid washing your scalp indefinitely out of fear that your coils will loosen.
Avoid Heavy Products
Heavy styling products can leave residue in your hair and may make it harder to keep your locs clean.
Using large amounts of wax, thick butter, or heavy cream is not necessary for creating healthy starter locs.
Choose products carefully and use them sparingly.
Do Not Retwist Too Frequently
Retwisting can help maintain the appearance and organization of your roots, but doing it too often may put unnecessary tension on your hair.
Your maintenance schedule should suit your hair, scalp, and stage of loc development.
If you are unsure how frequently to retwist, consult a loctician who understands your hair texture and loc method.
Remember that some frizz and minor loosening can occur even when you care for your coils properly. The aim is to reduce avoidable unraveling, not to keep every coil perfectly smooth at all times.
Can You Wash Comb Coil Starter Locs?
Yes, you can wash comb coil starter locs.
Keeping your scalp clean is an important part of caring for your hair, even during the early stages of your loc journey.
However, newly installed coils may be more vulnerable to unraveling than established locs, so you should use a gentle washing technique.
The timing of your first wash depends on how securely your coils hold, your scalp needs, and the instructions provided by your loctician.
When washing:
- Use a shampoo suited to your scalp and hair.
- Focus on gently cleansing the scalp.
- Avoid aggressive rubbing and pulling at the coils.
- Rinse thoroughly to remove shampoo residue.
- Allow your hair to dry completely.
If your scalp becomes sweaty, dirty, or uncomfortable, do not ignore it simply because your locs are new.
Instead, speak with your loctician about how to clean your hair safely at your current stage.
You should also avoid leaving your locs damp for extended periods. Make sure they dry thoroughly after washing.
What Products Should You Use for Comb Coil Starter Locs?
Choosing products for starter locs can feel confusing because there are so many oils, creams, gels, shampoos, and styling products available.
You do not need to buy everything marketed for locs.
A simple routine is often easier to maintain and makes it easier to identify products that do not agree with your scalp.
A Suitable Shampoo
Choose a shampoo that cleans your scalp effectively without leaving excessive residue.
Your scalp needs regular cleansing, and your shampoo should suit its condition.
If your scalp is sensitive or prone to irritation, choose products carefully and avoid ingredients that you know cause a reaction.
A Lightweight Moisturizing Product, If Needed
Some people use a lightweight product to help manage dryness.
The right choice depends on your hair and scalp. Avoid layering multiple products simply because you are worried about dryness.
Too much product can accumulate in locs and make them harder to clean.
A Suitable Scalp Product, If Needed
You may not need a separate scalp oil or treatment.
If you choose to use one, apply it sparingly and monitor how your scalp responds.
Heavy oil application is not a substitute for cleansing, and oil alone does not provide the same type of hydration as water.
If you experience persistent scalp irritation or dandruff, consider getting professional advice instead of repeatedly adding new products.
The main rule is simple: Choose products based on what your hair and scalp need, not on how many products you can collect.
Common Mistakes to Avoid With Comb Coil Starter Locs
Starting locs can be exciting, but a few common mistakes may make the early stages more difficult than necessary.
Here are some things to watch out for.
1. Making the Coils Too Tight
A coil does not need to be painfully tight to look neat.
Excessive tension can irritate your scalp and contribute to hair breakage or traction-related hair loss.
If your scalp hurts after installation, feels persistently tender, or develops bumps around the roots, the tension may be excessive.
Your starter locs should not cause persistent pain.
2. Using Too Much Product
Applying large amounts of gel, wax, or cream can leave residue inside the coils.
Product buildup may become difficult to remove once the hair begins to lock.
Use products sparingly and prioritize keeping your scalp clean.
3. Expecting Mature Locs Immediately
Your starter locs will change as they develop.
They may become frizzy, shrink, or appear less uniform than they did on installation day.
This does not mean that your loc journey is going badly.
Give your hair time to progress instead of trying to force it into the appearance of mature locs.
4. Retwisting Too Often
Frequent retwisting can place repeated tension on the roots.
Over time, excessive manipulation may weaken your hair, especially around the hairline and other areas where the strands are more vulnerable.
Follow a maintenance routine that suits your hair rather than retwisting whenever you notice new growth.
5. Ignoring Scalp Health
A beautiful loc journey starts with taking care of your scalp.
Persistent itching, soreness, redness, or unusual flaking should not be ignored.
These symptoms may be related to irritation, a scalp condition, or a product that does not agree with you.
If the problem continues, seek advice from a qualified healthcare professional.
6. Comparing Your Locs With Someone Else’s
Your hair may develop differently from another person’s hair, even if you started your locs around the same time.
Differences in texture, density, section size, and maintenance can affect the appearance of your locs.
Instead of comparing your progress with pictures online, pay attention to the health and development of your own hair.
Comb Coils vs. Two-Strand Twists for Starter Locs
If you are still deciding how to start your loc journey, you may be comparing comb coils with two-strand twists.
Both methods can be used to start locs, but they create different patterns and may behave differently depending on your hair.
| Feature | Comb Coils | Two-Strand Twists |
|---|---|---|
| How they are created | A section of hair is rotated into a coil using a comb | Two sections of hair are wrapped around each other |
| Initial appearance | Individual spiral-shaped coils | Rope-like twists |
| Sectioning | Can be arranged in different parting patterns | Can also be arranged in different parting patterns |
| Suitability | Depends on hair length, texture, and ability to hold a coil | Depends on hair length, texture, and ability to hold a twist |
| Early maintenance | Coils may unravel if disturbed | Twists may loosen or unravel if disturbed |
| Product needs | Usually benefits from avoiding heavy residue | Also benefits from avoiding heavy residue |
| Loc development | Develops gradually over time | Develops gradually over time |
Neither method is automatically better for everyone.
Comb coils may appeal to you if you like the appearance of individual coils and want to begin your loc journey with that pattern.
Two-strand twists may suit you if you prefer the initial appearance of twisted sections.
Your hair texture, length, desired loc size, and maintenance preferences should guide your decision.
If you are uncertain, a loctician can help you choose a method that suits your hair and the results you want.
How to Care for Comb Coil Starter Locs During the First Few Months
The first few months of your loc journey are a time to learn how your hair responds to the installation method.
You may notice that your coils look different from week to week. Some may remain well-defined, while others develop frizz or loosen slightly.
Rather than trying to control every change, focus on building a consistent routine.
Keep your scalp clean. Follow a suitable washing routine and adjust your technique if your coils are particularly delicate.
Protect your hair at night. Reduce friction with a comfortable satin or silk covering.
Avoid unnecessary manipulation. Do not keep twisting or pulling at the coils to make them look neat.
Use products sparingly. Avoid heavy layers of styling products that can accumulate inside your hair.
Watch for excessive tension. If your roots feel sore or your hairline appears to be thinning, have your installation and maintenance routine assessed.
Be patient with the process. Your starter locs may not look exactly as you imagined during every stage. Hair takes time to develop, and the early appearance is only one part of the journey.
You should also remember that a consistent routine does not mean following the same schedule as everyone else. Your scalp may need washing more frequently than another person’s, and your locs may require different maintenance depending on their condition.
Pay attention to your own hair rather than relying entirely on someone else’s routine.
Frequently Asked Questions About Comb Coils for Starter Locs
Can I Start Comb Coils on Very Short Hair?
Yes, comb coils can be used on short natural hair, provided there is enough length for the coils to hold securely.
The suitable length depends on your hair texture, section size, and installation technique.
If your hair is extremely short, consult a loctician to determine whether comb coils are the best option for you.
Do Comb Coils Work on 4C Hair?
Comb coils are commonly used on tightly coiled natural hair, including 4C hair.
However, the result depends on your hair’s length, density, and condition, as well as the technique used during installation.
Use a method that allows you to create the coils without excessive tension.
How Long Do Comb Coils Take to Lock?
The locking process varies from person to person.
Your locs may take many months to become more established, and full maturity can take a year or longer. Some locs may take considerably more time.
Hair texture, section size, maintenance, and individual growth patterns all influence the process.
Why Are My Comb Coils Unraveling?
Comb coils may unravel because of excessive manipulation, friction, washing techniques, insufficient length, or the natural characteristics of your hair.
If the unraveling is frequent, ask a loctician to assess the installation and show you how to maintain your coils.
Avoid repeatedly twisting the same sections or using heavy products to force them to stay in place.
Can I Retwist Comb Coils?
Yes, comb coil starter locs can be maintained using an appropriate retwisting technique.
However, the timing and frequency should suit your hair and scalp.
Retwisting too frequently or pulling too tightly can weaken the roots and contribute to hair loss. A loctician can help you determine a suitable maintenance schedule.
Do Comb Coils Shrink?
Comb coils can appear shorter as the hair develops, and natural hair shrinkage can also affect their appearance.
The amount of shrinkage varies according to hair texture, length, and other individual factors.
Do not assume that shorter-looking coils mean your hair has stopped growing.
Can I Style My Comb Coil Starter Locs?
Yes, but it is important to be gentle during the early stages.
Avoid hairstyles that pull tightly on your roots or disturb the coils excessively.
Simple, low-tension styling is generally a better choice while your locs are developing.
If you want ideas for protecting your new locs while trying different looks, read my guide on How to Maintain sisterlocks and keep them looking beautiful.
Should I Use Wax to Keep My Comb Coils in Place?
Wax is generally not necessary for maintaining comb coil starter locs.
Heavy waxes can leave residue that is difficult to remove from locs.
Instead, focus on proper installation, gentle maintenance, and using products that do not leave excessive buildup.
Can I Start Comb Coils at Home?
Yes, you can learn the technique and start your own comb coils at home if your hair length and texture are suitable and you can work carefully.
However, creating consistent sections across your entire head can be difficult, particularly when you cannot see the back clearly.
If you are new to loc installation, having a professional loctician do the installation or guide you through the process can help you avoid common mistakes.
Conclusion on Starting Comb Coils for Starter Locs
Starting comb coils on short hair can be a practical way to begin your loc journey without waiting for your hair to grow long first.
The process involves preparing your hair, choosing a suitable section size, creating a parting pattern, and carefully rotating each section into a coil. Once your starter locs are installed, the focus shifts to maintaining a clean scalp, protecting your hair, and allowing the locs to develop over time.
Remember that your coils will not look the same every day. You may experience frizz, shrinkage, or occasional unraveling, particularly during the early stages. These changes do not automatically mean that you have done something wrong.
What matters most is taking care of your scalp, avoiding excessive tension, and giving your hair time to develop.
You do not need dozens of products or a complicated routine to begin. Start with the basics, pay attention to how your hair responds, and seek professional guidance when you need it.
Your loc journey will be different from everyone else’s, and that is perfectly fine.
Are you planning to start your loc journey with comb coils, or have you already started? Share your experience or questions in the comments. I would love to hear how your loc journey is going.
Looking for fresh ways to style your locs? My guide on How to Style Medium-Length Locs when you are bored with your looks shares beautiful hairstyle ideas to help you switch up your look, from elegant updos to simple everyday styles you can wear for casual outings, work, or special occasions.