
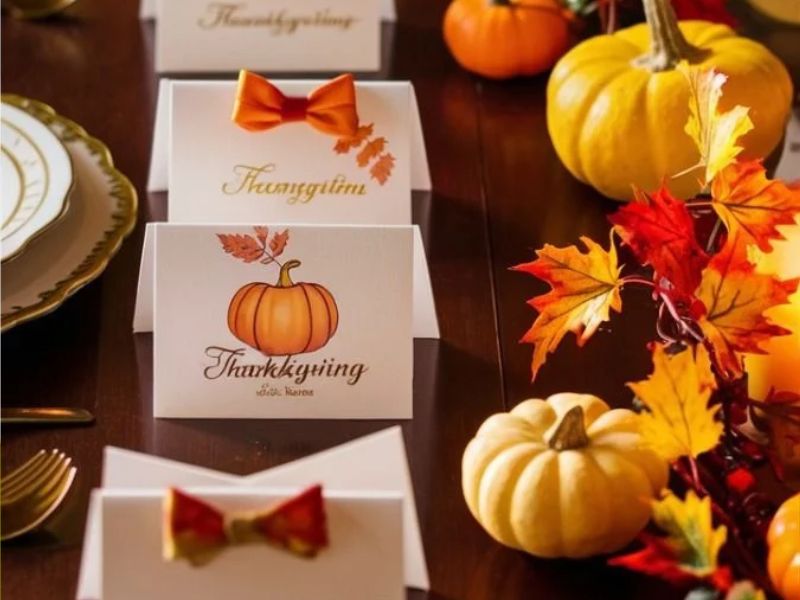
Thanksgiving is a special time to gather around the table with family and friends, enjoy delicious food, share stories, and appreciate the people who make life meaningful. While the turkey, side dishes, and desserts may receive most of the attention, the little details on your dining table can also make the celebration feel special.
One simple way to add a personal touch to your Thanksgiving dinner is with handmade place cards.
DIY Thanksgiving place cards help you organize your seating arrangement while making each guest feel welcome. They can complement your table decorations, bring out the beauty of autumn colors, and give your dinner table a thoughtful finishing touch.
The lovely thing about making your own place cards is that you do not need expensive materials or advanced crafting skills. With cardstock, markers, dried leaves, twine, miniature pumpkins, and a few other supplies, you can create beautiful designs that look right at home on a festive Thanksgiving table.
You can make your place cards elegant enough for a formal dinner, playful enough for a family gathering, or rustic enough for a cozy autumn celebration.
In this guide, we will look at 9 DIY Thanksgiving place cards that are easy to make, beautiful to display, and suitable for different decorating styles. Each idea includes the materials you need and simple instructions to help you create your own version.
Here is an article on 10 Beautiful DIY Acorn Crafts for Adult to Make This Fall To see how you an use acorn for Place holder.
Let’s get started.
1. DIY Leaf-Shaped Thanksgiving Place Cards
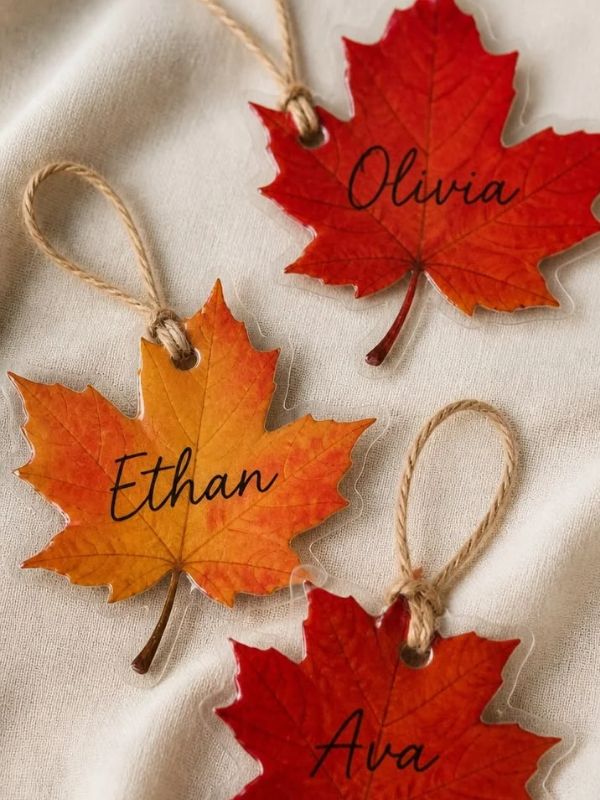
Leaf-shaped place cards are a lovely choice for Thanksgiving because they celebrate the natural beauty of autumn. The changing colors of leaves, from golden yellow to burnt orange and deep red, can inspire a beautiful table decoration without requiring many supplies.
These place cards work particularly well with rustic, farmhouse, woodland, and traditional Thanksgiving table settings.
You can make them using paper leaves or real fallen leaves, depending on the look you want to achieve.
Materials You Will Need
- Brown, orange, yellow, or burgundy cardstock
- Leaf template
- Pencil
- Scissors
- Black or gold marker
- Ruler
- Optional ribbon or twine
How to Make Leaf-Shaped Place Cards
Step 1: Choose your leaf design.
Find a simple maple leaf, oak leaf, or another autumn leaf shape. You can draw your own design on paper or use a printable template as a guide.
Choose a shape that is large enough to accommodate each guest’s name.
Step 2: Trace the leaf onto cardstock.
Place your template on the cardstock and trace around it with a pencil. Repeat this process until you have enough leaves for everyone attending your Thanksgiving dinner.
Try using different autumn colors to give your place cards a natural, varied appearance.
Step 3: Cut out the leaves.
Carefully cut around each outline. If you are making several cards, you can stack a few sheets of cardstock together, provided your scissors can cut through them neatly.
For a more natural appearance, avoid making every leaf look exactly the same.
Step 4: Write each guest’s name.
Use a fine-tip marker to write each name across the center of the leaf. Gold lettering can look beautiful on dark cardstock, while black lettering works well on lighter colors.
If you enjoy hand lettering, try a simple cursive style. However, make sure the names remain easy to read.
Step 5: Add the finishing touches.
You can draw small veins on the leaves, add a thin border, or tie a short piece of twine around the stem of each card.
Allow any ink or paint to dry before arranging the place cards on your table.
How to Style Your Leaf Place Cards
Place each leaf beside a dinner plate, on a folded napkin, or on top of a small bundle of natural twine.
For a coordinated look, combine your place cards with neutral table linens, wooden chargers, small pumpkins, and autumn foliage.
You could also place one card on each guest’s napkin to create a simple but thoughtful presentation.
Helpful tip: If you are hosting a dinner outdoors or using a table near an open window, choose sturdy cardstock so your place cards are less likely to bend or blow away.
This is also a wonderful craft to make with older children. They can help trace the leaves, choose colors, and decorate the cards while an adult handles any detailed cutting.
This article on 12 Halloween Paper Crafts for Kids That Are Almost Too Cute to Spook is such a good Post you may find useful.
2. Mini Pumpkin Thanksgiving Place Cards
Mini pumpkins are among the most recognizable symbols of autumn, making them a beautiful addition to Thanksgiving decorations.
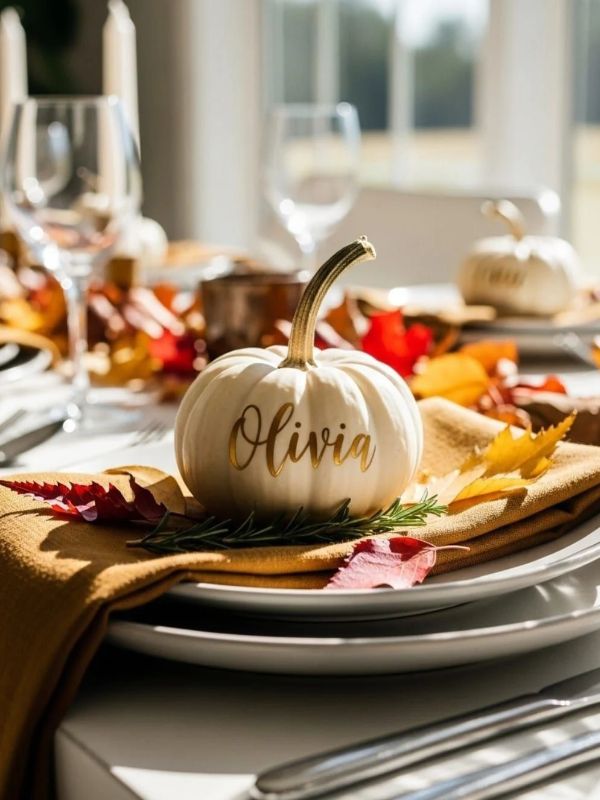
Instead of using pumpkins only as centerpieces, you can turn them into charming place card holders. Each guest receives a little pumpkin at their seat, complete with a personalized name card.
This idea works especially well if you love natural textures and want your Thanksgiving table to feel festive without looking overcrowded.
You can use small real pumpkins, miniature artificial pumpkins, or craft pumpkins that can be reused in future years.
Materials You Will Need
- Mini pumpkins
- Thick cardstock
- Scissors
- Fine-tip marker
- Toothpicks or small wooden craft sticks
- Twine or narrow ribbon
- Optional artificial leaves
How to Make Mini Pumpkin Place Cards
Step 1: Select your pumpkins.
Choose small pumpkins that can stand securely on a flat surface. White, cream, orange, and muted green pumpkins can all look beautiful.
If you are using real pumpkins, check that they are clean, dry, and free from soft or damaged areas.
Step 2: Prepare the name cards.
Cut your cardstock into small rectangles, approximately 2 by 3 inches. You can also cut the paper into little flags, leaves, or other decorative shapes.
Write each guest’s name on one card using a marker that contrasts with the paper.
Step 3: Create a card holder.
For artificial pumpkins, you may be able to attach a small wooden stick to the pumpkin with craft-safe adhesive.
For real pumpkins, avoid pushing sharp objects into the pumpkin near the stem if doing so could cause damage or create an unstable holder. Instead, place the name card beside the pumpkin or use a small folded cardstock stand.
If you choose to use a toothpick or wooden stick, ensure it is securely positioned and kept away from young children.
Step 4: Decorate the pumpkins.
Tie a little twine or ribbon around the stem of each pumpkin. You can also attach a paper leaf or small tag for extra detail.
Keep the decorations simple so the guest’s name remains the main feature.
Step 5: Arrange the place cards.
Position one pumpkin at each setting. Place the name card in front of the pumpkin or use a stable holder to display it upright.
How to Style Your Mini Pumpkin Place Cards
For a classic Thanksgiving table, pair orange pumpkins with cream napkins and brown or gold accents.
If you prefer a softer appearance, use white pumpkins with sage-green leaves and natural linen.
You can also arrange several extra pumpkins down the center of the table to connect the place cards with your centerpiece.
Helpful tip: If you want to reuse these decorations next year, artificial pumpkins are a practical option. Store them with your other seasonal decorations after Thanksgiving.
For real pumpkins, prepare them close to your event and avoid leaving them in warm, damp conditions for extended periods.
If you are looking for how to decorate your home, these 10 Beautiful DIY Fall Wreath Ideas for Front Door Decor to Welcome Autumn, is a good option to look at.
3. Kraft Paper Thanksgiving Place Cards
If you love simple decorations with a natural, rustic appearance, kraft paper place cards are an excellent option.
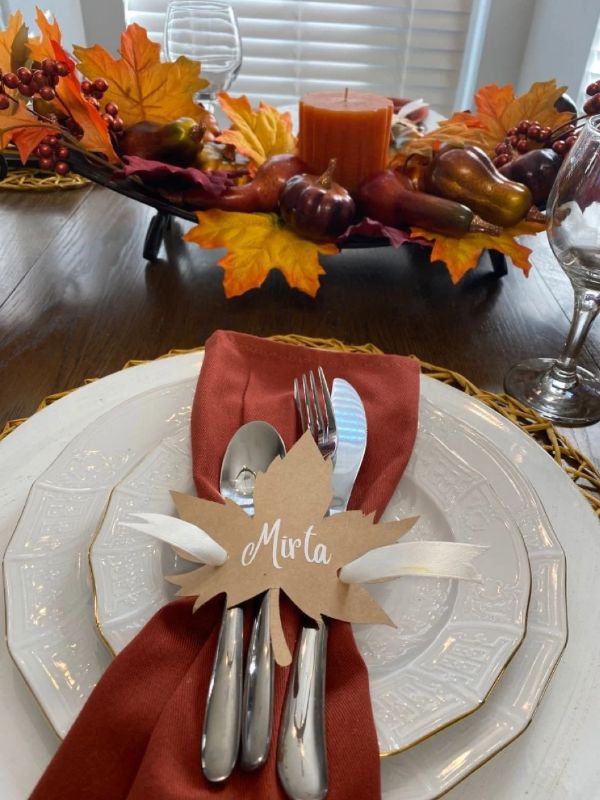
Kraft paper has a warm brown color that pairs beautifully with autumn foliage, wooden table accessories, neutral napkins, and dried flowers. It is also an affordable material that you can find in craft stores or stationery shops.
These place cards are particularly useful when you need to make several cards without spending too much money.
You can keep the design minimal or personalize it with small drawings and decorative details.
Materials You Will Need
- Kraft cardstock
- Scissors or a paper trimmer
- Pencil
- Ruler
- Black, white, or metallic marker
- Optional stamps and ink
- Optional twine or dried flowers
How to Make Kraft Paper Place Cards
Step 1: Cut the cardstock.
Cut your kraft cardstock into rectangles measuring approximately 3 by 4 inches.
Adjust the dimensions depending on the size of your dinner plates and the space available at each setting.
Step 2: Fold each card.
Fold the rectangle in half to create a tent-style place card. Press the crease firmly so the card can stand upright on the table.
If the cardstock is thick, use a ruler to help create a clean fold.
Step 3: Write the guest’s name.
Write the guest’s name on the front of the card.
A black marker creates a classic appearance, while a white or metallic marker adds contrast and makes the design feel more decorative.
You can write a small greeting, such as “Happy Thanksgiving,” inside the card.
Step 4: Add a decorative detail.
Draw a tiny leaf, acorn, pumpkin, or branch in one corner.
If you have decorative stamps, use them to create a repeated autumn pattern.
You could also attach a small dried flower to the corner with a tiny piece of twine, provided the decoration does not make the card difficult to stand.
Step 5: Arrange the cards.
Place each card at the top of a dinner plate or beside the napkin.
Make sure the writing faces the guest so they can easily identify their seat.
How to Style Kraft Paper Place Cards
Kraft paper looks particularly beautiful with white ceramic plates, cream tablecloths, wooden chargers, and simple glassware.
For a more colorful table, combine the cards with burnt-orange napkins and burgundy flowers.
If you are planning a farmhouse-style Thanksgiving dinner, you can also use small wooden decorations and natural foliage to complete the arrangement.
Helpful tip: Test your marker on a spare piece of kraft cardstock before writing all the names. Some inks may bleed into the paper, especially if the cardstock has a rough surface.
These cards are also easy to customize for other occasions. You can change the little drawings and reuse the same basic design for Christmas dinners, birthday parties, and family celebrations.
Amazon product ideas to consider
- Colored cardstock paper: Useful for leaf-shaped cards, pumpkin tags, and folded name cards.
- Fine-tip marker sets: Helpful for writing names neatly and adding small illustrations.
- Autumn leaf craft punches: Useful for creating consistent leaf shapes without cutting each one by hand.
- Natural jute twine: Suitable for rustic place cards and other fall crafts.
- Mini artificial pumpkins: Reusable decorations for Thanksgiving table settings.
- Dried flower craft supplies: Useful for place cards and other botanical decorations.
- Decorative paper trimmers: Helpful when making place cards for a large gathering
4. Dried Flower Thanksgiving Place Cards
Dried flowers bring a delicate, natural touch to handmade decorations. Their muted colors and interesting textures make them particularly suitable for a Thanksgiving table inspired by nature.
This design is ideal if you want your place cards to look elegant without using glitter or elaborate embellishments.
You can use dried baby’s breath, small dried daisies, statice, or other lightweight flowers that fit comfortably on a small card.
Choose flowers that complement the colors of your table linens and centerpiece.
Materials You Will Need
- Cream or white cardstock
- Scissors
- Ruler
- Fine-tip pen
- Small dried flowers
- Craft glue
- Optional ribbon or twine

How to Make Dried Flower Place Cards
Step 1: Prepare your cardstock.
Cut the cardstock into small rectangles or fold it into tent-style cards.
Cream and off-white paper work particularly well because they allow the flowers to stand out.
Step 2: Write the names.
Write each guest’s name on the front of the card.
You can use black ink for a simple look or a brown pen for a softer, natural appearance.
If you prefer calligraphy, write the names in a larger style and leave enough room for the flower decoration.
Step 3: Choose your dried flowers.
Select one or two small flower stems for each card.
Trim the stems carefully so they fit within the edges of the cardstock.
Avoid flowers that are too large or heavy because they may make the card difficult to display.
Step 4: Attach the flowers.
Apply a small amount of craft glue to the area where you want the flowers to sit.
Position the stems gently and allow the glue to dry according to the manufacturer’s instructions.
Keep the flower arrangement away from the guest’s name so the writing remains clear.
Step 5: Add a final detail.
If you want a little more decoration, draw a thin border around the card or tie a narrow ribbon around its base.
You can also leave the card plain and allow the flowers to provide all the decoration it needs.
How to Style Dried Flower Place Cards
These place cards work beautifully with linen napkins, ceramic plates, gold-toned cutlery, and understated floral centerpieces.
For a warm autumn palette, combine cream cardstock with dried flowers in beige, rust, dusty pink, and muted purple.
You can also coordinate the place cards with a larger dried flower arrangement placed in the center of your table.
If you enjoy making dried flower decorations, consider using leftover flowers for framed botanical art or other small home decor projects.
Helpful tip: Dried flowers can become brittle, so handle them gently. Make the cards a day or two before Thanksgiving and store them in a dry, protected container until you are ready to set the table.
Because dried flowers can shed small pieces, keep them away from food and avoid placing them directly on plates where guests will eat.
Look at these 10 Dried Flower Crafts and Decor Ideas That Make Your Home Look Beautiful.
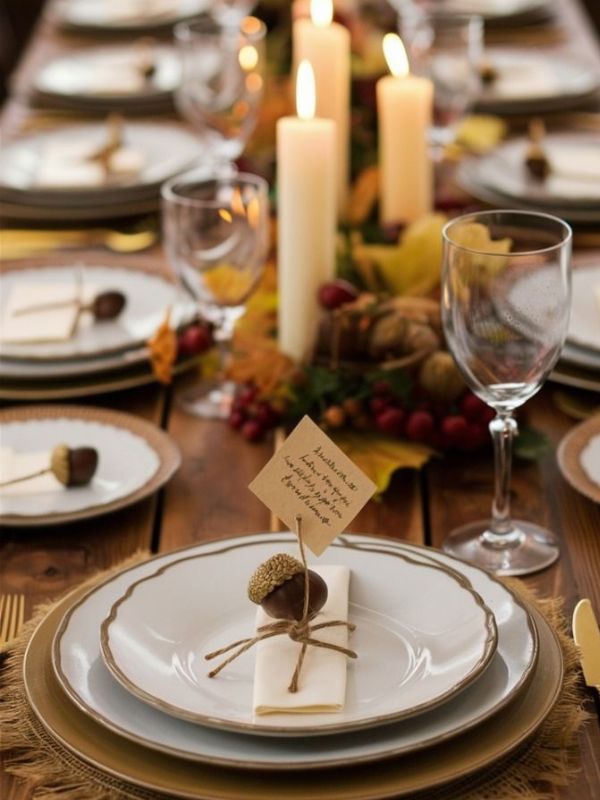
5. Acorn-Inspired Thanksgiving Place Cards
Acorns are a charming symbol of autumn and pair beautifully with leaves, pumpkins, and other natural Thanksgiving decorations.
If you want your table to have a woodland-inspired appearance, acorn-themed place cards are a creative alternative to traditional rectangular name cards.
You can make the acorns entirely from paper or combine paper shapes with clean, dry acorn caps for a more textured design.
This craft is especially suitable for people who enjoy collecting natural materials for seasonal projects.
Materials You Will Need
- Brown, tan, and cream cardstock
- Acorn template
- Pencil
- Scissors
- Fine-tip marker
- Craft glue
- Optional clean, dry acorn caps
- Optional twine
How to Make Acorn Place Cards
Step 1: Draw the acorn shape.
Draw a simple acorn outline on scrap paper.
The design should have a rounded bottom and a slightly curved cap at the top.
If you are unsure how to draw one, use a picture of an acorn as a reference.
Step 2: Trace the shape onto cardstock.
Use your template to trace enough acorns for your guests.
You can cut the body from tan cardstock and the cap from dark brown cardstock.
Alternatively, make the entire shape from one piece of brown paper.
Step 3: Assemble the acorns.
If you cut the cap and body separately, glue the cap onto the top of the body.
Allow the glue to dry before decorating the front.
Step 4: Add the guest’s name.
Write the name across the lower portion of the acorn.
Use a fine-tip marker to ensure the writing fits neatly.
If your acorn is too small for a long name, make a larger version or attach a small rectangular tag.
Step 5: Decorate the design.
Draw tiny dots, curved lines, or a simple pattern on the cap.
For a more natural effect, you can glue a clean, dry acorn cap onto a paper acorn, provided the additional weight does not prevent the card from standing.
Step 6: Display your cards.
Lay each acorn card beside a napkin or attach it to a small folded paper stand.
You can also place the acorns on top of a folded napkin for a simple, coordinated look.
How to Style Acorn Place Cards
Combine these cards with brown table runners, cream plates, small pumpkins, and autumn leaves.
For a woodland-inspired setting, add a few natural branches to your centerpiece and use neutral fabrics to keep the table from looking too busy.
You can also combine acorn cards with the leaf-shaped place cards described earlier to create a collection of related designs.
Helpful tip: If you collect acorns outdoors, inspect them carefully and discard any that are moldy, damaged, or infested with insects. Clean and dry natural materials thoroughly before using them for decoration.
If you would rather avoid collecting natural materials, paper acorns are just as attractive and easier to store.
I have an article on Fun natural table settings
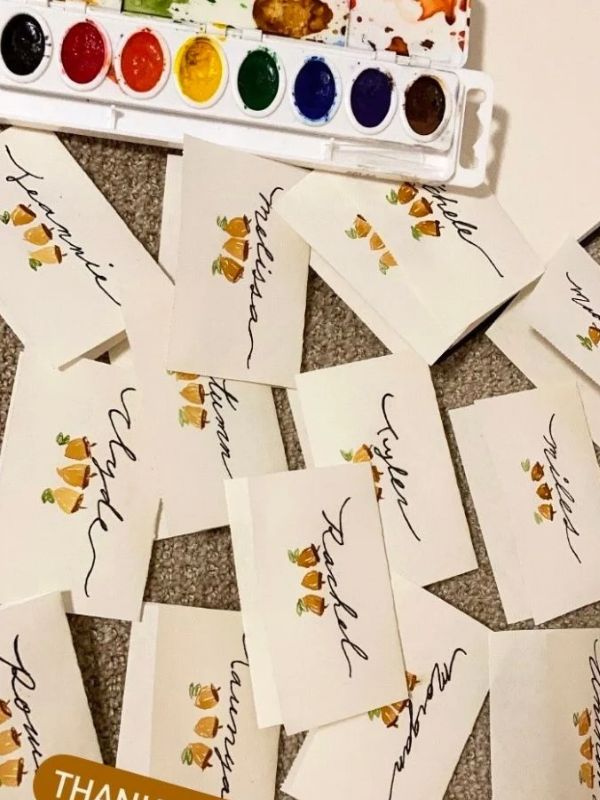
6. Watercolor Thanksgiving Place Cards
Watercolor place cards are a beautiful option for anyone who enjoys painting or wants to create a more artistic Thanksgiving table.
Their soft washes of color can make an ordinary piece of cardstock look special. You can paint tiny pumpkins, autumn leaves, branches, or abstract patterns inspired by the changing seasons.
The finished cards can be simple and understated or colorful enough to become part of your table’s overall decoration.
You do not need to be an experienced artist to try this project. A few basic shapes and carefully chosen colors are enough to create an attractive result.
Materials You Will Need
- Watercolor paper or thick watercolor-friendly cardstock
- Watercolor paints
- Paintbrushes
- Clean water
- Pencil
- Fine-tip waterproof pen, if suitable for your paper
- Scissors or paper trimmer
- Optional metallic pen
How to Make Watercolor Place Cards
Step 1: Cut the paper.
Cut your paper into rectangles or folded cards.
Watercolor paper is a good choice because it is designed to handle moisture better than ordinary printer paper.
Step 2: Choose your color palette.
Select two or three colors that complement your Thanksgiving table.
Burnt orange, golden yellow, muted red, brown, and sage green are all suitable choices.
You can also use a softer palette of cream, blush, and muted green for a more delicate look.
Step 3: Paint a small design.
Create a simple pumpkin in one corner, paint a row of autumn leaves along the bottom, or use a few abstract brushstrokes.
If you are painting pumpkins, start with a rounded orange shape and add a small brown or green stem after the paint dries.
For leaves, use short brushstrokes that narrow toward the ends.
Do not worry about making every design identical. Small variations can make handmade cards more interesting.
Step 4: Allow the paint to dry.
Set the cards aside until the paint is completely dry.
This step is important because writing on damp paper can cause ink to spread.
Step 5: Add the names.
Write each guest’s name in the space you left blank.
Use a pen that contrasts with the background so the names remain readable.
If the design is particularly colorful, keep the writing area relatively plain.
Step 6: Finish the cards.
You can add a thin painted border or a small metallic accent.
Avoid adding too many details because the watercolor artwork should remain the main decorative feature.
How to Style Watercolor Place Cards
Watercolor cards look beautiful with white plates, simple linen napkins, clear glassware, and small floral arrangements.
You can also match the painted colors to your napkins or centerpiece for a coordinated appearance.
For a relaxed Thanksgiving dinner, place each card directly on the dinner plate.
For a more formal setting, use folded tent cards and arrange them just above the plate.
Helpful tip: Make a test card before preparing the entire set. This helps you decide how much paint and water to use and gives you an opportunity to test the writing surface.
Watercolor cards are also a thoughtful way to personalize a place setting for guests who appreciate handmade details.
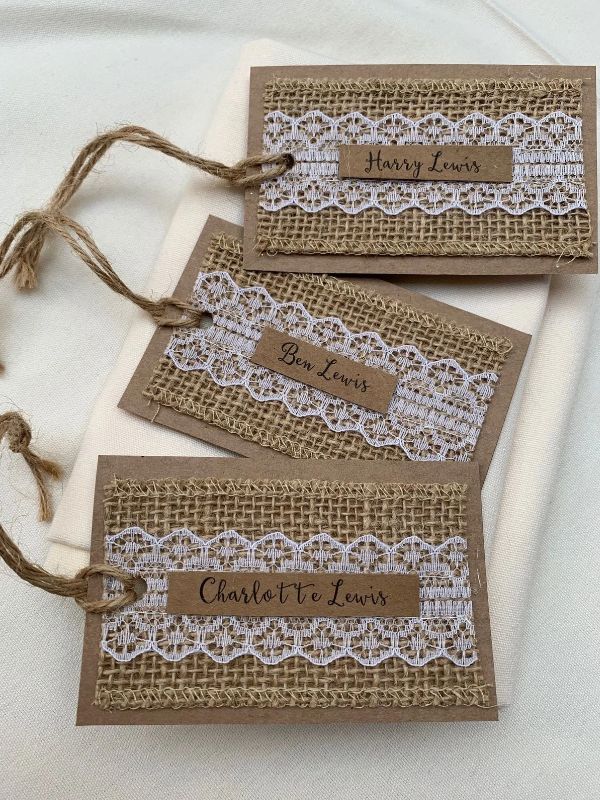
7. Burlap and Twine Thanksgiving Place Cards
Burlap and twine are useful materials for creating rustic decorations. Their natural texture makes them a good match for farmhouse-inspired Thanksgiving tables and arrangements featuring wood, dried flowers, and autumn foliage.
For this project, you can create simple cardstock name cards and decorate them with small pieces of burlap and twine.
The result is a handmade design that feels warm and natural without requiring complicated techniques.
Materials You Will Need
- Kraft cardstock or cream cardstock
- Small pieces of burlap ribbon
- Natural twine
- Scissors
- Ruler
- Fine-tip marker
- Craft glue
- Optional artificial leaves
How to Make Burlap and Twine Place Cards
Step 1: Prepare the base cards.
Cut your cardstock into rectangles and fold each one in half to create a tent-style card.
Make sure the cards are large enough to display the guest names clearly.
Step 2: Add a strip of burlap.
Cut a narrow strip of burlap ribbon for each card.
Attach it along the bottom edge of the card using craft glue.
Keep the strip relatively narrow so it does not overwhelm the name or make the card difficult to fold.
Step 3: Secure the twine.
Wrap a short piece of twine around the front of the card or tie a small bow.
If you are wrapping the twine around the entire card, avoid pulling it too tightly because this can distort the paper.
Use a small amount of glue to hold the twine in place if necessary.
Step 4: Write the guest’s name.
Write the name in the center of the card, leaving enough space between the lettering and the burlap decoration.
Black or dark brown ink generally works well with kraft and cream cardstock.
Step 5: Add a seasonal accent.
Attach a small paper leaf or a tiny artificial autumn flower to one corner.
You can also leave the card as it is if you prefer a more minimal design.
Step 6: Arrange the cards.
Place each card at the appropriate dinner setting.
Check that the cards stand securely and that loose pieces of burlap or twine do not interfere with the food or cutlery.
How to Style Burlap and Twine Place Cards
Pair these place cards with wooden chargers, neutral table runners, cream napkins, and small pumpkins.
A centerpiece featuring dried grasses, artificial leaves, or simple branches can help bring the whole arrangement together.
For a more colorful table, add rust-colored napkins or burgundy flowers.
Helpful tip: Burlap can shed fibers, so trim loose strands before placing the cards on your table. Keep the material away from candles, flames, and hot serving dishes.
If you want to make your decorations more affordable, purchase burlap ribbon and twine in rolls so you can use the leftover materials for other craft projects.
8. Personalized Thanksgiving Photo Place Cards
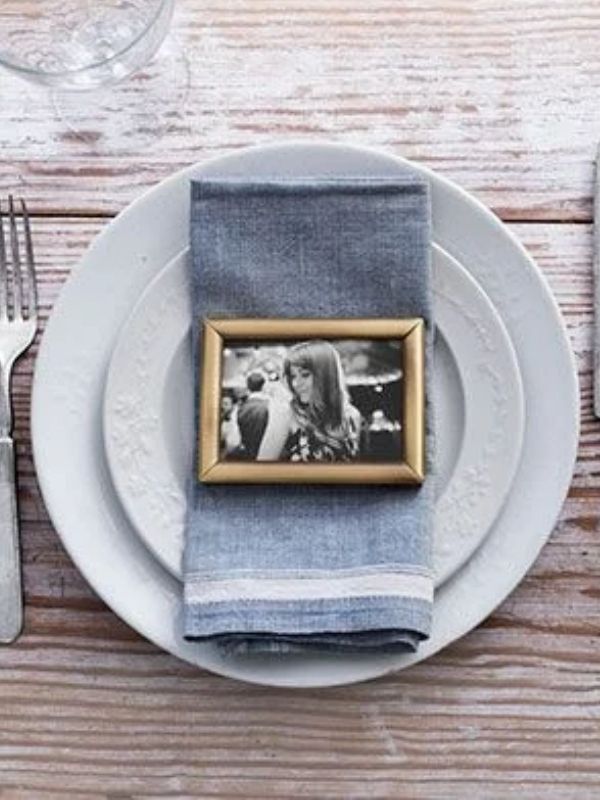
If you want your Thanksgiving table to feel especially personal, consider making place cards featuring small photographs.
This idea works beautifully for family gatherings, particularly when you have relatives traveling from different places or children who enjoy seeing pictures of their loved ones.
You can use a small photograph of each guest, a family picture, or a simple portrait-style image.
The photograph becomes part of the decoration while helping guests find their seats.
Materials You Will Need
- Printed photographs
- Cardstock
- Scissors
- Ruler
- Glue stick or photo-safe adhesive
- Fine-tip marker
- Optional decorative paper
- Optional small photo holders
How to Make Photo Place Cards
Step 1: Select your photographs.
Choose photographs that are clear enough to recognize when printed in a small size.
You can use individual portraits or pictures that reflect happy family memories.
If you are hosting a large gathering, make sure you have a suitable picture for each guest.
Step 2: Print and trim the pictures.
Print the photographs at a size that fits your card design.
Square photographs can look attractive, but small rectangles work just as well.
Carefully trim the edges to create a neat finish.
Step 3: Prepare the cardstock.
Cut your cardstock into rectangles or fold it into tent-style cards.
You can use white, cream, kraft, or colored cardstock depending on the style of your table.
Step 4: Attach the photographs.
Use a glue stick or photo-safe adhesive to attach each picture to the card.
Leave enough space below or beside the photograph to write the guest’s name.
Alternatively, write the name on a small decorative tag and attach it to the card.
Step 5: Add Thanksgiving details.
Draw a tiny leaf, pumpkin, or heart in one corner.
You can also add a short message, such as “Grateful you’re here,” to make the card feel more personal.
Step 6: Display the cards.
Place the cards beside the dinner plates or use small photo holders to display them upright.
Make sure each photograph is positioned so guests can see it easily.
How to Style Photo Place Cards
Photo place cards look lovely on a family-style table with simple decorations and warm lighting.
To keep the table from looking crowded, use small photographs and neutral cardstock.
You can also combine them with a simple centerpiece of pumpkins and autumn leaves.
If you are hosting a Thanksgiving dinner with children, consider using pictures of family members or familiar faces to make the place settings more engaging.
Helpful tip: If you are sharing photographs with other guests, choose images that everyone involved is comfortable displaying. For a large gathering, avoid using photographs that could embarrass someone or make them feel uncomfortable.
This project can also become a keepsake. Guests may enjoy taking their cards home after dinner, especially if the photographs capture a meaningful memory.
You can embroidery your visitors name while fixing the pictures, go through this articles to learn more about. Embroidery Gift Ideas That Turn Simple Stitches Into Beautiful Keepsakes
Amazon product ideas to consider
- Colored cardstock paper: Useful for leaf-shaped cards, pumpkin tags, and folded name cards.
- Fine-tip marker sets: Helpful for writing names neatly and adding small illustrations.
- Autumn leaf craft punches: Useful for creating consistent leaf shapes without cutting each one by hand.
- Natural jute twine: Suitable for rustic place cards and other fall crafts.
- Mini artificial pumpkins: Reusable decorations for Thanksgiving table settings.
- Dried flower craft supplies: Useful for place cards and other botanical decorations.
- Decorative paper trimmers: Helpful when making place cards for a large gathering.
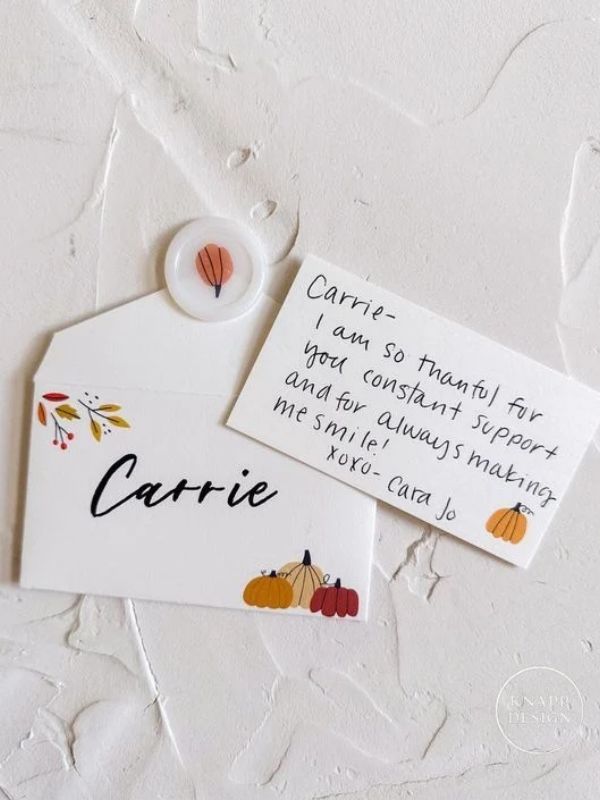
9. DIY Thankful Message Place Cards
Thanksgiving is a time to reflect on gratitude, making thankful message place cards a meaningful addition to your dinner table.
Instead of displaying only a guest’s name, each card can include a short message about gratitude, family, friendship, or the joy of gathering together.
You can also leave a small space for guests to write something they are thankful for during the meal.
This turns an ordinary place card into a simple activity that encourages conversation and creates a memorable experience.
Materials You Will Need
- Cardstock in your preferred colors
- Scissors
- Ruler
- Pens or markers
- Optional stickers
- Optional autumn-themed stamps
- Optional small envelopes
How to Make Thankful Message Place Cards
Step 1: Cut your cardstock.
Cut the cardstock into small rectangles.
Fold each rectangle in half if you want the cards to stand upright.
You can use cream, white, brown, orange, or burgundy paper.
Step 2: Write each guest’s name.
Write the guest’s name prominently on the front of the card.
Leave enough space below the name for a short message or decorative detail.
Step 3: Add a gratitude message.
Write a short phrase beneath the name.
Here are a few ideas you can use:
- Grateful to have you here.
- Thankful for family and friendship.
- Your presence makes this day special.
- So thankful we can share this meal.
- Gathered together with grateful hearts.
- Thank you for being part of our story.
Choose a message that suits the people you are hosting.
Step 4: Decorate the cards.
Draw small autumn leaves, hearts, pumpkins, or simple branches around the edges.
You can also use stickers or stamps to add a little color.
Keep the decorations light so the message remains easy to read.
Step 5: Add a gratitude prompt.
If you want to turn the cards into a dinner activity, write a short question on the back.
For example:
“What is one thing you are thankful for this year?”
Guests can write their answers before dinner or share them during the meal.
If you prefer to keep the activity private, invite everyone to write their answers without requiring them to read them aloud.
Step 6: Set the table.
Place each card beside the appropriate plate or on top of a folded napkin.
Provide a few extra pens if you want guests to write their gratitude messages.
How to Style Thankful Message Place Cards
These cards work well with almost any Thanksgiving table design because you can adjust the colors and decorations to suit your theme.
For a traditional table, use warm autumn colors and simple leaf illustrations, a more elegant setting, choose cream cardstock with understated lettering and a small gold accent, or For a family gathering, let children decorate some of the cards with drawings or stickers.
Helpful tip: If you are hosting guests who may not feel comfortable sharing personal thoughts aloud, make the gratitude activity optional. The purpose is to create a welcoming atmosphere, not to put anyone under pressure.
These place cards are also easy to prepare in advance, allowing you to spend less time crafting on Thanksgiving Day.
Look at these articles on Easy Fall Handprint Crafts for Preschoolers That Are Too Cute to Throw Away
Tips for Making Your DIY Thanksgiving Place Cards Look Beautiful
You do not need elaborate decorations to create a beautiful Thanksgiving table. A few thoughtful choices can help your handmade place cards look coordinated and polished.
Here are some practical tips to keep in mind as you prepare your designs.
1. Choose a Consistent Color Palette
One of the easiest ways to make your place cards look attractive is to choose colors that complement the rest of your table.
Traditional Thanksgiving colors include burnt orange, golden yellow, burgundy, brown, and deep red.
If you prefer a softer look, consider cream, beige, sage green, and muted pink.
You do not need to use every color. Two or three complementary shades are usually enough to create a coordinated appearance.
For example, kraft paper place cards with cream napkins and small orange pumpkins can create a warm, rustic setting.
2. Make Sure the Names Are Easy to Read
Beautiful lettering is lovely, but your guests should be able to identify their seats without struggling to read their names.
Choose a pen or marker that contrasts with the paper.
For dark cardstock, consider white or metallic lettering. For light cardstock, black or dark brown ink usually works well.
If you have guests with long names, make the cards slightly larger or use a smaller but readable writing style.
3. Prepare the Cards Before Thanksgiving Day
Making your place cards in advance gives you more time to enjoy the celebration.
Try to prepare them a few days before the dinner.
This allows you to finish any painting, gluing, or lettering without rushing.
It also gives you time to replace a damaged card or make an extra one if your guest list changes.
If you are using fresh or delicate natural materials, add those details closer to the event when appropriate.
4. Match the Place Cards to Your Table Decorations
Your place cards do not need to match every decoration exactly, but they should complement the overall look.
If you are using a rustic centerpiece with pumpkins and dried leaves, kraft paper or acorn-inspired cards may fit beautifully.
If your table features white plates, glassware, and elegant linens, watercolor or dried flower cards may be a better choice.
Look at the table as a whole before choosing your final design.
5. Keep the Table Comfortable for Guests
Remember that your guests need enough room to eat and enjoy the meal.
Avoid making place cards so large that they take up too much space.
Keep decorations away from serving dishes and ensure that every card can be seen without blocking anyone’s view.
If you are using materials such as dried flowers, burlap, or twine, keep loose fibers and small decorative pieces away from food.
A beautiful table should also be practical.
6. Make a Few Extra Place Cards
It is helpful to make one or two extra blank cards when preparing for Thanksgiving.
You may need an additional card if someone joins the gathering unexpectedly or if you make a mistake while writing a name.
Keep a few extra pieces of cardstock and a marker nearby so you can make a replacement quickly.
7. Involve Your Family in the Crafting Process
Making Thanksgiving decorations can be a fun activity to enjoy with your family before the holiday.
Children can help choose colors, decorate paper leaves, draw little pumpkins, and add stickers to the cards.
Older children may also enjoy practicing lettering or painting small autumn designs.
Give younger children age-appropriate tasks and supervise them when using scissors, glue, or small decorative pieces.
The goal is to enjoy the process rather than create perfectly identical decorations.
What Supplies Do You Need to Make DIY Thanksgiving Place Cards?
Most of the projects in this guide use inexpensive materials you may already have at home.
Before purchasing anything, check your craft supplies to see what you can reuse.
Here are some useful materials to gather.
| Craft Supply | How You Can Use It |
|---|---|
| Cardstock | Creating the base for most place cards |
| Kraft paper | Making rustic and farmhouse-style designs |
| Markers | Writing names and drawing seasonal details |
| Watercolor paints | Creating artistic autumn designs |
| Scissors | Cutting paper shapes and decorative pieces |
| Twine | Adding natural texture to cards |
| Dried flowers | Decorating elegant handmade place cards |
| Mini pumpkins | Creating festive place card displays |
| Craft glue | Attaching paper and decorative materials |
| Ruler | Measuring and folding cards neatly |
| Leaf templates | Creating consistent autumn shapes |
| Acorn templates | Making woodland-inspired decorations |
You can find many of these supplies at craft stores, stationery shops, or online.
If you plan to make seasonal crafts regularly, consider purchasing reusable tools and basic materials in larger quantities.
For example, a paper trimmer can help you cut multiple cards neatly, while a set of fine-tip markers can be useful for everything from place cards to handmade gift tags.
Frequently Asked Questions About DIY Thanksgiving Place Cards
1. What can I use to make DIY Thanksgiving place cards?
You can use cardstock, kraft paper, watercolor paper, markers, dried flowers, twine, miniature pumpkins, and other simple craft materials.
The materials you choose will depend on the style you want. Paper leaves and kraft cardstock work well for rustic designs, while watercolor paper and dried flowers are suitable for more elegant place cards.
2. How do I make Thanksgiving place cards on a budget?
Start with materials you already own, such as scrap paper, leftover cardstock, markers, ribbon, and craft glue.
You can also make simple folded cards from one sheet of cardstock and decorate them with hand-drawn leaves or pumpkins.
Making your own cards in batches can help reduce waste and keep the cost per guest low.
3. What should I write on a Thanksgiving place card?
The simplest option is to write each guest’s name clearly on the card.
You can also add a short Thanksgiving greeting, a gratitude message, or a personal note.
Phrases such as “Grateful you’re here” and “Thankful for family and friendship” can add a thoughtful touch without taking up too much space.
4. When should I make my Thanksgiving place cards?
It is usually helpful to make your place cards a few days before Thanksgiving.
Preparing them in advance gives you time to complete the designs, write the names carefully, and make replacements if necessary.
If your cards include delicate natural materials, store them properly until you are ready to set the table.
5. Can children help make Thanksgiving place cards?
Yes! Many of these projects are suitable for family crafting sessions.
Children can decorate paper leaves, draw pumpkins, add stickers, and help choose colors.
Adults should supervise cutting and the use of craft materials, especially when projects involve small objects or sharp tools.
6. How can I make my Thanksgiving place cards look elegant?
Choose a coordinated color palette, use good-quality cardstock, and keep the design simple.
Cream paper, neat lettering, dried flowers, and understated metallic details can create an elegant appearance.
You can also match the cards to your napkins, dinnerware, and centerpiece.
7. Do Thanksgiving place cards have to match the table decorations?
No. They do not have to match perfectly, but choosing complementary colors and materials helps create a coordinated look.
For example, paper leaf cards can complement a pumpkin centerpiece, while watercolor cards can work well with simple floral arrangements.
The goal is to make the place cards feel like part of the table rather than a separate decoration.
Conclusion on DIY Thanksgiving Place Cards
Thanksgiving is a wonderful opportunity to bring people together and create memories around the dinner table. While planning the meal and decorating your home can take time, small handmade details can make the celebration feel even more personal.
These 9 DIY Thanksgiving place cards offer different ways to welcome your guests, from colorful leaf-shaped cards and miniature pumpkin displays to elegant dried flower designs and personalized photo cards.
You can choose a project that matches your decorating style, work with materials you already have, and customize the details to suit your gathering.
If you enjoy rustic decorations, try kraft paper or burlap and twine. If you prefer something artistic, experiment with watercolor. For a family-focused celebration, personalized photo cards or thankful message cards can make each place setting more meaningful.
You can even combine two or three of these ideas if you want a little variety while keeping the table coordinated.
The important thing is to create something that feels welcoming and reflects the spirit of your celebration.
Which of these DIY Thanksgiving place cards would you love to make for your dinner table? Share your favorite idea and save this article for your Thanksgiving crafting plans!