
I love DIY projects that are useful after you finish making them. A pretty craft is always nice, but when you can make something with your own hands and then use it to organize your home, it feels even more rewarding.
That is exactly why I like DIY baskets.
A basket can hold blankets in the living room, toys in a child’s room, towels in the bathroom, craft supplies on a shelf, or those little things that somehow end up scattered around the house. You can also make one in colors and materials that match your space, so your storage becomes part of the decor instead of something you are trying to hide.
If you have been searching for DIY basket ideas, you don’t need expensive supplies to get started. Many of the ideas in this post can be made with simple materials such as cardboard, rope, old fabric, paper, newspaper, and items you may already have at home.
In this guide, I’m sharing 15 clever DIY basket ideas that are practical, attractive, and fun to make. I’ll also explain how to make each one, where you can use it, and little ways to customize it so it feels like something you would actually want to keep in your home.
If you love quick and satisfying crafts like these, check out my favorite DIY projects adults can finish in a day for more easy home decor and organization ideas you can complete over a weekend.
Why I Love Making DIY Baskets
One reason baskets are so useful is that they solve a very common problem: small things need somewhere to go.
You can have a beautiful bedroom, living room, bathroom, or kitchen, but when several little items are sitting around without a home, the entire space can start looking untidy.
A basket gives those items a designated place.
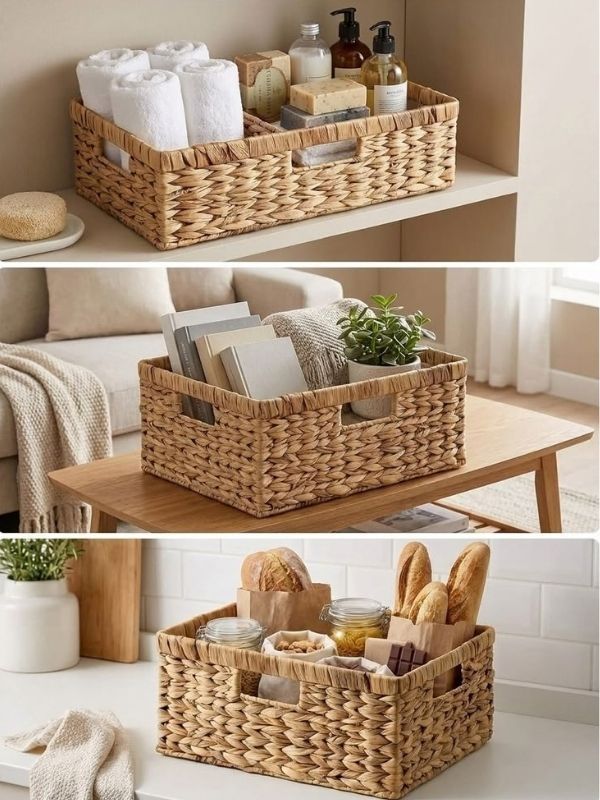
Instead of having toys spread across the floor, you can place them in a toy basket. Instead of leaving extra blankets on the sofa, you can keep them in a large basket beside it. Hair accessories can go into a small basket on a dressing table, while craft supplies can be grouped together in another one.
Making the basket yourself gives you even more control.
You can decide how large it should be, what color it should have, how much it should cost, and where you want to use it.
It is also a great way to reuse things that you already have at home.
An old cardboard box that would normally go into the trash can become the base for a beautiful storage basket. Old clothes can become fabric strips. Newspapers can become woven paper baskets. Leftover rope can become a decorative basket for your living room.
So if you enjoy crafts and also want to make your home more organized, these projects are worth trying.
Homemade baskets are one of my favorite 10 home decor ideas to transform your home because they instantly add warmth and texture to any shelf or coffee table.
What to Think About Before Making a DIY Basket
Before choosing a basket design, think about what you want to store inside it.
This small step makes a big difference.
A basket for blankets needs to be strong and spacious. A basket for jewelry can be much smaller. A basket for children’s toys needs a wide opening so little hands can easily reach inside.
You should also consider where the basket will be placed.
If it is going inside a shelf, measure the shelf first. If it is going under a table, measure the available height. If it is going inside a cabinet, check both the width and depth.
You don’t want to spend time making a beautiful basket only to discover that it does not fit where you planned to put it.
Another thing to consider is weight.
Paper may be perfect for lightweight items, while cardboard, rope, or reinforced fabric will be better for heavier storage.
Once you know the purpose, you can choose the right material and design.
Matching your fabric storage with wall decor is a great way to tie a room together—take a look at these embroidery hoop wall art: 10 cute ideas to try for easy fabric craft inspiration.
15 Clever DIY Basket Ideas To Try
1. DIY Rope Basket
A DIY rope basket is one of the first projects I would recommend if you want something that looks decorative as well as practical.
Rope gives a handmade basket a textured appearance, and you can make it in different shapes and sizes depending on your needs.
You can use cotton rope for a softer appearance or jute rope for a more natural, rustic look.
What You Need
- Thick cotton or jute rope
- Strong craft glue or hot glue
- Scissors
- A bowl, bucket, or container to use as a shape guide
- Fabric for lining, optional
- Rope or another material for handles, optional
How to Make a Rope Basket
Start by deciding how wide you want your basket to be.
Place the end of your rope in the center of your planned base. Begin coiling the rope around itself, adding small amounts of glue as you go.
Try to keep each row close to the previous row. Large gaps can make the basket weaker and can also make the finished piece look uneven.
Continue coiling until the base is wide enough.
Once you have the size you want, begin building upward. You can use a bowl, bucket, or another container inside the basket to help guide the shape.
Keep wrapping the rope around the previous row and securing it as you go.
If you want a straight-sided basket, keep each row close to the same position. If you want a basket that becomes slightly wider toward the top, angle the rope outward gradually.
When you reach the desired height, cut the rope and secure the end carefully.
Adding Handles
Handles can make the basket much easier to move.
You can attach two short pieces of rope to opposite sides. Make sure they are securely fastened, especially if you plan to use the basket for blankets, books, or other heavy items.
For a decorative finish, you could also add a fabric lining around the inside.
Where to Use a Rope Basket
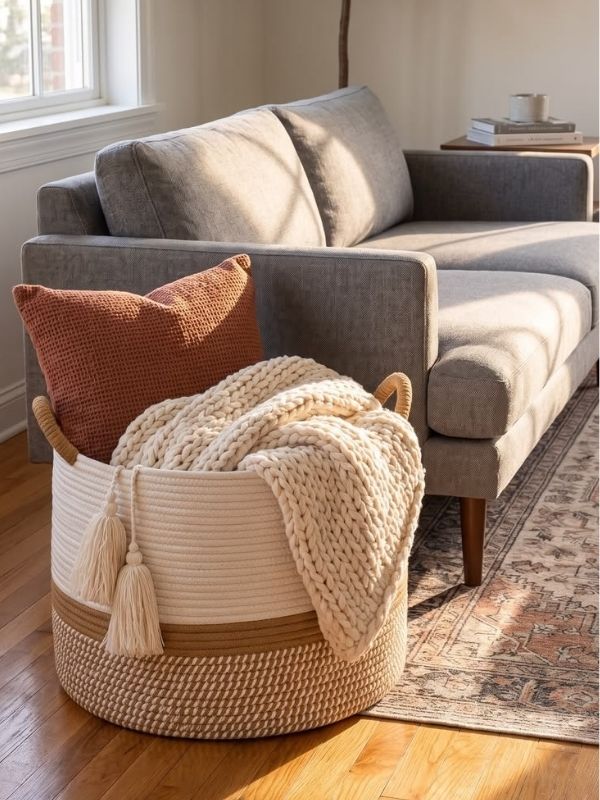
A rope basket can work beautifully in a living room for blankets and pillows.
You can also use it in a bedroom for extra clothes, scarves, or accessories.
A smaller rope basket can sit on a bathroom shelf for towels or toiletries.
Customizing your crafts with simple stitching is a lovely personal touch—explore these embroidery gift ideas that turn stitches into beautiful keepsake to create thoughtful, handmade presents.
2. DIY Cardboard Storage Basket
Don’t underestimate cardboard.
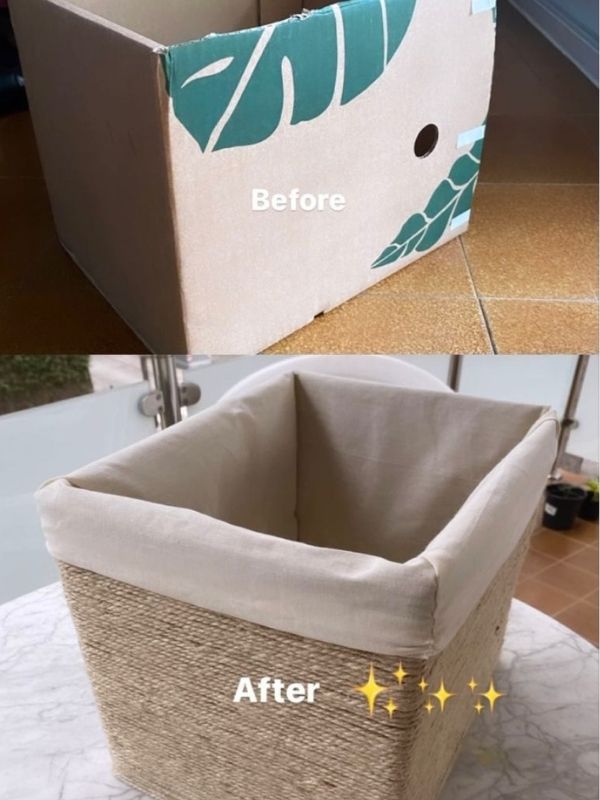
With the right finishing touches, a cardboard box can become a surprisingly attractive storage basket.
This is one of my favorite options when I want to create something useful without spending much money.
What You Need
- A sturdy cardboard box
- Ruler
- Pencil
- Scissors or craft knife
- Strong glue
- Fabric, decorative paper, or rope
- Handles, optional
How to Make It
Choose a box that is close to the size you need.
If it is too tall, measure the height you want and mark a straight line around the box.
Carefully cut away the excess cardboard.
If the box feels weak, add another layer of cardboard to the bottom. You can also reinforce the corners with additional strips of cardboard.
Now comes the fun part: covering it.
You can use fabric for a soft appearance, decorative paper for a quick makeover, or rope for a more basket-like finish.
If you are using fabric, cut pieces large enough to cover the outside and fold neatly over the edges.
If you prefer rope, begin at the bottom and wrap it around the box, securing each row with glue.
Take your time around the corners because neat corners will make the final basket look much better.
Working with yarn and textiles is such a relaxing way to spend an afternoon take a look at these 7 crochet chicken pattern that will make you want to pick up your hook if you are looking for your next quick stitching project.
Where to Use It
A cardboard basket can be useful in:
- Closets
- Bedrooms
- Living rooms
- Home offices
- Craft areas
- Children’s rooms
- Shelves
You can even make several baskets from boxes of similar sizes and cover them with the same material so they look like a matching storage set.
3. DIY Fabric Basket
A fabric basket is soft, lightweight, and especially useful for bedrooms, closets, nurseries, and laundry areas.
You can make one from new fabric or use leftover fabric from another sewing project.
What You Need
- Cotton or other suitable fabric
- Lining fabric
- Interfacing or stabilizer
- Scissors
- Measuring tape
- Pins
- Sewing machine or needle and thread

How to Make It
First decide how wide, deep, and tall you want the basket.
Measure and cut the outer fabric and lining.
The exact measurements will depend on the size you want, but remember to include a seam allowance when cutting.
Sew the fabric pieces together to create the sides and base.
Do the same with the lining.
Place the lining inside the outer basket with the correct sides facing each other and sew around the upper edge.
Turn the basket right side out and press the top edge neatly.
For extra structure, use interfacing or another suitable stabilizing material between the layers.
Ready to take your home styling further? Take a look at these 35 interior home decor designs for simple, budget-friendly ways to refresh your entire living space.
Add Handles
You can make two fabric handles and attach them to opposite sides.
If the basket will carry heavier items, reinforce the points where the handles are attached.
Make It Match Your Room
This is where fabric baskets become really fun.
4. DIY Newspaper Basket
If you have old newspapers sitting around, this is a creative way to reuse them.
A newspaper basket takes more patience than some of the other projects, but the weaving process can be relaxing.
What You Need
- Old newspapers
- Glue
- Scissors
- Ruler
- Paint, optional
- Clear protective finish, optional

Photo credit
How to Make It
Cut newspaper pages into long strips.
Roll each strip tightly from one corner toward the opposite corner. Add a small amount of glue at the end to keep each paper tube from opening.
You will need quite a few tubes, so prepare enough before you begin weaving.
Create the base by arranging several tubes side by side.
Then weave other tubes over and under them.
As you build upward, push the rows together so there aren’t large gaps.
Continue until the basket reaches your preferred height.
Secure the ends carefully.
Once everything is dry, you can leave the newspaper pattern visible or paint the entire basket.
A white, cream, brown, or another neutral finish can give it a simple decorative appearance.
Paper basket craft is a wonderful low-impact craft take a look at these crafts for seniors with limited mobility to do from bed or a wheel chair for gentle, accessible craft ideas that require minimal setup.
What Can You Store Inside?
A newspaper basket is better suited to lightweight items such as:
- Magazines
- Craft supplies
- Small toys
- Wrapping materials
- Scarves
- Decorative items
Keep it away from water and damp areas unless you have used a suitable protective finish.
5. DIY Jute Basket
Jute has a natural texture that can make homemade storage look warm and decorative.
It works particularly well with neutral, rustic, natural, and simple home decor styles.
What You Need
- Jute rope or thick jute twine
- Strong glue
- Scissors
- A container to use as a shape guide
- Fabric lining, optional

How to Make It
Start by coiling the jute into a tight circle.
Glue each section as you go.
Once the base reaches the desired size, start building the sides.
Continue wrapping the jute around the previous row.
Keep checking the shape because small adjustments are easier to make while you are still working.
When you reach the desired height, secure the final end carefully.
You can add handles made from jute or another sturdy material.
Keeping small items sorted in custom baskets is one of my top 20 genius pantry organization ideas that save room and stop clutter, helping you transform messy shelves into neat, accessible storage.
How to Decorate It
You could add a simple ribbon around the top, attach a small fabric label, or add a lining.
If you are making several for the same room, keeping them in similar colors can make your storage area look much more organized.
6. DIY Basket From Old Clothes
Old clothes can become useful craft material instead of immediately going into the trash.
T-shirts and other sturdy fabrics can be cut into strips and used to create a soft basket.
How to Make It
Cut the fabric into long strips.
If the strips are too short, join them together by sewing or tying them.
Braid three or more strips together.
Once you have a long braid, begin coiling it into a basket shape.
Secure the coils together as you work.
You can sew the coils together for a stronger basket or use an appropriate strong adhesive for a lightweight version.
Continue until the basket is the size you want.
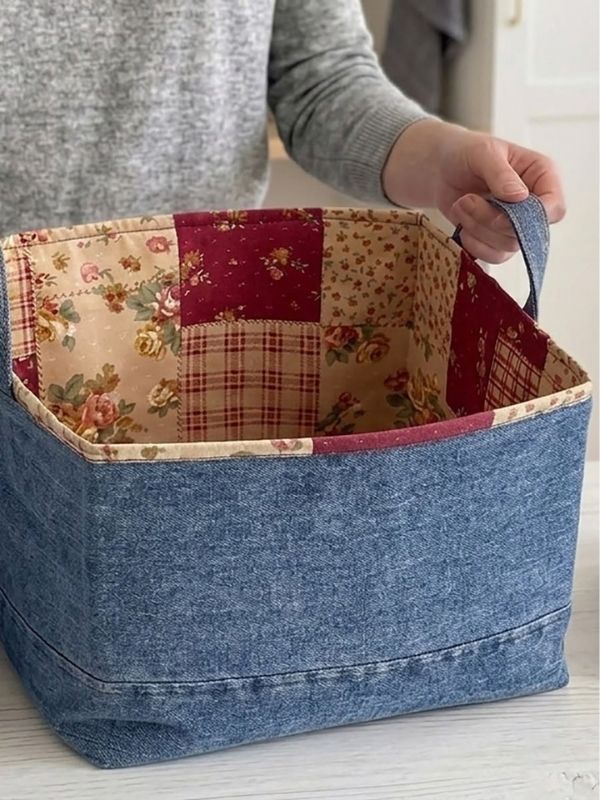
Why This Idea Is Useful
It gives old clothing another purpose.
It can also be a fun way to preserve fabric from a favorite shirt that you no longer wear.
You could even combine different colors of fabric to create stripes.
Where to Use It
A fabric-strip basket can hold:
- Hair accessories
- Scarves
- Socks
- Small toys
- Craft materials
- Lightweight clothing
Because the finished basket is soft, it is better for lighter items.
Repurposing t-shirts and fabrics into baskets is just one way to give worn garments a second life check out these DIY Cut t shirt ideas to transform old shirts into cute fashion pieces for more creative upcycling projects you can try.
7. DIY Paper Basket
A paper basket is perfect for small storage or gift-giving.
You can use cardstock, kraft paper, scrapbook paper, or other sturdy paper.
How to Make It
Cut your paper into strips of similar width.
Arrange several strips vertically.
Then weave other strips horizontally through them, alternating over and under the vertical pieces.
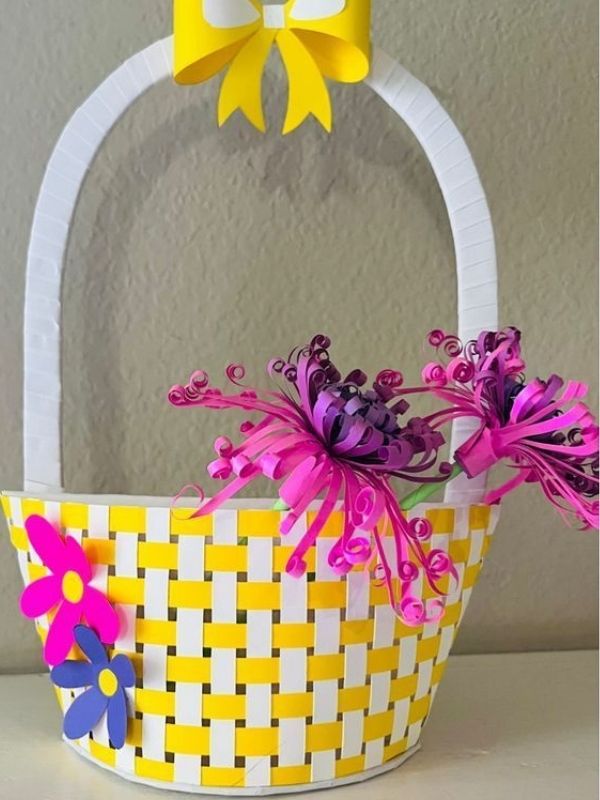
As you work, gently push the rows together to create a tighter structure.
Once the basket is tall enough, fold the remaining strips over the top edge and secure them.
You can add a paper handle if you want to carry it.
Turn It Into a Gift Basket
A small paper basket can be filled with chocolates, beauty products, stationery, handmade gifts, or other small items.
Instead of buying a disposable gift bag, you can make the container part of the gift.
Looking for more inspiration on creating thoughtful, personalized gifts? Take a look at these 7 Best retirement gift ideas for dad who says he wants nothing for unique ways to show your appreciation
8. DIY Basket With Handles
Sometimes the simplest basket becomes much more useful once you add handles.
Handles make it easier to move storage from one room to another.
You can add them to cardboard baskets, fabric baskets, rope baskets, or other sturdy designs.
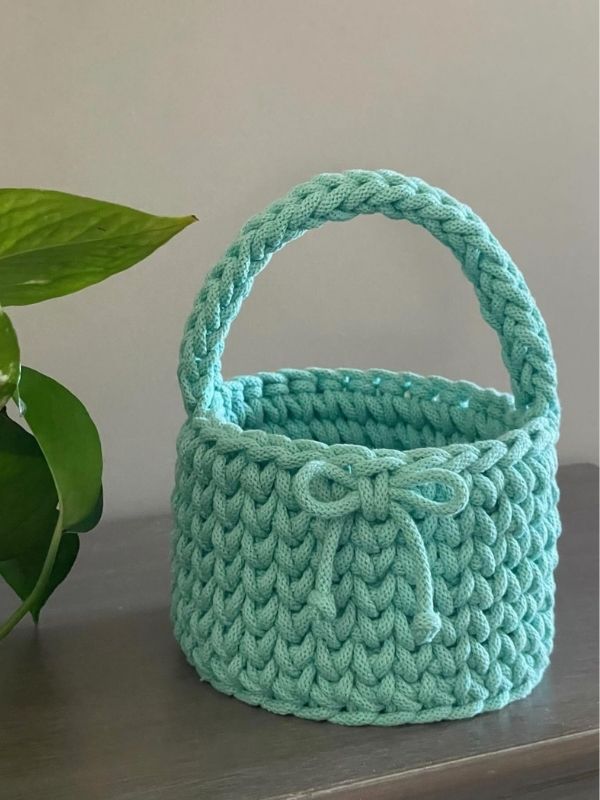
How to Make the Handles
For a rope basket, use two equal pieces of rope.
Place one handle on each side.
For a fabric basket, cut two long fabric strips, fold them, sew them securely, and attach them to the basket.
For a cardboard basket, reinforce the areas where the handles will be attached before installing them.
Important Tip
Think about the weight of the basket before choosing the handle material.
A basket holding blankets or books needs stronger handles than one holding hair accessories.
If you plan to carry something heavy, reinforce the handle attachment points instead of relying on a small amount of glue.
Creating custom baskets is a wonderful way to package thoughtful presents check out these handmade crafts for gifts ideas that look beautiful without costing a fortune for more creative, personal craft projects you can share with loved ones.
9. DIY Woven Paper Basket
This is another beautiful project for people who enjoy weaving.
You can make woven paper baskets from newspaper, kraft paper, paper bags, or old magazines.
How to Make It
Cut your paper into long strips.
Fold the strips several times to make them stronger.
Create the base by crossing several strips over each other.
Then begin weaving additional strips through the base.
Continue building the sides.
Keep checking the shape as you go.
If you want a square basket, pay close attention to the corners. If you want a round basket, continue shaping the strips around the sides.
When finished, secure the ends and allow everything to dry.
Add a Finish
You can paint the basket once it is complete.
You can also use a suitable protective coating if the material and project are compatible with it.
10. DIY Basket for Kids’ Toys
A homemade toy basket can make cleanup much easier.
Instead of trying to make every toy disappear into a cupboard, give children one easy place to put their things.
How to Make One
Start with a sturdy cardboard box or fabric basket.
Make sure the opening is wide enough for children to reach inside.
Cover the outside with colorful paper or fabric.
You can add your child’s name or decorate it with simple shapes.
Stars, hearts, flowers, clouds, animals, and other easy designs can make the basket more appealing.

Create Separate Toy Baskets
If you have a lot of toys, one huge basket can quickly become difficult to manage.
Instead, create smaller categories.
One basket could be for stuffed animals.
Another could be for cars.
Another could hold dolls.
Another could be for building blocks.
This makes it easier for children to find what they want and return it when playtime is over.
For young children, avoid loose decorations or small pieces that could become choking hazards.
11. DIY Bathroom Storage Basket
A small basket can make a bathroom shelf or countertop look much neater.
You can use one to organize washcloths, hair accessories, toiletries, or other small items.
Choosing Materials
Bathrooms can be humid, so think carefully about the material you use.
Keep paper and untreated cardboard away from water.
A sturdy rope basket can work well if kept dry.
Fabric baskets can also work for dry storage.
If the basket will sit near a sink, make sure it is positioned where it won’t regularly get splashed.
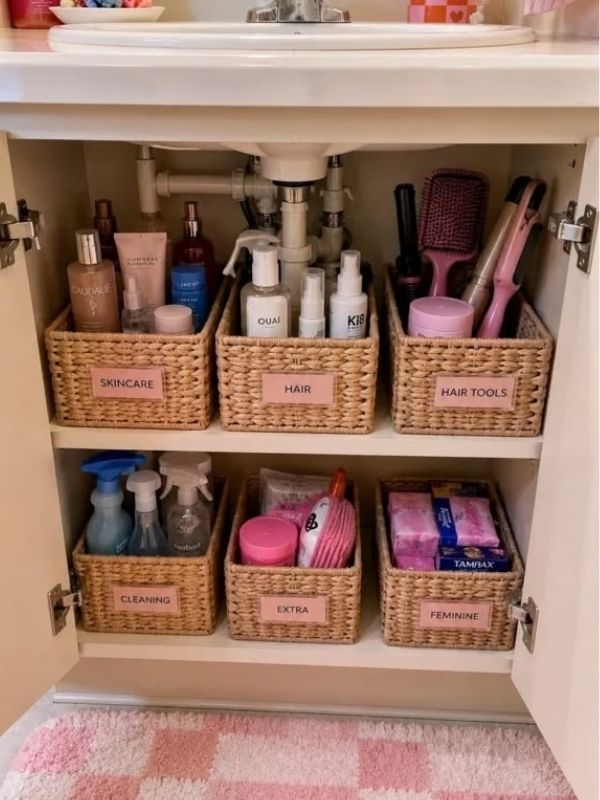
A Simple Bathroom Setup
You could make three small baskets.
One for hair products.
One for extra toiletries.
One for towels or washcloths.
Keeping similar items together can make your morning routine much easier.
12. DIY Basket From Cardboard Tubes
Cardboard tubes are another material that can be reused creatively.
Instead of throwing them away, collect several and turn them into a decorative storage project.
How to Make It
Start with a strong cardboard base.
Cut the tubes into pieces of equal height.
Arrange them closely around the base and secure them.
Once the structure is stable, cover the outside with rope, paper, fabric, or another suitable material.
The tubes help create the structure while the outer covering gives the basket its finished appearance.
What Makes This Project Interesting?
You are taking a material that normally has very little use after its original purpose and turning it into home storage.
It can also be a fun recycling craft to make with older children under proper supervision.
Shallow, custom-made baskets are also a fantastic solution for bedroom organization explore these clever under the bed ideas that save space for smart ways to utilize hidden storage spots.
13. DIY Mini Basket
Small baskets are incredibly useful because so many household items are tiny.
Think about hair clips, rings, earrings, keys, beads, pens, craft pieces, and other little objects that tend to disappear.
A mini basket can give each category a home.
How to Make It
Use paper, thin rope, fabric, or lightweight cardboard.
Create a small base and build the sides upward.
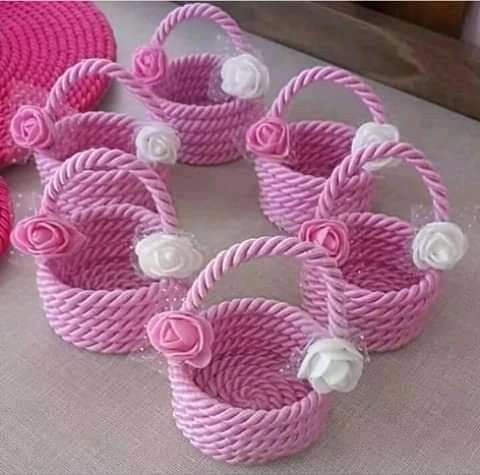
Keep the basket shallow if you want it for a tabletop.
For a more decorative appearance, add a tiny handle.
Where to Use Mini Baskets
A mini basket can sit on:
- A dressing table
- Bathroom shelf
- Office desk
- Bedside table
- Craft table
- Entryway table
You can make several in matching colors and use them as a small organization system.
Woven storage and natural fibers are a simple way to bring texture into your seasonal styling explore these spring home decor ideas for more easy ways to refresh your home.
14. DIY Basket for Blankets
Blankets can make a living room look messy when they are folded over chairs or left on the sofa.
A large basket beside the sofa gives them a designated place.
How to Make It
For a blanket basket, choose a sturdy material.
A reinforced cardboard structure covered in rope can work well.
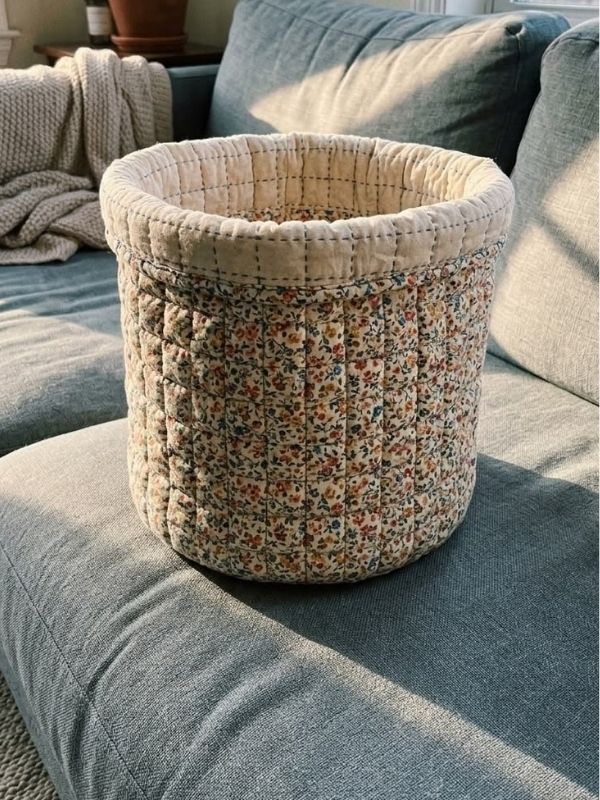
You can also make a strong fabric basket using stabilizer and reinforced handles.
Make the opening wide enough that blankets can easily be placed inside.
The basket should also have a strong base.
Decorating Your Blanket Basket
Neutral shades work especially well in living rooms because they can blend with different decorating styles.
Try cream, beige, brown, gray, black, or natural rope.
You could also add a simple fabric label or a small decorative tag.
Place the finished basket beside the sofa, reading chair, or bed.
Ready to give your sleeping space a fresh, aesthetic update? Take a look at these girly bedroom decor ideas for simple ways to transform your room on a budget.
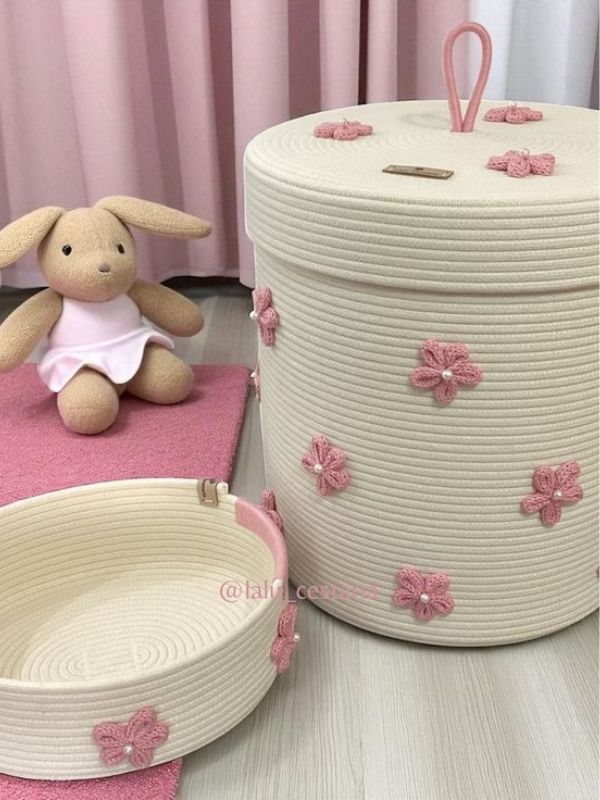
15. DIY Decorative Basket With a Lid
If you want storage that hides its contents, a basket with a lid is a great choice.
A lid allows you to store things that you don’t necessarily want visible.
What You Need
- Cardboard or another sturdy basket material
- Fabric, paper, or rope
- Strong adhesive
- Scissors or craft knife
- Ruler
- Cardboard for the lid
- Decorative handle or knob
How to Make It
First make the main basket using your preferred method.
Then measure the opening.
Cut a piece of sturdy cardboard slightly larger than the opening so it can sit securely on top.
Cover the lid with the same material used on the basket.
Attach a small handle or knob to the center.
Allow everything to dry properly before using it.
Crafting your own storage lets you customize colors and materials so that your organization blends effortlessly with the rest of your Home Interior Ideas for living room
Where to Use a Lidded Basket
This style is especially useful for:
- Bedroom storage
- Closet organization
- Living room storage
- Home office supplies
- Extra accessories
- Items you don’t use every day
It can make a room look cleaner because the contents are hidden.
How to Make DIY Baskets Look Expensive
You don’t need expensive materials to make a handmade basket look beautiful.
The finishing details matter more than spending a lot of money.
Choose a Simple Color Palette
If you’re making baskets for one room, choose colors that already appear in your decor.
For a neutral home, cream, beige, white, brown, and natural tones can work beautifully.
For a colorful room, choose one or two colors that complement what you already have.
Try not to add too many unrelated colors to the same basket.
Custom storage baskets are a secret weapon for organizing crowded counters and cabinets check out these small kitchen makeover ideas for more budget-friendly ways to transform a compact cooking space
Pay Attention to the Edges
A messy edge can make an otherwise beautiful basket look unfinished.
Take your time around the top.
Trim loose threads.
Cut excess fabric neatly.
Secure the ends of rope.
Fold paper carefully.
These little details can make a homemade basket look much more polished.
Add Simple Handles
Handles can change the appearance of a basket completely.
You can use rope, fabric, wooden handles, or sturdy straps depending on the project.
For a decorative basket, even a simple handle can become part of the design.
Add a Small Label
Labels are useful when you have multiple baskets.
You could label them:
Towels
Blankets
Toys
Crafts
Scarves
Accessories
Office Supplies
This makes it easier to put things back where they belong.
How to Choose the Right Basket Material
The material should match the job.
For lightweight items, paper can be enough.
For medium-weight items, fabric or reinforced cardboard can work.
For heavier items, choose a stronger structure such as a sturdy rope basket or reinforced construction.
Also think about moisture.
Paper and untreated cardboard aren’t good choices for areas that regularly get wet.
Fabric can be useful in bedrooms but may need more care in humid spaces.
Jute and rope can look beautiful but should also be protected from prolonged moisture.
Choosing the right material from the beginning can help your basket last longer.
Adding handmade textured storage is one of my favorite touches from these simple interior home designs because it effortlessly brings warmth and organization into any room.
DIY Basket Ideas for Every Room
One reason I think baskets are so useful is that you can find a place for them almost anywhere.
Living Room
Use baskets for blankets, pillows, books, magazines, toys, and remote controls.
A large basket beside the sofa can keep extra blankets organized while also adding texture to the room.
Bedroom
Use baskets for scarves, handbags, extra clothing, accessories, or laundry.
Small baskets are especially useful on dressing tables.
Bathroom
Use smaller baskets for towels, hair accessories, toiletries, and other dry items.
Kitchen
Baskets can organize packaged food, napkins, kitchen towels, and pantry items.
For food storage, choose materials that are appropriate for the specific use and avoid direct food contact when the material isn’t designed for it.
Kids’ Room
Toy baskets are one of the easiest ways to create a simple cleanup system.
Use different baskets for different categories so children know where things belong.
Home Office
A small basket can hold notebooks, pens, chargers, cables, envelopes, and other desk supplies.
How to Make DIY Baskets on a Budget
The easiest way to save money is to start with what you already have.
Before buying supplies, look around your home.
You might already have:
- Cardboard boxes
- Old newspapers
- Paper bags
- Old clothes
- Fabric scraps
- Cardboard tubes
- Leftover ribbon
- Rope
- Decorative paper
These can become the main materials for your project.
You can also save money by purchasing one material in a larger quantity and making several baskets.
For example, if you buy a roll of jute rope, you could make a large basket, a small basket, and a few decorative containers from the same material.
That can be much more economical than buying several ready-made baskets.
How to Keep Your DIY Baskets Organized
Making a basket is only the beginning.
The basket needs to have a purpose after you finish it.
If you make a basket for blankets, try to keep blankets in it.
If you make one for toys, don’t let random household items slowly take over the space.
A simple rule that helps is one basket, one main purpose.
You can still place different items inside, but they should belong to the same general category.
For example, a basket for hair accessories can contain hair clips, scrunchies, headbands, and hair ties.
That makes it easier to find what you need.
Don’t Overfill Your Baskets
A basket that is overflowing may technically be storing everything, but it can still make the room look cluttered.
Leave some space at the top.
This also makes it easier to remove items without having everything fall out.
If the basket is constantly overflowing, it may be time to make another basket or reduce the number of things you are storing.
DIY Baskets as Handmade Gifts
I also think DIY baskets can make beautiful gifts.
Instead of giving someone several small items separately, you can create a themed basket and arrange everything together.
For example, make a small basket for a friend and fill it with:
- Body care products
- Chocolates
- A candle
- Hair accessories
- A handwritten note
If You are craft lover, you could make a basket and fill it with beads, scissors, ribbons, thread, and other supplies.
a new mother, a larger fabric basket can hold useful baby items.
For Christmas, you can create a basket filled with small treats and useful gifts.
The basket itself becomes part of the present.
Can You Sell DIY Baskets?
Yes, DIY baskets can also become a small handmade business idea.
If you’re considering selling them, think beyond making one random basket at a time.
Create collections.
You could have a Bathroom Storage Collection, a Kids’ Room Collection, a Bedroom Collection, or a Living Room Collection.
Offer different sizes so customers can choose what fits their space.
You can also offer color choices.
A customer might want a cream basket for a neutral living room while someone else may prefer a colorful basket for a child’s bedroom.
Good photography will matter too.
Show the basket by itself, but also show how it looks when being used.
A blanket inside a basket gives a much better idea of its purpose than a picture of an empty basket sitting on a table.
How to Make Your Basket Photos More Interesting
If you’re making DIY baskets for your blog, Pinterest, or a craft business, think about showing the project from different stages.
You could photograph:
- The materials before starting
- The basket base
- The basket taking shape
- A close-up of the texture
- The finished basket
- The basket being used for storage
For example, if you make a blanket basket, place it beside a sofa with a folded blanket inside.
If you make a bathroom basket, show it holding neatly folded towels.
These photos help readers understand how the finished project can fit into their own homes.
Common DIY Basket Mistakes to Avoid
Making the Basket Too Large
A very large basket may look impressive, but it can become difficult to move once it is full.
Make the size practical for its purpose.
Using Weak Materials for Heavy Items
Paper isn’t the right material for heavy books.
A thin fabric basket may not be suitable for large blankets.
Match the material to the weight of what you want to store.
Forgetting to Measure the Space
Always measure shelves, cabinets, and corners before making a basket intended for a specific location.
Rushing the Glue
Give glue enough time to dry.
Moving or filling the basket too soon can cause the structure to shift.
Making the Basket Too Flexible
If you want a structured basket, use reinforcement.
Fabric without stabilizer can collapse.
Thin cardboard may bend.
Weak paper can tear.
A little reinforcement can help solve these problems.
Filling Every Inch
Leave enough room for items to be removed and returned easily.
Storage should make your life easier, not create another frustrating task.
What I Would Make First
If you’re new to DIY baskets, I would start with the cardboard storage basket.
It doesn’t require complicated weaving, and you can experiment with different coverings until you find a style you like.
After that, try the rope basket.
Once you become comfortable working with the materials, you can experiment with fabric, paper weaving, jute, recycled clothing, and more detailed designs.
You don’t have to make all 15 projects at once.
Choose one that solves an actual storage problem in your home.
That makes the project much more satisfying because you get to see the result being used every day.
Conclusion
I really enjoy DIY projects that give you something beautiful and useful at the same time, and baskets fit perfectly into that category.
You don’t need expensive materials to create attractive storage. A cardboard box, old newspaper, leftover fabric, rope, jute, paper, or an old piece of clothing can become the starting point for something completely new.
The key is to choose a design that matches what you want to store.
If you need blanket storage, make something large and sturdy. If you need a place for hair accessories, a small basket may be all you need. If your children have toys everywhere, make a few simple baskets and give each one a purpose.
You can also make your baskets match your home by choosing colors, textures, handles, labels, and finishes that work with your existing decor.
And if you enjoy making handmade items for other people, these projects can become thoughtful gifts or even the beginning of a small craft business.
Start with one simple design and see where it takes you.
You might begin with a cardboard box that was going to be thrown away and end up with a beautiful storage basket sitting proudly in your living room.
That is what I love about DIY basket ideas something ordinary can become something useful, personal, and beautiful with a little creativity.
Looking for another relaxing handmade craft to start next? Take a look at these Beginner friendly knitting projects for adults anyone can make for simple tutorials and creative inspiration.
Frequently Asked Questions About DIY Baskets
What is the easiest DIY basket to make?
A cardboard storage basket is one of the easiest options for beginners. You can start with an existing box, adjust the size, and cover it with fabric, paper, or rope.
What materials can I use to make a DIY basket?
You can use cardboard, rope, jute, fabric, paper, newspaper, old clothes, cardboard tubes, paper bags, and other sturdy recycled materials.
How can I make a DIY basket stronger?
Use a sturdy base, reinforce the corners and bottom, choose strong materials, and make sure glued or sewn sections are properly secured. Adding handles should also be done carefully if the basket will carry heavy items.
Can I make baskets from recycled materials?
Yes. Cardboard boxes, newspapers, old clothing, paper bags, and cardboard tubes can all be used for different types of basket projects.
What can I put in a DIY basket?
Depending on its size and strength, you can use baskets for blankets, toys, towels, clothes, craft supplies, books, accessories, pantry items, office supplies, and many other household items.
Are DIY baskets good for home organization?
Definitely. They’re useful for grouping similar items together and making shelves, closets, bedrooms, living rooms, and other areas easier to keep organized.