

10 Home Decor Ideas: This Post gives you a step by step guide on how to refresh your home with these DIYS.
Sometimes I look around a room and feel like it needs something new, but that does not always mean I need to go shopping for new furniture or spend a lot of money on decorations. And that’s because I know a few simple changes can make a familiar space feel completely different.
That is one reason I love DIY home decor Ideas. You can take simple materials, give them a little creativity, and turn them into something beautiful enough to display in your home. You also get to choose the colors, shapes, and style, so the finished piece can actually match your space.
If you have been wanting to refresh your home without spending too much, these home decor ideas you can DIY are worth trying. Most of them use simple materials, and you do not need to be an expert crafter to make them.
Why DIY Home Decor Ideas Are Worth Trying
DIY decor is more than just a way to save money. It gives you the opportunity to make your home feel more personal.
Instead of buying the same decoration that everyone else has, you can make something that fits your own style. You can also reuse things you already have at home, which means some projects may cost very little.
Another thing I love about DIY decor is that you can change things whenever you feel like your space needs a little update. You can repaint an old vase, change the design of a picture frame, or create something completely new from materials that would otherwise be thrown away.
And if you enjoy crafts, decorating your home this way gives you a fun project to work on while also creating something useful. Check out this small space decoration to see more ideas on how to Refresh your space.
Now, let us get into some simple Home Decor ideas you can actually make.
1. Give a Plain Wine Glass a Beautiful DIY Makeover
If you have plain wine glasses at home, you can turn them into pretty decorative pieces with a little creativity. You do not need to use them only for drinks. Decorated wine glasses can also make beautiful centerpieces for your dining table, special occasions, or even everyday home decor.
What you need
- Plain wine glasses
- Glass paint or glass markers
- Small paintbrushes
- Rubbing alcohol
- Cotton pad or clean cloth
- Painter’s tape, optional
- Small decorative stickers, optional

How to make it
Start by washing the wine glasses thoroughly with soap and water. Once they are dry, wipe the outside with a little rubbing alcohol using a clean cotton pad. This helps remove oils and residue so your paint can adhere better.
Before painting, decide on your design. You can keep it simple with small dots, flowers, leaves, lines, or an abstract pattern. If you want neat stripes or sections, use painter’s tape to mark the areas you want to keep clear.
Using glass paint or a glass marker, carefully draw your design on the outside of the glass. Try not to make the paint too thick because thin, even layers usually give a cleaner finish.
Allow the paint to dry according to the instructions on the product you are using. Some glass paints need to be cured in an oven to become permanent, while others are designed to air-dry, so always follow the manufacturer’s instructions.
Once finished, you can display the glasses on a tray, dining table, bar cart, or open shelf.
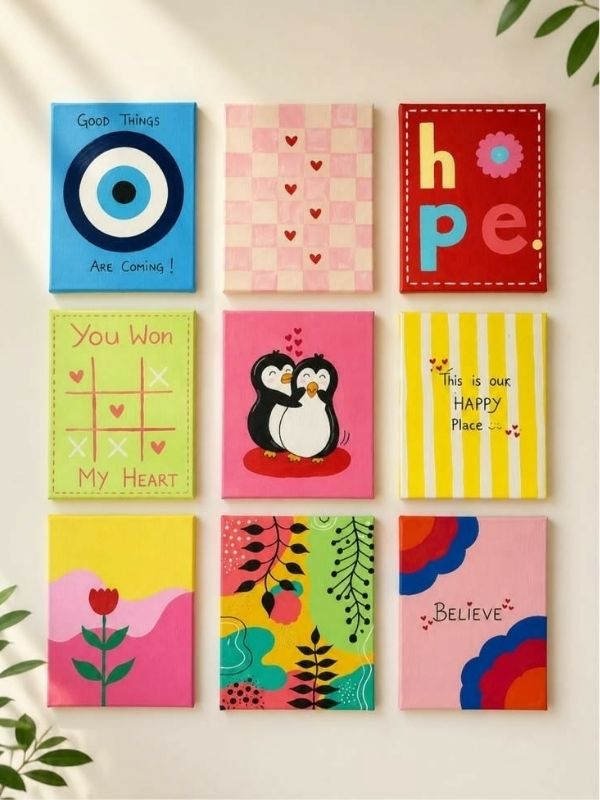
2. Make Your Own Wall Art
An empty wall can make a room feel unfinished, especially when the rest of the space is already decorated.
The good news is that you do not need expensive artwork to change that. You can make your own simple wall art with a few basic supplies. I have a post on new year wall decor ideas, check it out to learn more on art decorations
What you need
- A canvas, thick cardstock, or sturdy cardboard
- Acrylic paint
- Paintbrushes
- Pencil
- Ruler
- Picture frame, if you are using paper or cardboard
- Masking tape, optional
How to make it
Start by deciding what kind of design you want. If you are not confident with drawing, do not worry. You can create something as simple as lines, circles, arches, leaves, or geometric shapes.
Lightly draw your design with a pencil first. If you want straight lines, use a ruler to help you.
Choose two or three colors that already look good with your furniture, curtains, rug, or cushions. Paint each section carefully and allow it to dry before adding another color.
If you are using cardboard or cardstock, put it inside a simple frame once the paint is completely dry.
You can make two or three smaller pieces and hang them together instead of making one large piece.
Where to use it: Above your sofa, bed, desk, console table, or in an empty hallway.
Why it works: Wall art fills an empty wall and gives your room a little more personality without requiring a major makeover.
3. Turn an Empty Wine Bottle Into Beautiful Home Decor
Before throwing away an empty wine bottle, you can give it a completely new purpose. With a little paint and creativity, a simple glass bottle can become a beautiful vase, table decoration, or statement piece for your home.
I have a special Guide for Empty Wine Bottle crafts that will make you look at wine bottle differently
What You Need
- An empty wine bottle
- Warm water and dish soap
- Clean cloth
- Rubbing alcohol
- Acrylic paint or glass paint
- Paintbrushes
- Twine or jute rope, optional
- Decorative ribbon, optional
- Artificial or dried flowers

How to Make It
Start by washing the bottle thoroughly with warm water and dish soap. Remove the label carefully and make sure there is no sticky residue left on the glass. Allow the bottle to dry completely.
Once it is dry, wipe the outside with a little rubbing alcohol and a clean cloth. This removes any remaining oil or residue and gives the paint a cleaner surface to stick to.
Now choose the look you want. You can paint the entire bottle in one color for a simple finish, or create something more decorative with flowers, leaves, dots, stripes, or abstract patterns.
Apply the paint in thin, even layers instead of putting on one thick coat. Let each layer dry before adding another one. If you want a softer handmade look, you can also wrap part of the bottle with jute rope or twine and secure it with a strong craft glue.
After everything has dried completely, place a few artificial or dried flowers inside the bottle. You can also leave the bottle empty and use it as a decorative piece on its own.
Where to Use Your DIY Wine Bottle
Your finished bottle can sit beautifully on a dining table, coffee table, console table, kitchen counter, bookshelf, or bedroom dresser. You can also make three bottles in different heights or colors and arrange them together as a simple centerpiece.
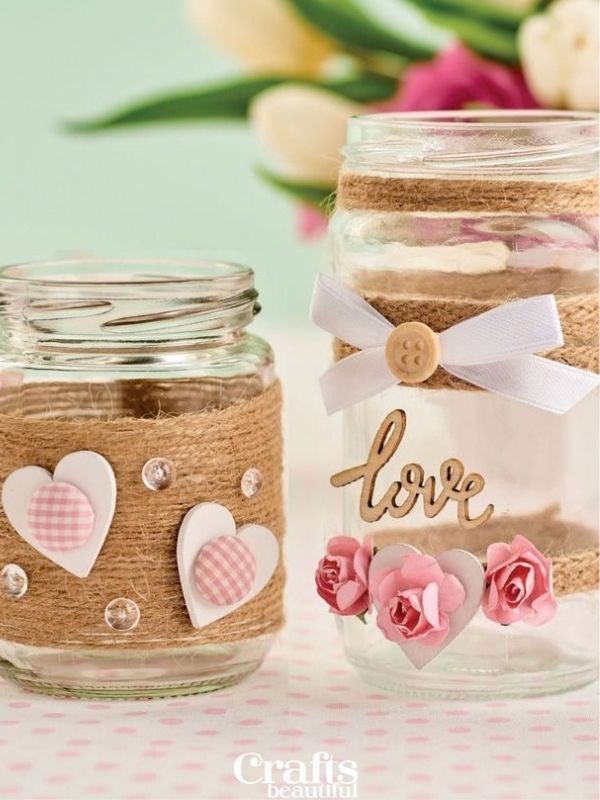
5. Turn Empty Glass Jars Into Beautiful Vases
Before throwing away an empty glass jar, take a second look at it. That old food jar can become a simple little vase for your home.
This is one of my favorite ideas because you are reusing something you already have instead of buying another decoration.
If you love repurposing glass containers, check out these creative Glass jar crafts for more budget-friendly ways to style every room.
What you need
- Empty glass jar
- Warm water and dish soap
- Acrylic paint
- Paintbrush
- Twine, ribbon, or lace
- Flowers or decorative stems
- Glue, optional
How to make it
First, wash the jar properly and remove the label. If there is sticky residue left behind, clean it until the glass is smooth.
Allow the jar to dry completely.
You can leave the glass clear, or paint it in a color you like. If you want a simple look, one solid color is enough.
For a more decorative design, paint small dots, flowers, stripes, or arches on the outside. You could also wrap twine around the middle or tie a ribbon around the top.
Once everything is dry, add fresh flowers, artificial flowers, dried flowers, or a few attractive branches.
Where to use it: Coffee table, dining table, kitchen counter, bedside table, or shelf.
Why it works: It gives an ordinary jar a completely different purpose while adding a small decorative touch to your room.
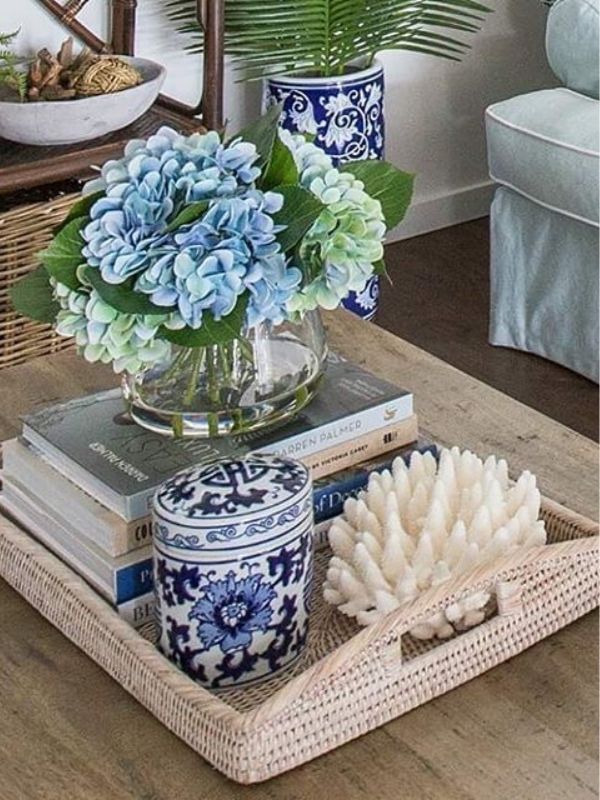
6. DIY a Decorative Tray
A decorative tray can make a table look more organized because it gives your smaller decorations one place to sit.
You can buy a plain wooden tray, but if you already have an old tray at home, this is a good opportunity to give it a makeover.
Setting a styled tray in the center is one of the easiest coffee table decor styling hacks to make your living room feel intentionally arranged.
What you need
- Wooden tray or old tray
- Sandpaper
- Acrylic paint or wood paint
- Paintbrush
- Handles, optional
- Clear sealant, optional
How to make it
If you are using an old wooden tray, clean it first and allow it to dry.
If the surface feels rough, gently sand it until it feels smooth.
Paint the tray in a color that works with your room. You can paint the whole thing one color or paint the inside a different shade from the outside.
Allow it to dry completely. If you want a more finished look, you can apply a clear sealant after the paint has dried.
You can also attach small handles to both sides if you want the tray to be easier to carry.
Once finished, place a few decorations inside it. A small vase, candle, decorative bowl, and coffee-table book can work nicely together.
Where to use it: Coffee table, ottoman, dining table, dresser, or console table.
Why it works: Instead of having several small items scattered across a surface, the tray brings everything together and makes the arrangement look intentional.
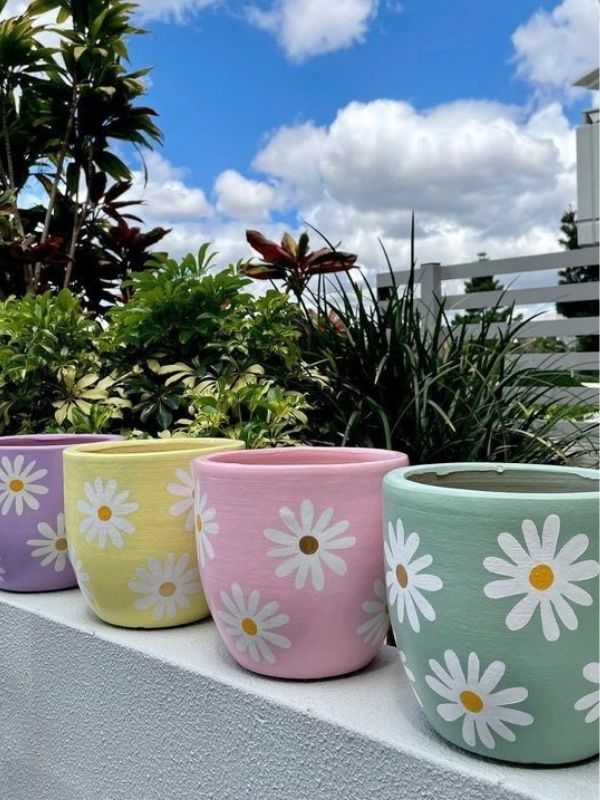
6. Give a Plain Flower Pot a New Look
If you already have plants in your home, you can refresh the space simply by changing the appearance of their pots.
You do not need to buy new plant pots. A plain terracotta or plastic pot can become much more interesting with a little paint. If you love personalizing plain planters, try these easy terracotta pot makeover idea to match your pots to your room’s color scheme
What you need
- Plain flower pot
- Acrylic paint
- Paintbrushes
- Pencil
- Ruler, optional
- Clear sealant, optional
How to make it
Clean the pot and make sure it is completely dry before you start painting.
For the easiest design, paint the entire pot one color and allow it to dry.
If you want something more creative, use a pencil to lightly draw your pattern first. You could make stripes, dots, arches, checkerboard designs, flowers, or simple leaves.
Paint over the design carefully and allow it to dry.
If the pot will be exposed to water regularly, use a suitable sealant to help protect the painted surface.
Once it is ready, put your plant back inside and find a nice spot for it.
Where to use it: Windowsill, shelf, plant stand, balcony, entryway, or living room.
Why it works: Sometimes changing the container around an existing plant can make the whole plant display look new.
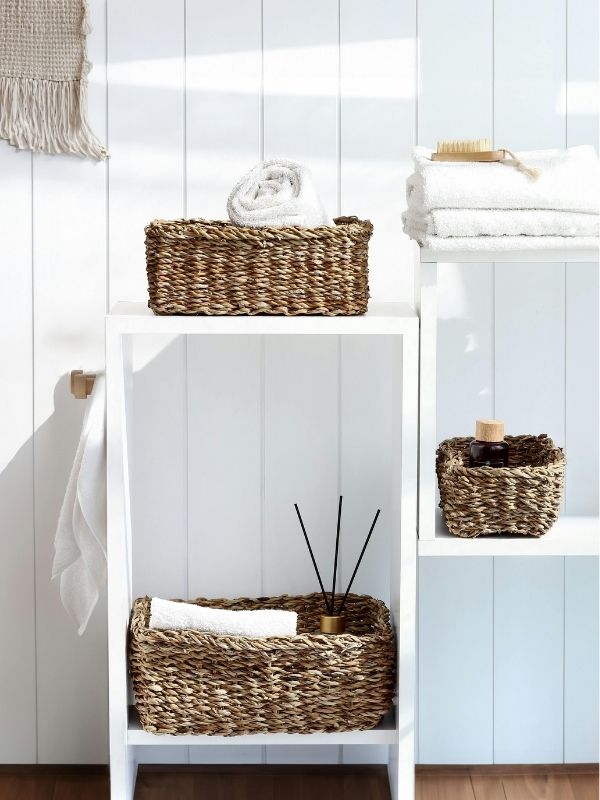
7. Make a DIY Rope Storage Basket
I love home decor that is also useful, and this is one of those projects.
Instead of having blankets, toys, magazines, or other items lying around, you can turn an ordinary container into a decorative storage basket. Go through my post on small bathroom decoration to see more on storage basket and how to use it for your home decor.
What you need
- Old plastic basket or sturdy container
- Thick rope
- Strong craft glue
- Scissors
- Fabric for lining, optional
How to make it
Clean the container and allow it to dry.
Starting from the bottom, apply a small amount of glue and begin wrapping the rope around the outside.
Keep the rope close together as you work so that you do not have large gaps between the rows.
Continue adding glue and wrapping the rope until you reach the top.
When you get to the end, cut the rope neatly and secure it firmly with glue.
If you want the basket to look even nicer inside, add a simple fabric lining.
Allow the glue to dry completely before using the basket.
Where to use it: Living room, bedroom, bathroom, children’s room, or craft area.
What you can store: Blankets, toys, towels, magazines, pillows, craft supplies, or small household items.
Why it works: You get extra storage while also creating a decorative piece that can sit openly in the room.
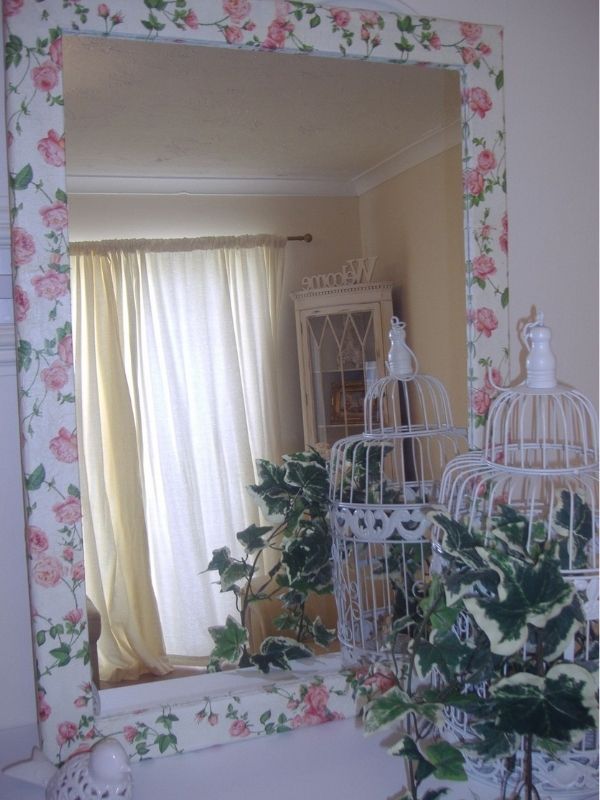
8. Give an Old Mirror a DIY Makeover
A plain mirror does not have to stay plain.
If you are decorating a compact room, check out these small space decoration tips and Girly bedroom decor
to see how placing a decorated mirror near a window can make your space feel bigger and brighter.
If you have an old mirror that still works perfectly but looks a little boring, you can give the frame a new appearance.
What you need
- Plain mirror with a frame
- Acrylic or suitable frame paint
- Paintbrush
- Sandpaper
- Wooden sticks, rope, beads, or other decorative materials, optional
- Strong glue, if adding decorations
How to make it
Clean the mirror and frame first.
If the frame has an old glossy finish, lightly sand it so that the new paint can adhere better.
Paint the frame and allow it to dry completely.
If you want to add more detail, attach wooden pieces, rope, beads, or another suitable decoration around the frame.
Keep the design balanced instead of adding too many different materials.
Once everything is dry and secure, clean the mirror and hang it in your chosen spot.
Where to use it: Bedroom, entryway, hallway, living room, or above a console table.
Why it works: A mirror is useful on its own, but a decorated frame can turn it into a proper feature piece for the room.
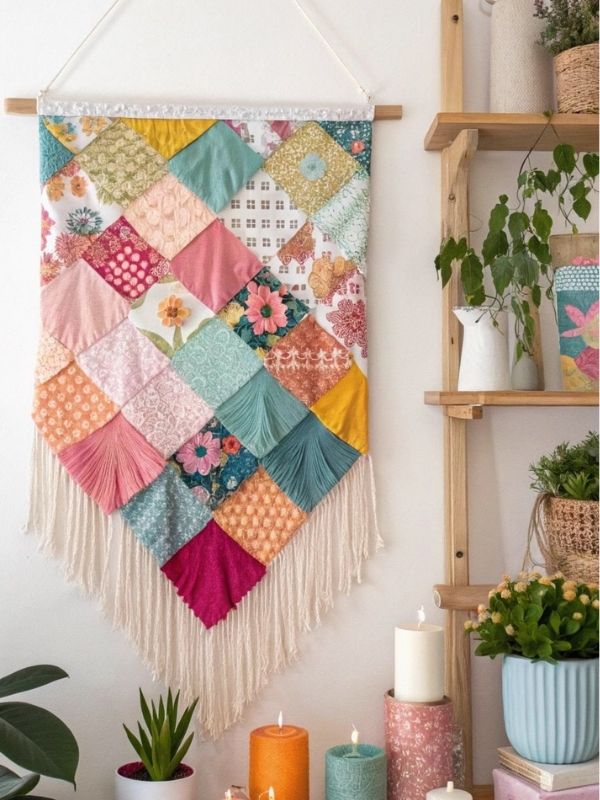
9. Create a Simple DIY Wall Hanging
If you have an empty wall but do not want to use traditional artwork, try making a wall hanging.
This project is especially nice because you can change the colors and materials to suit your home. check out this Embroidery hoop wall art to learn more about DIY wall hanging.
What you need
- Wooden dowel or smooth stick
- Yarn, rope, or fabric strips
- Scissors
- String
- Beads, optional
How to make it
Cut several pieces of yarn, rope, or fabric to different lengths.
Take your wooden dowel and begin tying the pieces onto it. You can arrange the longer pieces toward the sides and shorter pieces in the middle, or create any pattern you like.
If you want some extra detail, add a few wooden or decorative beads.
Once you have finished tying everything, attach a piece of string to both ends of the dowel so you can hang it.
Trim any uneven pieces at the bottom if needed.
Where to use it: Above a bed, sofa, desk, reading corner, or entryway.
Why it works: It adds texture to a plain wall and gives the room a handmade touch.
10. Transform an Old Picture Frame
An old picture frame can become a completely different decoration with some paint and creativity.
You can even use frames that no longer match your current furniture.
What you need
- Old picture frame
- Sandpaper
- Acrylic or frame paint
- Paintbrush
- Decorative paper, fabric, or artwork
- Glue, optional

How to make it
Remove the old picture from the frame and clean the frame properly.
Lightly sand it if the surface is rough or very glossy.
Paint it in a color that matches your room and allow it to dry.
Now decide what you want to display inside it.
You can use a photograph, printable artwork, decorative paper, fabric, a quote, or even dried flowers.
If you are using fabric or paper, cut it carefully so that it fits neatly inside the frame.
You can make several frames in different sizes and hang them together for a simple gallery wall.
Why it works: You are giving something old a new purpose while creating inexpensive wall decor.
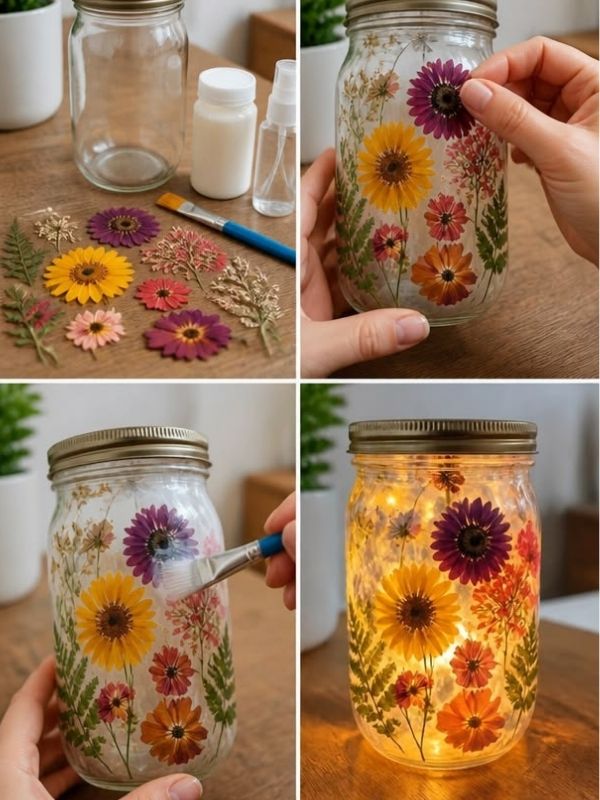
11. Make a Simple DIY Candle Holder
A candle holder can make a small corner of your home feel warmer and more decorated.
You can create a simple one using suitable containers you already have, as long as they are safe for the type of candle you intend to use. You can easily shape coil clay around a small votive or jar to craft a unique candle holder.
What you need
- Small heat-safe glass or ceramic container
- Acrylic paint, if suitable for the surface
- Decorative materials such as ribbon or rope for the exterior
- Candle or LED candle
How to make it
Clean your container and allow it to dry.
If you want to paint the outside, apply thin coats and allow each coat to dry before adding another.
You can also decorate the outside with suitable non-flammable materials.
Once the decoration is completely dry, place your candle inside.
For homes with children or pets, LED candles are a simple alternative to an open flame.
Important: Never leave a burning candle unattended, and keep flames away from curtains, paper, fabric, rope, and other flammable materials.
Where to use it: Dining table, coffee table, bedside table, bathroom, or shelf.
Why it works: A small candle display can add warmth and make a simple table arrangement feel more finished.
12. Create a DIY Table Centerpiece
You do not need a complicated arrangement to make your dining or coffee table look beautiful.
A few carefully chosen pieces can create a lovely centerpiece. check out this fun natural table settings to see more on table centerpiece decoration
What you need
- Small tray, bowl, or decorative plate
- Small vase
- Flowers or greenery
- Candle or LED candle
- Small decorative object

How to make it
Start by placing your tray or decorative plate in the middle of the table.
Put your largest item, such as a vase, slightly off-center.
Then add one or two smaller items beside it. You could use a candle, small bowl, decorative stone, or another piece that matches your style.
Step back and look at the arrangement before adding anything else.
If it already looks balanced, stop there.
One of the easiest mistakes to make with a centerpiece is adding too many things. Sometimes, keeping it simple makes it look much more beautiful.
Where to use it: Dining table, coffee table, kitchen island, console table, or entryway.
Why it works: A centerpiece immediately gives a table a focal point and makes the surrounding space feel more thoughtfully decorated.
A Few Tips Before You Start Your DIY Home Decor Ideas Projects
Before you start buying materials, look around your home first. You may already have jars, old frames, baskets, cardboard, fabric, paint, or other supplies that can be reused.
It is also helpful to choose a general color palette before starting several projects. If you use completely different colors for every piece, the decorations may not look connected when you put them in the same room.
And please do not feel like every Home Decor Ideas DIY project has to come out perfectly on the first try. That is part of the fun. If you do not like the color, paint it again. If the arrangement feels too busy, remove a few pieces. Your home should reflect what you like.
Final Thoughts On Home Decor Ideas
Refreshing your home can be as simple as changing one small corner.
You could turn an old jar into a vase, give a plain flower pot a new design, create your own wall art, or make a storage basket that helps keep the room organized.
The beauty of these home decor ideas you can DIY is that you can adjust them to fit your own home, budget, and style. You do not need expensive supplies or advanced crafting skills. Start with one project, use what you already have where possible, and see where your creativity takes you.
Sometimes, the little things we make ourselves are what make a home feel the most personal.