
This Post Will Show You, How to Make a Coil Clay Pot Step by Step: A Beginner Project Worth Trying.
I really enjoy crafts that allow me to start with something simple and slowly turn it into something beautiful. Making a coil clay pot is one of those projects. And In this particular, You don’t necessarily need a pottery wheel or a lot of fancy equipment to get started. With some clay, your hands, and a few simple tools, you can build a small pot one layer at a time.
If you have never worked with clay before, don’t worry. The first pot you make may not look perfect, and that is completely fine. Learning how to roll the coils evenly, join them together, smooth the walls, and shape the pot takes a little practice.
In this tutorial, I’ll walk you through how to make a coil clay pot step by step, including the supplies you need, how to prepare your clay, how to make the coils, how to build the pot, and what to do if you notice cracks or uneven areas along the way.
What Is a Coil Clay Pot?
A coil clay pot is made by building the walls of a pot using long, rope-like pieces of clay called coils.
Instead of starting with a pottery wheel, you make a flat clay base and then place the coils around it one at a time. Each coil is joined to the one below it until the pot reaches the height you want.
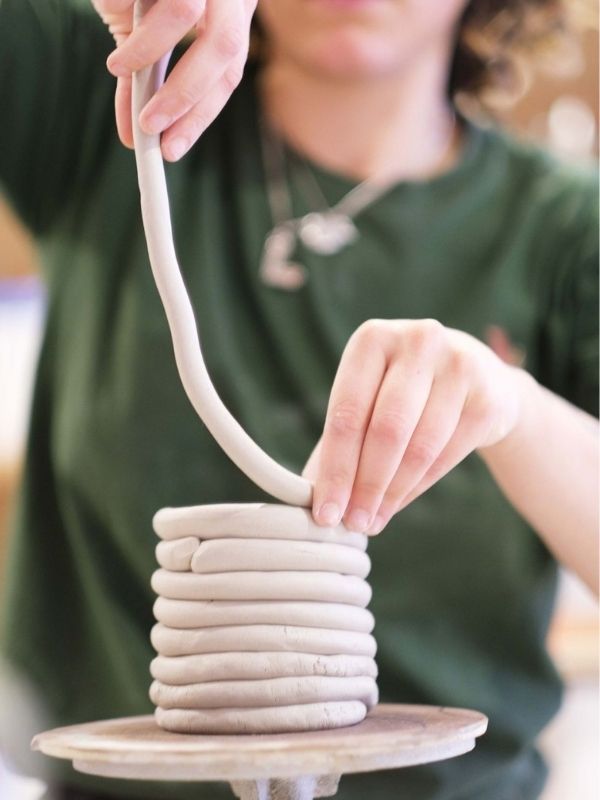
You can make the sides straight, slightly rounded, wider at the top, or narrower toward the opening. This makes coil pottery a nice project for beginners because you have plenty of control over the shape.
You can also leave some of the coil texture visible for a handmade look or smooth the surface if you prefer a cleaner finish.
What You Need to Make a Coil Clay Pot
Before you begin, gather everything you need and place it near your work area. This makes the process much easier because you won’t have to keep stopping while your clay is sitting out.
Here are the basic supplies:
- Clay suitable for your chosen finishing method
- A flat work surface
- Rolling pin or clay roller
- Small knife or clay cutting tool
- Water in a small container
- Sponge
- Wooden skewer or toothpick
- Ruler, optional
- Small bowl or cup, optional
- Sandpaper, if appropriate for your clay
- Paint or glaze, depending on the clay you use
- Oven or kiln if your clay requires firing
You don’t need to buy every pottery tool available. A beginner can start with a surprisingly small collection of supplies.
What Kind of Clay Should You Use?
This is one of the most important things to check before you start.
Different types of clay require different finishing methods. Some pottery clay needs to be fired in a kiln, while some oven-bake clays are designed to cure in a household oven.

If you are using air-dry clay, you normally allow the finished piece to dry according to the manufacturer’s instructions instead of putting it in a kiln or regular oven.
If you are using polymer clay, follow the baking instructions on the specific package because temperature and baking time can vary between products.
For a traditional pottery-style coil pot, choose a clay that is specifically suitable for the type of pottery you want to make.
Never put clay in your kitchen oven unless the clay manufacturer’s instructions specifically say that it is suitable for oven curing.
If you also enjoy working with polymer clay, you may want to read my guide on How to Store Unbaked Polymer Clay So It Stays Soft and Ready to Use. It explains how to keep leftover polymer clay in good condition between projects.
Prepare Your Work Surface
Before touching the clay, prepare your workspace.
You want a flat surface where you can comfortably roll, shape, and turn your pot. A smooth board, craft mat, or another suitable work surface can work well.
Keep a small amount of water nearby, but don’t pour water directly onto your clay.
It’s also helpful to keep a damp sponge nearby. You can use it to smooth the surface and clean your hands as you work.
Try to keep your workspace free from dust, hair, food, and other small particles. They can easily stick to soft clay.
Prepare the Clay
Take the amount of clay you need and begin working it with your hands.
If your clay requires wedging or kneading according to the manufacturer’s instructions, do that before you start building. This helps prepare the clay and can make it easier to work with.
You want the clay to feel workable and consistent, but not extremely wet or sticky.
If it feels too dry and begins cracking as you work, check the instructions for your specific clay before adding anything to it. Don’t automatically add water because different clays respond differently.
If it feels very soft and difficult to handle, allow it to firm up slightly according to the clay manufacturer’s recommendations.
Step 1: Make the Base of Your Pot
Start by taking a piece of clay and flattening it.
You can use your hands or gently roll it with a rolling pin until you have a flat piece.
For a small beginner pot, you could aim for a base that is roughly 10 to 12 cm wide, although you can make yours smaller or larger.
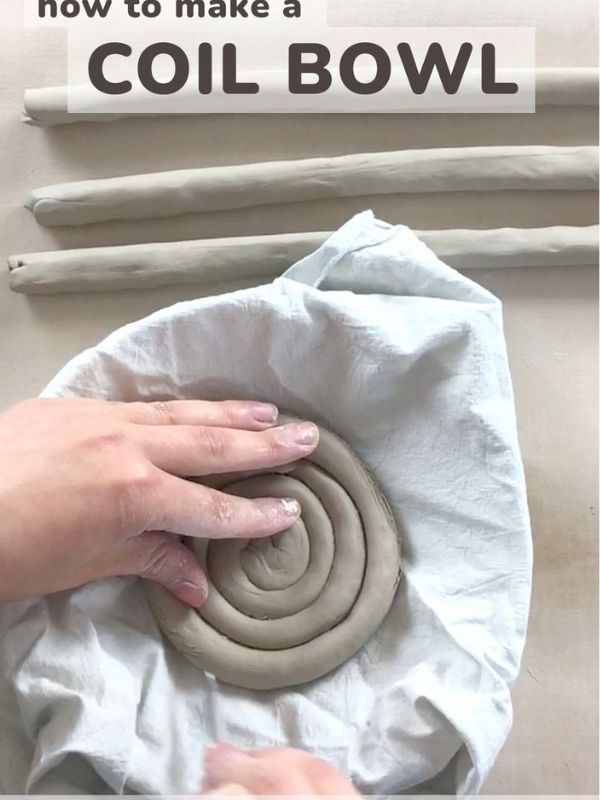
Try to keep the thickness reasonably even.
Don’t worry about getting a perfectly round circle immediately. You can place a small bowl or another round object over the clay and carefully cut around it if you want a cleaner shape.
Once you have your base, gently smooth the edges with your fingers. Also check out my guide on 10 air dry clay ideas that look too pretty to be handmade that will make you fall in love more with clays.
You now have the foundation of your pot.
Step 2: Make Your First Clay Coil
Now comes the part that gives coil pottery its name.
Take a piece of clay and roll it between your hands or against your work surface to create a long rope.
This is your first coil.
Try to roll it slowly instead of pressing down too hard. You want the coil to have a fairly even thickness from one end to the other.
For a small pot, a coil around 1 to 1.5 cm thick can be a comfortable starting point.
The exact size is not as important as keeping your coils reasonably consistent.
If one section is extremely thin and another section is very thick, the walls of your pot may become uneven.
How Long Should the Coil Be?
Your coil should be long enough to travel around part or all of the edge of your clay base.
You can simply measure it against the base as you work.
Don’t worry if the first coil isn’t perfect. You are learning how the clay behaves, and your technique will improve as you continue.
Step 3: Attach the First Coil to the Base
Place your first coil around the outer edge of the clay base.
You want the coil to sit directly against the edge rather than hanging too far over it.
Now gently press the coil against the base.
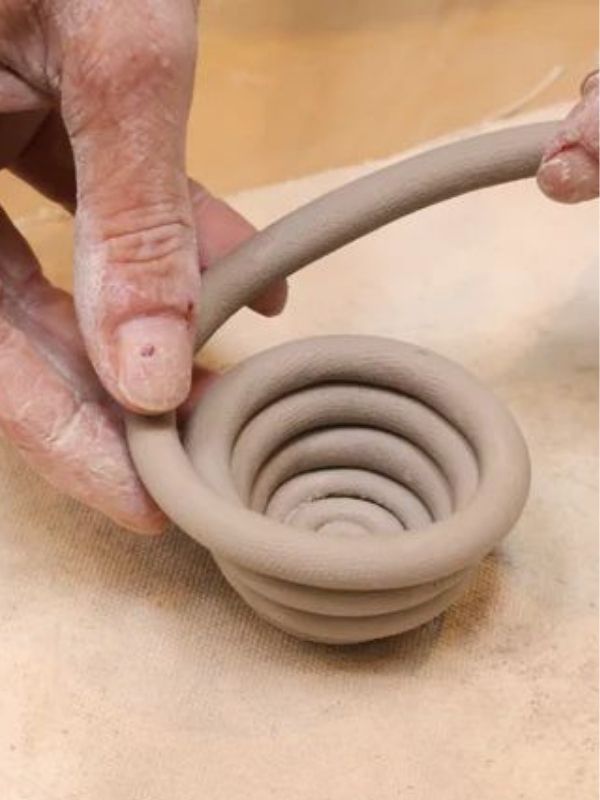
This is where you want to make a strong connection between the two pieces of clay.
You can use a wooden tool, your fingers, or another suitable clay tool to gently press and blend the joining area.
Don’t press so hard that you completely flatten the coil.
The goal is to join the pieces while keeping enough clay in the wall to maintain its shape.
Go through this post to see clay Ideas that so simple you can finish in a day
Step 4: Score and Slip the Clay if Your Clay Requires It
For some pottery clays, you may use a technique called score and slip when joining pieces of clay.
Scoring means making small scratches or rough marks on the surfaces you want to join.
Slip is a liquid mixture made from clay and water that is used as a joining aid.
If your clay type and pottery method call for score and slip, scratch the joining surfaces, apply the appropriate slip, and then press the pieces together.
Follow the recommendations for your particular clay because clay bodies and techniques can vary.
For a beginner, the important thing to understand is that the connection between each coil needs to be secure.
A beautiful-looking coil pot can still develop problems later if the layers aren’t joined properly.
Step 5: Add Another Coil
Roll another coil that is approximately the same thickness as the first one.
Place it on top of the first coil.
Try to line it up carefully instead of dropping it onto the pot.
Once it is in position, gently press and blend the two coils together.
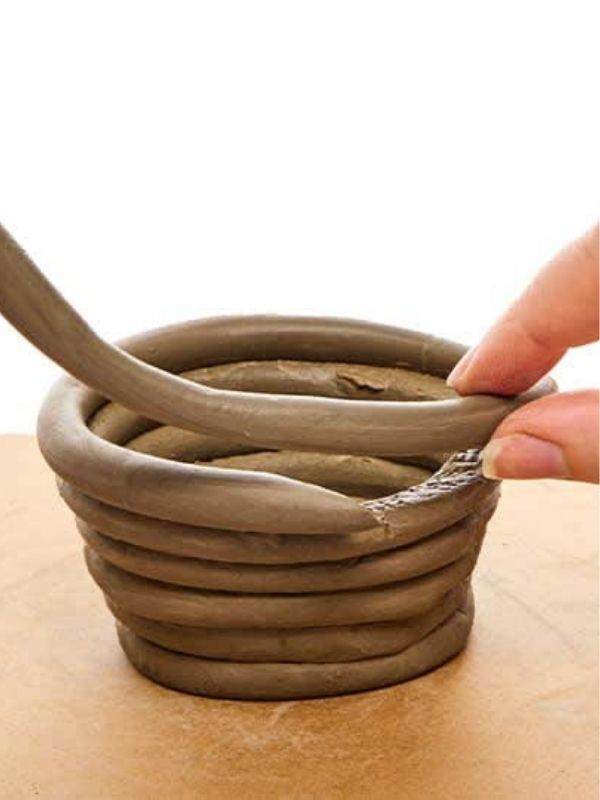
You can smooth the inside of the pot while leaving some of the coil texture visible on the outside.
Or you can smooth both sides if you prefer a more polished appearance.
Continue adding coils around the pot.
Step 6: Build the Walls Slowly
This is where patience becomes important.
Don’t rush to build the entire pot in a few minutes.
Add one coil, attach it securely, smooth or blend it, and then add the next one.
As the pot becomes taller, regularly look at it from different angles.
Check that the walls are not leaning too far to one side.
You can gently support the inside of the pot with one hand while adding or smoothing a coil with the other.
If you notice that one side is becoming thicker than the other, gently adjust it while the clay is still workable.
More DIY Crafts to Try
If you enjoyed this clay project, here are a few more DIY ideas you might want to try next:
- Simple DIY Bag Charms to Make at Home
- DIY Projects Adults Can Finish in a Day
- Wine Bottle Crafts Ideas
- DIY Christmas Wreath Ideas
- Egg Carton Crafts for Kids
- Popsicle Stick Crafts for Kids
- Embroidery gift ideas that turn pieces into a beautiful keepsake
- Embroidery hoop wall art 10 beautiful diy ideas to try
Step 7: Decide What Shape You Want
You don’t have to make your pot completely straight.
This is one of the fun things about coil pottery.
You can make a pot that:
- Has straight sides
- Gets wider toward the top
- Gets narrower toward the top
- Has a rounded belly
- Has a slightly uneven handmade shape
- Has a narrow opening
- Has a wide opening

For your first pot, I recommend keeping the shape fairly simple.
A slightly rounded pot with a wider opening is easier to manage than a complicated shape with dramatic curves.
How to Make the Pot Wider
If you want your pot to become wider as you build it, place each new coil slightly toward the outside of the previous layer.
Do this gradually.
Moving the coils too far outward can make the walls unstable.
How to Make the Pot Narrower
To create a narrower opening, place each new coil slightly farther inward.
Again, make small adjustments instead of trying to create a large curve in one layer.
Step 8: Smooth the Inside of the Pot
Once you have built several layers, look carefully at the inside.
You may see the individual coils where they meet.
Use your fingers or a suitable clay tool to blend those joints together.
Work slowly.
If you press too hard, you can accidentally make the wall thinner in certain areas.
A small sponge can help you gently smooth the surface afterward.
Be careful with water. Too much moisture can make the clay soft and difficult to control.
Step 9: Decide How You Want the Outside to Look
You have two main choices here.
Leave the Coil Texture Visible
You can leave some or all of the coils visible on the outside.
I actually like this look because it makes the handmade process part of the finished pot.
You can gently smooth any sharp or rough areas while keeping the individual layers visible.
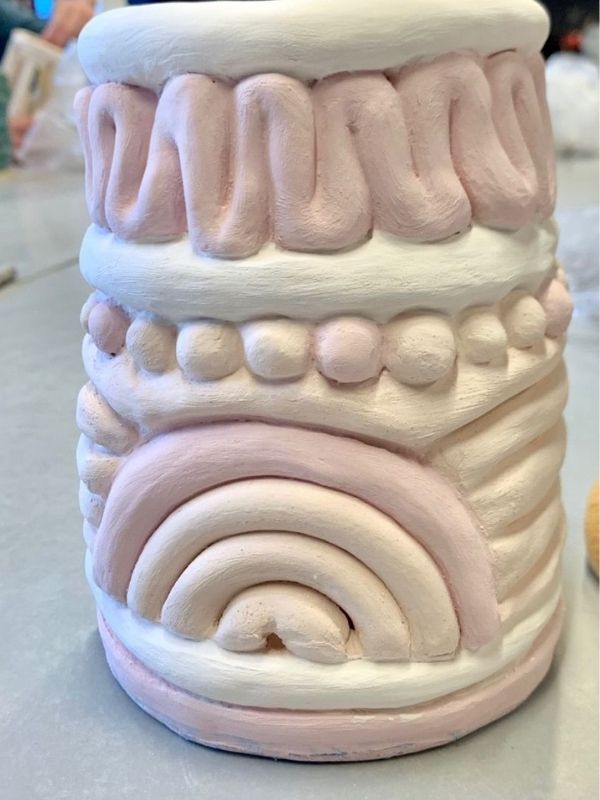
Smooth the Coils Completely
If you prefer a smoother pot, blend the coils together using your fingers or an appropriate clay tool.
Move around the pot slowly instead of trying to smooth everything at once.
If you want a very smooth surface, take your time. Small imperfections become easier to notice after the clay dries or is fired.
Step 10: Shape the Rim
Once your pot has reached the height you want, take some time with the top edge.
The rim is the part that people will see immediately, so you want it to feel intentional.
Look around the opening and check for areas that are much higher or lower than the rest.
Gently adjust the clay with your fingers.
You can make the rim:
- Straight
- Rounded
- Slightly wavy
- Thick and chunky
- Thin and delicate
For your first pot, a simple rounded rim is a good option.
Step 11: Smooth the Final Surface
Now give your pot one final inspection.
Look at the outside, inside, base, and rim.
Feel the surface gently with your fingers.

If you find a deep crack, rough edge, or loose section, fix it while the clay is still workable if your clay type allows it.
You can use a slightly damp sponge to smooth the surface.
Don’t keep adding water simply because you want the clay to look shiny or smooth. Too much moisture can create other problems.
Step 12: Let the Pot Dry or Cure Properly
This step depends completely on the type of clay you used.
Air-Dry Clay
Allow the pot to dry according to the manufacturer’s instructions.
Don’t place it directly in intense heat to make it dry faster unless the product specifically recommends that method.
Rapid or uneven drying can contribute to cracking.
Oven-Bake Clay
Follow the exact curing instructions on the package.
Check the recommended temperature and curing time for your particular clay.
Pottery Clay
Traditional pottery clay generally needs to dry thoroughly and then be fired in a suitable kiln.
If you are new to pottery, you may need access to a community studio, pottery class, school, or local ceramic studio that offers firing services.
Don’t put traditional pottery clay in a normal kitchen oven.
What If My Coil Clay Pot Starts Cracking?
Don’t panic if you notice a small crack while you’re working.
First, check what is causing it.
The clay may be drying too quickly, the wall may be too thin, or the pieces may not have been joined properly.
If the clay is still workable, you may be able to gently repair a small area using the appropriate method for your clay.
If the clay has already dried, follow the repair recommendations for that particular clay instead of simply adding water to the crack.
Also pay attention to how you dry your pot. Uneven drying can put stress on the clay.
How Thick Should a Coil Clay Pot Be?
There isn’t one thickness that works for every clay body and every pot.
For a small beginner project, the important thing is consistency.
You don’t want one part of the wall to be very thick while another part is extremely thin.
Keeping your coils similar in size makes it easier to create an even wall.
If you’re following a specific pottery class, clay manufacturer, or firing method, use their recommended thickness for the clay you are working with.
How Do I Stop My Pot From Collapsing?
This is one of the most common beginner problems.
If your pot starts leaning or collapsing, you may be building too quickly.
Try stopping after a few coils and allowing the clay to firm up slightly before continuing, following the recommendations for your clay.
You can also support the inside of the pot with your hand while attaching the next coil.
Another important thing is not to make your coils excessively heavy.
Build gradually and check the shape after every few layers.
What If My Coils Keep Breaking?
Your clay may be too dry, or you may be rolling the coil too aggressively.
Try working with a smaller amount of clay at a time.
Roll the clay gently and evenly.
If the coil cracks badly, don’t simply keep rolling it and hoping it improves. Check the condition of your clay and follow the manufacturer’s guidance for bringing it back to a workable consistency.
How Can I Make My Coil Pot Look More Professional?
You don’t need to make your first pot perfectly smooth.
A few small details can make a big difference.
Take time to make the rim neat.
Keep the base stable.
Try to maintain a fairly even wall thickness.
Smooth rough areas instead of trying to remove every handmade mark.
And most importantly, don’t rush the drying or curing stage.
A little patience during the building process can make the finished piece look much more intentional.
Easy Ways to Decorate a Coil Clay Pot
Once your pot has been properly dried, cured, or fired according to the clay instructions, you can decorate it.
Your options depend on the type of clay and the finish you want.
Paint It
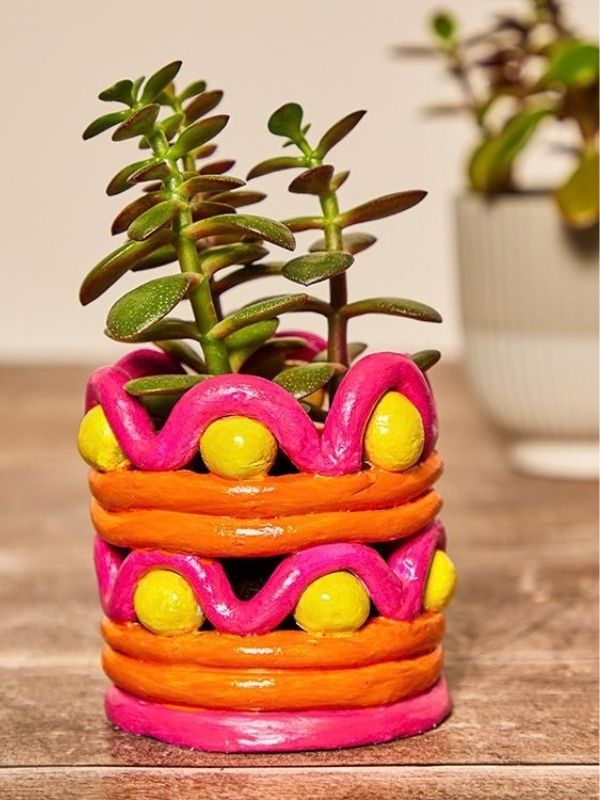
You can paint a suitable finished clay surface using a compatible paint.
Try a simple color first if this is your first pottery project.
You could paint the entire pot one color or add small details around the rim.
Add Simple Patterns
You could create dots, lines, leaves, flowers, waves, or geometric shapes.
You don’t need a complicated design.
A simple repeating pattern around the top of the pot can look beautiful.
Keep the Natural Clay Look
You can also leave the clay in its natural color if you like the handmade pottery appearance.
A simple finish can allow the texture of your coils to remain the main feature.
What Can You Use a Coil Clay Pot For?
This depends on the clay, finish, and whether the finished pot is suitable for holding water or food.
For a decorative piece, you could use it as:
- A small plant pot
- A pencil holder
- A jewelry holder
- A decorative container
- A bathroom storage piece
- A desk organizer
- A small vase, if properly finished and waterproofed for that purpose
- A handmade gift
If you plan to use it for a real plant, check that the clay and finish are suitable for that purpose.
If you enjoy making useful handmade pieces for yourself or as gifts, you may also like my Handmade Crafts for Gifts That Look Special Without Costing a Fortune.
Can Beginners Make a Coil Clay Pot Without a Pottery Wheel?
Absolutely.
In fact, coil building is one of the traditional hand-building methods used to create pottery without a wheel.
You build the shape yourself instead of relying on a spinning wheel.
That is one reason I like this project for beginners. You can take your time and make small adjustments as you go.
You don’t need to know how to throw clay on a wheel before you start.
Beginner Mistakes to Avoid
Making the Coils Too Uneven
Your coils don’t need to look perfectly identical, but very large differences in thickness can make the pot difficult to build.
Try to keep them reasonably consistent.
Building Too Quickly
Adding too many coils before the lower part of the pot has enough strength can cause the walls to lean or collapse.
Slow down when necessary.
Using Too Much Water
Water can make clay easier to smooth, but too much can make it overly soft.
Use only what your clay instructions recommend.
Ignoring the Rim
The top of your pot can make the entire project look unfinished if it is extremely rough.
Take a few minutes to smooth and shape it.
Rushing the Drying Process
Let the clay dry or cure according to the manufacturer’s instructions.
Trying to speed up the process can cause problems.
How to Make Your First Coil Pot Easier
If this is your very first clay project, start small.
A small pot requires less clay and is easier to control than a large one.
Don’t try to create a complicated shape on your first attempt.
Make a simple round pot, focus on getting your coils attached properly, and pay attention to how the clay responds as you work.
Once you understand the process, you can start experimenting with taller pots, wider shapes, handles, textures, patterns, and different finishes.
A Simple Coil Pot Project You Can Try
If you want an easy project to follow, try making a small decorative pot.
Start with a clay base around 10 cm wide.
Make several coils of similar thickness.
Attach the first coil around the base and blend the connection.
Continue adding coils until the pot is around 8 to 12 cm tall.
Keep the sides slightly rounded and leave the opening fairly wide.
Smooth the inside, shape the rim, and leave a little of the coil texture visible on the outside.
Once you’re happy with the shape, follow the correct drying, curing, or firing instructions for your clay.
You can then decorate it with a simple pattern or leave it natural.
This gives you a manageable first project without trying to do too much at once.
More DIY Clay Projects to Try
Once you’ve made your first clay pot, you may find yourself wanting to try other clay projects.
You could experiment with small dishes, candle holders, jewelry trays, plant pots, ornaments, or other decorative pieces.
If you also work with polymer clay, make sure you store your unused clay properly between projects. I have a full guide on How to Store Unbaked Polymer Clay So It Stays Soft and Ready to Use that you can check out before putting your leftover clay away.
Final Thoughts
Making a coil clay pot is one of those projects where you can actually see your progress as you work.
You start with a simple piece of clay and slowly build it up, one coil at a time. The first few coils might feel awkward, especially if you’ve never worked with clay before, but your hands start to understand the process as you continue.
Don’t worry if your first pot has a few uneven areas. Those little imperfections are part of learning, and they can make a handmade piece feel more personal.
Start with a small pot, take your time with each layer, and pay attention to how your clay behaves. Once you become comfortable with the basic technique, you can start experimenting with different shapes, textures, sizes, and decorations.
And before you know it, that simple piece of clay in front of you can become a little pot that you actually made with your own hands.