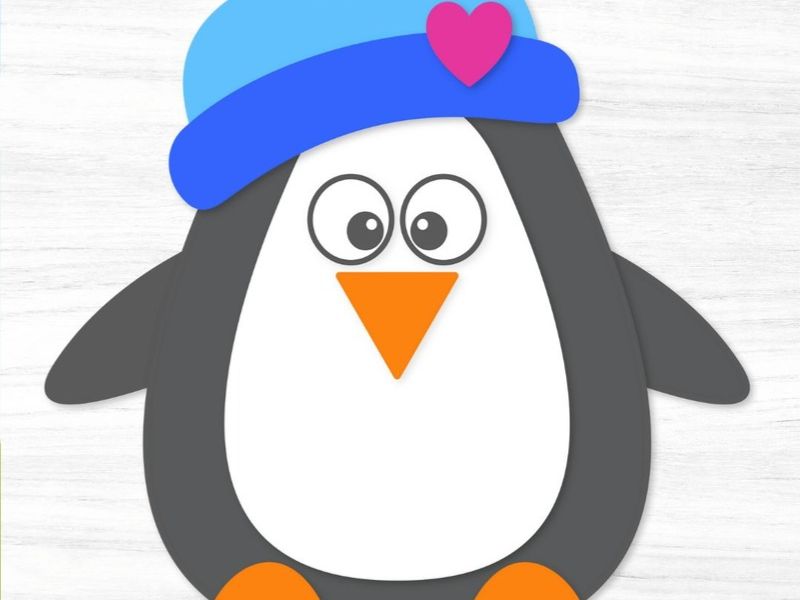
6 Adorable Penguin Crafts for Preschoolers That Are Simply Too Cute.
Penguins are such adorable animals, and their funny little waddles, black-and-white feathers, and bright orange feet make them an exciting subject for children’s craft activities. Preschoolers especially enjoy making animals they recognise, and penguins offer plenty of opportunities to explore colours, shapes, textures, and different art materials.
If you are looking for something fun to keep little hands busy during the colder months, these penguin crafts for preschoolers are lovely projects to try. They use simple materials such as paper plates, cardboard rolls, construction paper, cotton balls, and paint. You do not need expensive craft supplies or complicated instructions to help children create something beautiful.
These activities are also suitable for winter-themed classroom lessons, daycare activities, family craft afternoons, and creative play at home. Some projects involve painting and gluing, while others encourage children to practise cutting, tracing, and arranging simple shapes.
The six ideas below are designed with preschoolers in mind. Adults can prepare the more difficult cutting steps beforehand, allowing little ones to enjoy the parts they can manage independently.
So, gather your craft supplies and get ready to make some adorable little penguins,
This Craft on 10 Winter Animal Crafts for Kids to Enjoy is another fun article crafts to explore this winter.
1. Paper Plate Penguin Craft
A paper plate penguin is a wonderful starting project for preschoolers. Paper plates are inexpensive, easy to find, and provide a convenient shape for creating a penguin’s body.
Children can enjoy painting the plate, attaching a white belly, and adding colourful feet and a little beak. The finished penguin can stand alone as a decoration or become part of a larger winter animal display.
This activity is especially useful for introducing preschoolers to basic shapes and colours.
Materials Needed
- 1 white paper plate
- Black construction paper
- White construction paper
- Orange construction paper
- Googly eyes
- Black washable paint
- Paintbrush
- Glue stick
- Child-safe scissors
- Pencil
- Newspaper or a washable craft mat
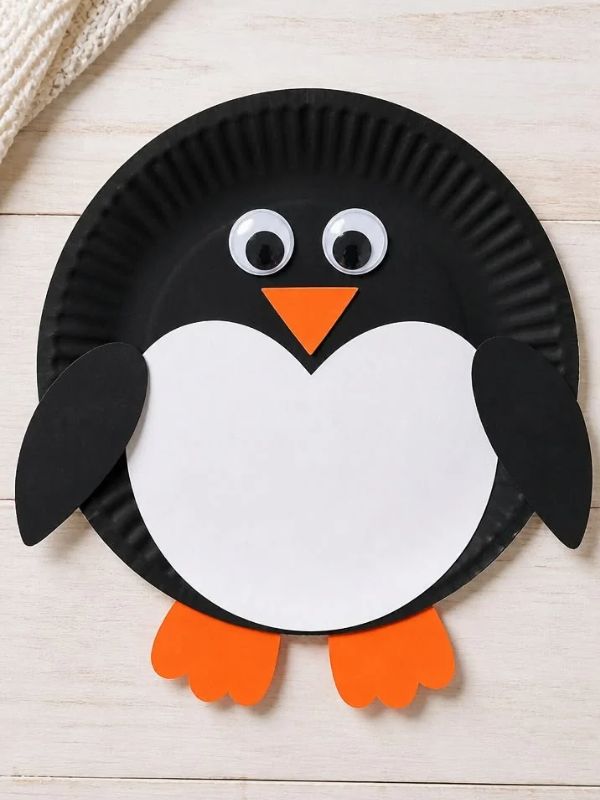
How to Make a Paper Plate Penguin
Step 1: Prepare the paper plate.
Place the paper plate on a protected work surface. Give your preschooler black washable paint and a paintbrush.
Encourage them to paint the entire front of the plate black. They can use broad brushstrokes to cover the surface.
If you prefer a less messy activity, cover the plate with black construction paper instead.
Allow the paint to dry completely before continuing.
Step 2: Create the penguin’s white belly.
Draw a large oval on white construction paper and cut it out.
Help your child position the oval in the centre of the black plate. Apply glue to the back and press it gently onto the plate.
The white oval will become the penguin’s belly.
Step 3: Add the eyes.
Attach two googly eyes near the top of the white section.
If you do not have googly eyes, cut two small white circles and draw black dots in the middle.
Step 4: Make the beak.
Cut a small triangle from orange construction paper. Apply glue to the back and place it underneath the eyes.
Ask your child which direction the pointed end should face. This is a simple way to introduce triangles during the activity.
Step 5: Create the feet.
Draw two small penguin feet on orange construction paper. Cut them out and attach them to the bottom of the paper plate.
Make sure the feet extend slightly beyond the edge so they are easy to see.
Step 6: Add the wings.
Cut two curved shapes from black construction paper. Attach one to each side of the plate.
You can position the wings slightly outward to make the penguin look as if it is welcoming someone.
Step 7: Decorate your penguin.
Let your preschooler add a small paper scarf, a bow, or a winter hat. They can also decorate the background with paper snowflakes.
Allow everything to dry before displaying the finished craft.
Fun Ways to Personalise It
Children can make several paper plate penguins with different accessories. One penguin might wear a red scarf, while another has a blue hat.
You can also use coloured paper plates to create a group of playful penguins. Encourage children to choose their favourite colours for the decorations.
For a classroom activity, each child can make one penguin and write their name on the back. Arrange the finished projects together on a winter display board.
What Preschoolers Can Learn
This project helps children practise recognising circles, ovals, and triangles. They can also identify black, white, and orange while learning how different shapes combine to form an animal.
Painting, applying glue, and positioning small decorations encourage fine motor development and hand-eye coordination.
2. Cotton Ball Penguin Craft
If your preschooler enjoys touching and exploring different textures, a cotton ball penguin is a lovely activity to try.
Cotton balls give the penguin a soft, fluffy appearance, making the project different from ordinary paper crafts. Children can pull the cotton apart, spread glue, and carefully attach the pieces to their penguin’s body.
This is a simple activity that can be completed with only a few basic materials.
Materials Needed
- White cardstock
- Cotton balls
- Black construction paper
- White construction paper
- Orange construction paper
- Googly eyes
- Glue
- Child-safe scissors
- Pencil
- Black marker
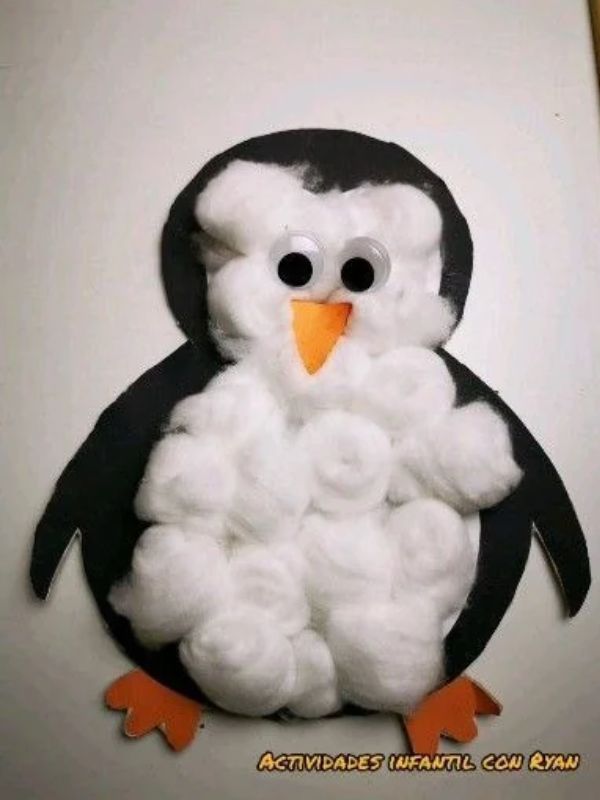
How to Make a Cotton Ball Penguin
Step 1: Prepare the penguin’s body.
Draw a large oval penguin shape on white cardstock. The shape should have a rounded body and a slightly narrower top for the head.
An adult can prepare the outline before the activity if the child is not yet comfortable drawing.
Cut out the shape.
Step 2: Add the black body.
Cut a large black oval that is slightly smaller than the white base. Glue it onto the cardstock.
Leave a white oval area in the middle to represent the penguin’s belly.
Alternatively, you can use black paint to colour the outer body.
Step 3: Prepare the cotton balls.
Place several cotton balls in a small bowl. Show your child how to gently pull them apart into smaller pieces.
This can be an enjoyable sensory activity because children get to explore how the cotton feels and changes shape.
Step 4: Attach the cotton balls.
Apply glue to the white belly area and encourage your child to place the cotton pieces on top.
Press each piece gently so it sticks.
Continue until the belly has a fluffy appearance. Avoid covering the black section of the body.
Step 5: Add the penguin’s face.
Attach two googly eyes near the top of the body.
Cut a small orange triangle and glue it underneath the eyes to create the beak.
Step 6: Make the feet and wings.
Cut two orange feet and attach them to the bottom of the penguin.
Use black construction paper to create two wings. Glue them to the sides of the body.
Step 7: Finish the design.
Place the penguin on blue construction paper. Add small white paper snowflakes or cotton wool along the bottom to create a snowy scene.
Fun Ways to Personalise It
Instead of using cotton balls for the entire belly, children can use small pieces of white tissue paper. They can also add a cotton wool snowbank beneath the penguin.
Another idea is to create a baby penguin beside a larger adult penguin. Use smaller pieces of cardstock for the baby and let children decorate both animals.
If you are making this craft with a group of preschoolers, allow each child to create a different penguin family.
What Preschoolers Can Learn
The cotton ball penguin introduces children to texture and sensory exploration.
They can compare the soft cotton with the smooth construction paper and describe how the materials feel.
The activity also encourages children to practise picking up small pieces, applying glue, and placing decorations carefully.
Safety tip: Supervise young children throughout the activity. Keep cotton balls and other small craft materials away from their mouths.
3. Toilet Paper Roll Penguin Craft
Empty toilet paper rolls are useful for children’s craft projects. Instead of throwing them away, you can save a few and turn them into adorable handmade animals.
A toilet paper roll penguin is particularly cute because the cardboard tube allows the finished animal to stand upright. Children can decorate it with black paper, a white belly, orange feet, and a little beak.
It is also a lovely way to introduce preschoolers to reusing everyday materials.
Materials Needed
- Empty toilet paper roll
- Black construction paper
- White construction paper
- Orange construction paper
- Googly eyes
- Glue stick
- Child-safe scissors
- Pencil
- Black marker
- Colourful paper for decorations
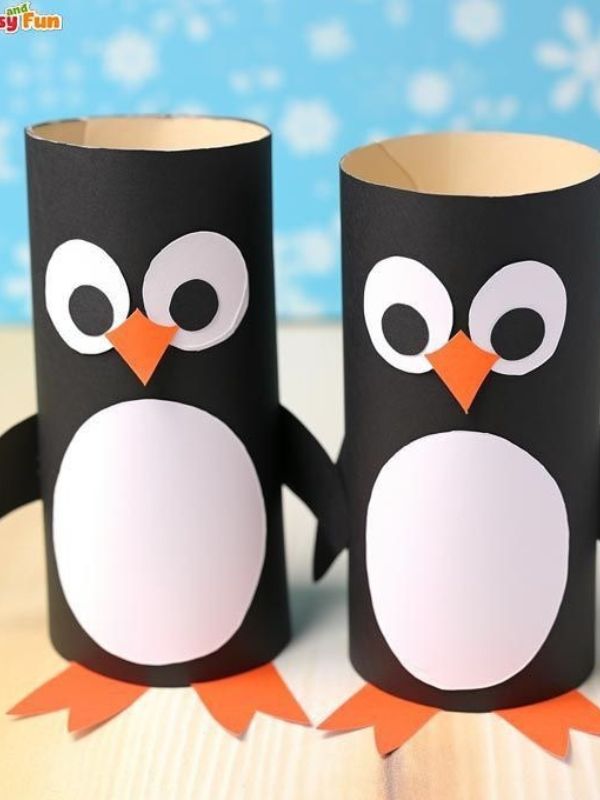
How to Make a Toilet Paper Roll Penguin
Step 1: Prepare the cardboard roll.
Check that the empty cardboard tube is clean and dry.
Cut a piece of black construction paper large enough to wrap around the tube. Apply glue to the back of the paper and wrap it around the cardboard.
Press the edges gently so they stay in place.
If the paper is slightly longer than the tube, trim the extra section.
Step 2: Make the white belly.
Draw a long oval on white construction paper. Cut it out and glue it to the front of the cardboard roll.
The white shape should cover most of the middle section while leaving a black border around it.
Step 3: Attach the eyes.
Place two googly eyes near the top of the white belly.
You can use small paper circles instead if you do not have googly eyes.
Step 4: Create the beak.
Cut a small orange triangle and attach it underneath the eyes.
Press it gently to make sure it sticks.
Step 5: Add the wings.
Cut two narrow oval shapes from black construction paper.
Glue one to each side of the tube. You can bend the outer edges slightly so the wings point away from the body.
Step 6: Make the feet.
Draw two small feet on orange construction paper and cut them out.
Attach them to the bottom of the cardboard tube. Leave a little space between them so the penguin can stand.
Step 7: Add colourful accessories.
Cut a thin strip of coloured paper to make a scarf. Wrap it around the penguin’s neck and attach it with glue.
Children can also create a small paper hat or bow tie.
Fun Ways to Personalise It
Create a whole penguin family using cardboard tubes of different heights. You can cut some tubes shorter to make baby penguins.
Another idea is to make each penguin a different character. One could wear a scarf, another could have a bow tie, and another could carry a tiny paper snowflake.
Children can also arrange their finished penguins on a table to create a little winter village.
What Preschoolers Can Learn
This project introduces children to recycling and creative reuse.
They learn that ordinary household materials can become something new with a little imagination.
The activity also encourages shape recognition, cutting practice, and problem-solving as children work out how to attach the different pieces to a curved cardboard surface.
Here are some other crafts to explore
- 12 Paper Snowflake Crafts for Kids of All Ages
- 11 Thoughtful New Years Eve Crafts for Family Parties at Home
- 15 Valentines Day Crafts for Preschoolers That Are Almost Too Cute to Resist
- 10 Dried Flower Crafts and Decor Ideas That Make Your Home Look Beautiful.
- 5 Loaves and 2 Fish Crafts for Kids That Make Learning About Jesus Fun
- Wine Bottle Crafts Ideas That Will Make You Look at Empty Bottles Differently
- David and Goliath Crafts for Preschoolers That Teach Children to Trust God and Be Brave
- Creative Christmas Crafts for Adults That Look Store Bought but Aren’t
4. Handprint Penguin Craft
Handprint crafts are special because they capture the size and shape of a child’s hand at a particular age. Parents often enjoy keeping these projects as memories, especially when children grow older.
A handprint penguin is a lovely winter activity that uses a child’s hand to create the penguin’s body and wings.
It is simple, inexpensive, and suitable for a relaxed afternoon at home or a preschool classroom activity.
Materials Needed
- Black construction paper
- White construction paper
- Orange construction paper
- Googly eyes
- Glue stick
- Child-safe scissors
- Pencil
- Crayons
- Blue cardstock for the background
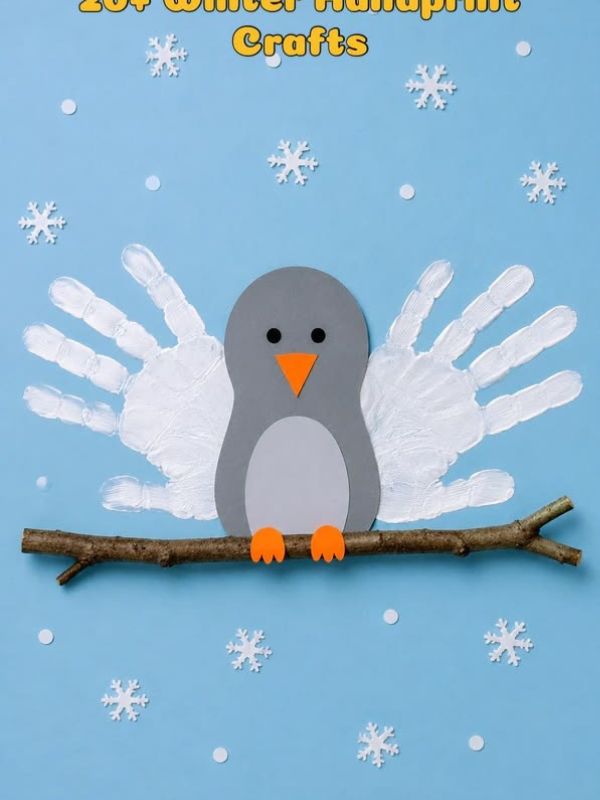
How to Make a Handprint Penguin
Step 1: Trace the child’s hand.
Place the child’s hand on black construction paper with the fingers slightly spread apart.
Use a pencil to trace around the hand.
The palm will form the penguin’s body, while the fingers will create the wings and outer shape.
Step 2: Cut out the handprint.
Carefully cut around the traced outline.
Younger children may need help with this step. Allow them to observe or assist with safe parts of the process.
Step 3: Prepare the white belly.
Draw a large oval on white construction paper. Cut it out and place it over the palm section of the handprint.
Glue it in position.
Step 4: Add the eyes.
Attach two googly eyes near the top of the white oval.
If you do not have googly eyes, use small white and black paper circles.
Step 5: Create the beak.
Cut a small orange triangle and attach it underneath the eyes.
Step 6: Add the feet.
Draw two small penguin feet on orange paper. Cut them out and attach them to the lower part of the handprint.
Step 7: Decorate the background.
Glue the finished penguin onto blue cardstock.
Children can draw snowflakes, add cotton wool snow, or create a small iceberg using white paper.
You can also write the child’s name and age on the background.
Fun Ways to Personalise It
Try making handprint penguins in different sizes. If siblings are participating, each child can trace their hand and create their own penguin.
You can also turn the finished craft into a greeting card. Fold a piece of cardstock in half and attach the penguin to the front.
Add a message such as “Waddling into Winter” or “Sending You a Little Penguin Love.”
What Preschoolers Can Learn
Handprint crafts help children explore their own body shapes and develop an understanding of how outlines can be used to create pictures.
Tracing and cutting also support fine motor development.
For parents, this project offers a simple way to create a keepsake that can be saved in a memory box or scrapbook.
5. Penguin Popsicle Stick Craft
Popsicle sticks are another useful material for preschool craft activities. They are easy to decorate and can be arranged to create a flat surface for different designs.
For this project, children will use craft sticks to make a little penguin. The sticks form the body, while construction paper provides the face, wings, beak, and feet.
The finished penguin can be displayed on a shelf, attached to a classroom board, or turned into a simple winter decoration.
Materials Needed
- 5–6 wide craft sticks
- Black washable paint
- White construction paper
- Orange construction paper
- Black construction paper
- Googly eyes
- Glue
- Paintbrush
- Child-safe scissors
- Pencil
- Cardboard or cardstock
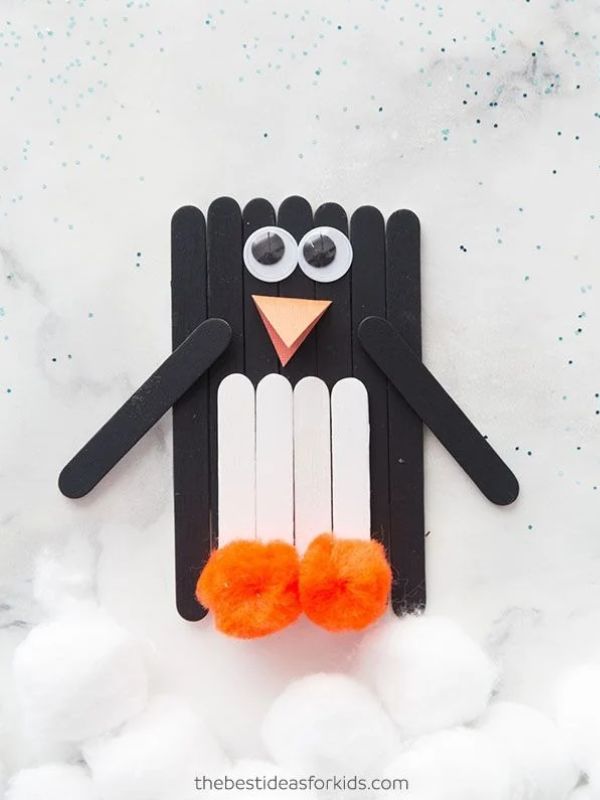
How to Make a Popsicle Stick Penguin
Step 1: Arrange the craft sticks.
Place five or six craft sticks side by side on the table.
Make sure their edges are close together so they form a flat surface.
An adult can glue the sticks onto a piece of cardboard to hold them in position.
Step 2: Paint the sticks.
Give your preschooler black washable paint and a paintbrush.
Encourage them to paint the front of the sticks black. Allow the paint to dry before continuing.
Step 3: Create the white belly.
Draw an oval shape on white construction paper and cut it out.
Glue it to the centre of the craft sticks.
Make sure the white shape is large enough to be visible against the black background.
Step 4: Add the eyes.
Attach two googly eyes near the upper part of the white belly.
Step 5: Make the beak.
Cut a small orange triangle and glue it underneath the eyes.
Step 6: Create the wings.
Cut two curved wing shapes from black construction paper.
Attach them to the left and right sides of the craft sticks.
Step 7: Add the feet.
Cut two orange feet and glue them to the bottom of the penguin.
Step 8: Finish with decorations.
Children can add a small scarf, paper bow, or winter hat.
If you want to hang the finished project, an adult can attach a piece of string to the back after everything has dried.
Fun Ways to Personalise It
Children can make a group of penguins using different numbers of craft sticks.
You can also use coloured craft sticks instead of painting plain wooden ones, although black sticks will give the penguin its familiar appearance.
For a classroom activity, let each child decorate their penguin with a different scarf colour. Display the finished projects together to create a cheerful winter collection.
What Preschoolers Can Learn
This activity introduces children to arranging materials and creating a picture from separate pieces.
Painting the craft sticks helps develop brush control, while attaching the paper shapes encourages hand-eye coordination.
Children can also practise counting by counting the craft sticks before beginning.
6. Penguin Footprint Winter Art
Footprint crafts are another adorable way to create animal artwork with young children. They are especially lovely as keepsakes because they capture the size of a child’s foot.
For this activity, a child’s footprint becomes the main shape of a penguin. With a little paint and a few paper decorations, the footprint can be transformed into a cute winter animal.
This project requires adult assistance, especially when applying paint and cleaning the child’s foot.
Materials Needed
- White cardstock
- Black washable, non-toxic paint
- White washable paint
- Orange construction paper
- Googly eyes
- Paintbrush or sponge
- Glue
- Child-safe scissors
- Baby wipes or a damp cloth
- Newspaper or a washable mat
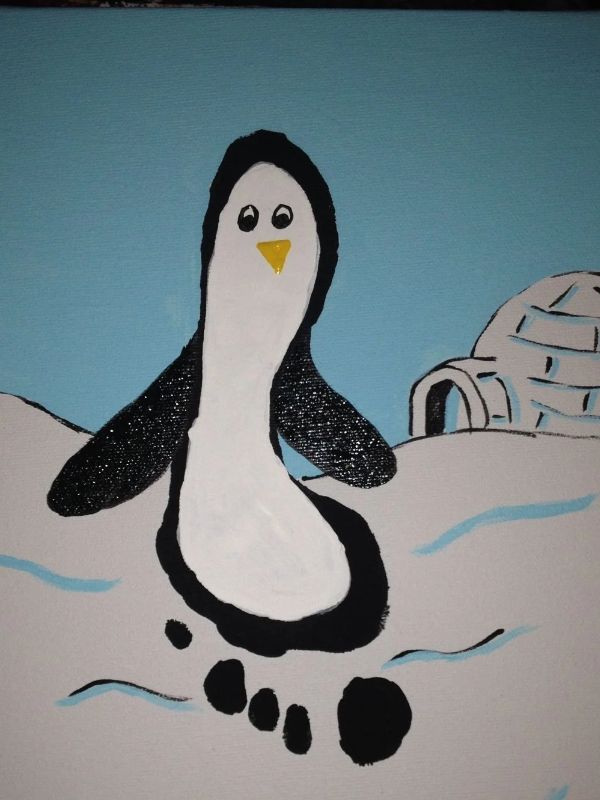
How to Make Penguin Footprint Art
Step 1: Prepare the work area.
Cover the table or floor with newspaper or a washable mat.
Place the white cardstock on the protected surface and keep baby wipes or a damp cloth nearby.
Make sure the paint is labelled as suitable for children’s use.
Step 2: Apply black paint to the foot.
Use a paintbrush or sponge to apply a thin layer of black washable paint to the bottom of the child’s foot.
Avoid using too much paint because it can make the footprint unclear.
Step 3: Make the footprint.
Help the child place their painted foot gently onto the white cardstock.
Press carefully to transfer the shape, then lift the foot straight up.
The footprint will form the penguin’s body.
Clean the child’s foot immediately after completing the print.
Step 4: Allow the paint to dry.
Leave the cardstock flat until the black paint is completely dry.
Do not begin adding decorations while the paint is still wet.
Step 5: Add the white belly.
Use white paint to create an oval area in the middle of the black footprint.
You can also cut an oval from white paper and glue it onto the body once the footprint has dried.
Step 6: Make the penguin’s face.
Attach two googly eyes near the top of the footprint.
Cut a small orange triangle and glue it underneath the eyes to create the beak.
Step 7: Add the feet and winter background.
Cut two small orange feet and attach them near the bottom of the penguin.
Decorate the background with paper snowflakes, a winter hat, or a few cotton wool clouds.
Step 8: Add a special message.
Write the child’s name and the date on the artwork.
You can also add a short message such as “My Little Winter Penguin” to make it a memorable keepsake.
Fun Ways to Personalise It
Create a penguin family using footprints from different family members. Larger footprints can represent adult penguins, while smaller ones can become baby penguins.
You can also make a winter greeting card using the finished artwork.
If you have more than one child participating, place their penguin footprints on one large sheet of paper and create a family winter display.
What Preschoolers Can Learn
Footprint art introduces children to printing and simple art techniques.
They can observe how paint transfers from one surface to another and how a familiar shape can become something completely different.
The activity also provides an opportunity to talk about penguins and compare the different sizes of the footprints.
Safety tip: Use only non-toxic, child-appropriate paint. Keep the child seated and supervised while making the footprint, and clean their foot immediately afterwards.
More Fun Ways to Enjoy Penguin Crafts With Preschoolers
After making these six adorable penguin crafts, you can extend the activity with a few simple games and creative ideas.
Preschoolers enjoy activities that allow them to move, talk, explore, and use their imagination. You can use the finished penguins as the starting point for a whole afternoon of winter-themed fun.
1. Create a Penguin Family
Children can make a penguin family using different craft materials.
For example, use a paper plate to make a large adult penguin, a cardboard tube for another penguin, and a handprint to create a baby penguin.
Arrange them together on a table or display board.
You can encourage children to give each penguin a name and describe which one is the parent and which one is the baby.
This is a lovely activity for discussing families and helping children practise describing things.
2. Make a Snowy Penguin Display
Use a large sheet of blue or white paper to create a winter background.
Arrange the finished penguins across the bottom and add paper snowflakes, icebergs, and snowy hills.
You can also use cotton wool to create soft snow.
Let every child contribute one penguin to the display. This works particularly well in preschool classrooms because everyone gets to see their work included in a shared project.
3. Read a Penguin Story After Craft Time
Pair the craft session with a children’s book about penguins.
After making their penguins, children can listen to a story and identify the animals, colours, and winter settings they recognise.
You can ask simple questions such as:
- What colour is the penguin?
- What is the penguin doing?
- Where does the penguin live?
- Can you find another penguin in the story?
This connects art activities with early language development and reading.
4. Play a Penguin Colour Game
Use coloured paper to create small penguin decorations.
Ask children to find the penguin wearing a red scarf, the one with a blue hat, or the one with a yellow bow.
You can also ask them to group the penguins according to their colours.
This is a simple way to practise colour recognition while enjoying the finished crafts.
5. Make a Penguin Waddling Game
Once the crafts are complete, give children an opportunity to move like penguins.
Ask them to walk slowly with their arms close to their sides and take small steps.
You can play gentle music and encourage them to waddle from one side of the room to another.
Make sure the play area is clear and safe.
This movement activity adds a little physical fun to the craft session.
Tips for Making Penguin Crafts Easier for Preschoolers
Preschoolers are still developing their coordination and independence, so a little preparation can make craft time more enjoyable.
Here are some practical tips to help you get the most out of these activities.
Prepare Difficult Shapes Beforehand
Some projects require cutting small triangles, ovals, and curved shapes.
Instead of expecting preschoolers to cut everything themselves, prepare the difficult pieces before the activity begins.
You can place the shapes in separate containers and let children choose the ones they need.
This allows them to focus on decorating and assembling their penguins.
Use Washable Materials
Paint, markers, and glue can easily end up on children’s hands and clothes.
Choose washable, child-appropriate products whenever possible.
Cover the working surface and keep cleaning materials nearby.
Give Children Simple Instructions
Preschoolers may find long instructions difficult to follow.
Break each project into small steps and explain one part at a time.
For example, you can say, “First, let’s paint the body. Next, we will add the white belly. After that, we can make the eyes.”
This helps children understand what they are doing without feeling overwhelmed.
Allow Time for Creativity
Not every penguin needs to look exactly the same.
Some children may want to add a colourful scarf, while others may prefer a little hat or bow tie.
Allow them to make their own choices. Their individual ideas are part of what makes handmade crafts special.
Choose the Right Project for the Child’s Age
Some activities are easier for younger preschoolers than others.
For children who are new to crafting, start with the paper plate penguin or cotton ball penguin.
Older preschoolers may enjoy the popsicle stick project or handprint penguin.
Always supervise activities involving scissors, glue, small decorations, and other craft supplies.
What Children Learn From Making Penguin Crafts
Craft activities can provide more than a finished decoration. They also give preschoolers opportunities to practise different skills while exploring new materials.
Here are some of the benefits of making penguin crafts.
Fine Motor Skills
Picking up cotton balls, holding a paintbrush, attaching googly eyes, and pressing paper shapes into place all require small, controlled hand movements.
These activities help children practise using their fingers and hands.
Colour Recognition
Penguin crafts naturally introduce children to black, white, and orange.
You can ask them to identify each colour before attaching the materials.
You can also use colourful scarves and hats to introduce additional colours.
Shape Recognition
Most penguin crafts involve simple shapes such as circles, ovals, triangles, and rectangles.
Children can learn to identify these shapes while creating the animal.
For example, the beak is usually a triangle, while the belly is often an oval.
Creativity and Imagination
Children can decorate their penguins in different ways.
They may add scarves, hats, bows, or other accessories. They can also create names and personalities for their animals.
This gives them an opportunity to express their ideas through art.
Early Science Learning
Penguins provide an interesting introduction to animal life.
Children can learn that penguins are birds, that they have feathers, and that they use their wings to swim.
You can also explain that different penguin species live in different parts of the world.
Patience and Following Instructions
Craft projects usually involve several steps.
Children learn to complete one stage before moving to the next. They also practise waiting for glue and paint to dry.
These simple experiences can help develop patience and confidence.
Frequently Asked Questions About Penguin Crafts for Preschoolers
1. What are the easiest penguin crafts for preschoolers?
Some of the easiest projects include paper plate penguins, cotton ball penguins, and handprint penguins.
They use simple materials and involve basic activities such as painting, gluing, and attaching paper shapes. Adults can prepare the more difficult cutting steps beforehand.
2. What materials do I need to make penguin crafts?
Most penguin crafts can be made with construction paper, paper plates, cardboard tubes, cotton balls, popsicle sticks, glue, washable paint, googly eyes, and child-safe scissors.
You can also reuse household materials such as empty toilet paper rolls and leftover paper scraps.
3. How do I make a penguin craft without paint?
You can make a penguin using black and white construction paper instead of paint.
Cut out a black oval for the body and a smaller white oval for the belly. Add paper eyes, an orange beak, wings, and feet.
This is a good option for children who prefer less messy activities.
4. Can toddlers make penguin crafts?
Yes, toddlers can participate in simple penguin craft activities with close adult supervision.
Choose projects that involve large paper shapes and adult-assisted gluing. Avoid small loose decorations that could present a choking hazard.
5. How can I use recycled materials to make penguin crafts?
Empty cardboard tubes, clean paper packaging, and leftover construction paper can be used to create penguins.
A cardboard toilet paper roll is particularly useful because it already has a shape that can become an upright penguin body.
6. How can I display preschoolers’ penguin crafts?
You can arrange the finished projects on a classroom noticeboard, bedroom wall, shelf, or craft display table.
Use blue and white paper to create a winter background. Add cotton wool, paper snowflakes, and handmade icebergs to complete the display.
7. Are penguin crafts suitable for winter classroom activities?
Absolutely! Penguin crafts are suitable for winter art lessons, animal-themed activities, preschool classroom decorations, and group craft sessions.
Each child can make a different penguin and contribute it to a shared classroom display.
Conclusion
These six adorable penguin crafts for preschoolers are lovely ways to introduce little ones to creative activities during the winter season. With simple supplies such as paper plates, cotton balls, cardboard tubes, popsicle sticks, and construction paper, children can make their own collection of playful penguins.
Each project offers something different. The paper plate penguin is a great starting activity, the cotton ball version introduces interesting textures, and the handprint and footprint designs make special keepsakes for families.
You can enjoy these crafts at home, in a preschool classroom, or during a fun winter afternoon with the children. Add a few animal facts, read a penguin story, or create a snowy display to make the experience even more memorable.
Remember to let children explore their own ideas. Their penguins may have colourful scarves, funny expressions, or unusual decorations, and that is perfectly fine.
Gather a few supplies, choose a favourite project, and enjoy making some adorable little penguins together!