
I love little handmade projects that can make something ordinary feel more personal. A keychain is one of those simple crafts that you can make without needing a huge collection of supplies, and you can easily change the colors, charms, beads, or decorations to match your style.
If you have been looking for how to make a cute DIY keychain at home, this is a fun project to try. You can make one for your own keys, attach it to a handbag or backpack, or make a few as small handmade gifts for friends and family.
The great thing about making your own keychain is that you get to decide exactly how you want it to look. I especially like mixing pretty beads with small charms because it gives the finished keychain a cute, personalized feel.
A handmade keychain can also be a good little project when you want to use up leftover beads and craft supplies. You don’t need to buy everything brand new for every project. Sometimes a few beads sitting in your craft box can become a really cute accessory.
I have an article on Diy bag charms you can make at home for beginners, this post will be useful to you.
In this tutorial, I’ll show you a simple way to make a beaded DIY keychain at home using easy-to-find craft supplies. I’ll also share different ways you can customize the design, make keychains as gifts, troubleshoot common problems, and turn the basic idea into several different styles.
What You Need to Make a DIY Keychain
You do not need many materials for this project. Most of the supplies are small, inexpensive craft items that you may already have at home.
Here is what you will need:
- Keychain ring
- Beading cord or strong elastic cord
- Assorted beads
- A small decorative charm
- Scissors
- Jewelry pliers
- Crimp bead, if needed
- Jump ring for attaching the charm
- Small ruler or measuring tape
- Craft glue, if suitable for your chosen cord
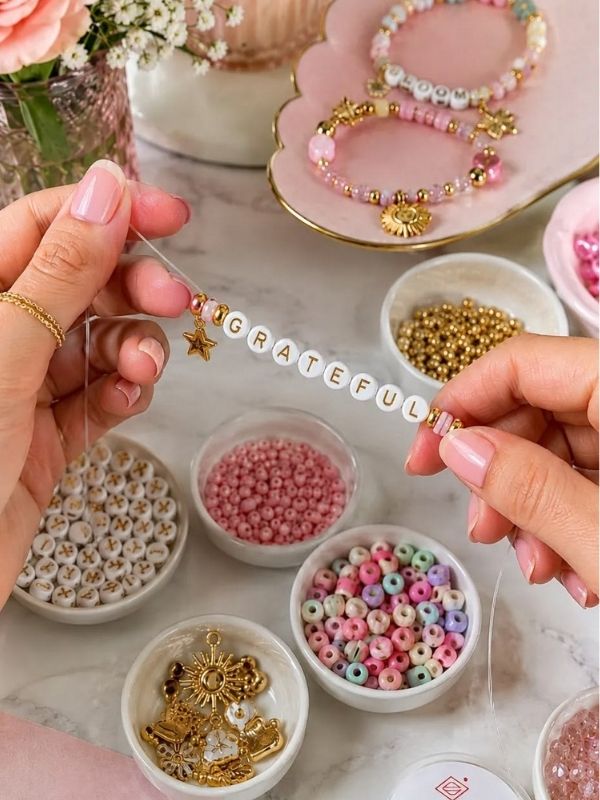
You can also add letter beads, spacer beads, pearl beads, flower beads, heart beads, smiley beads, or other decorative pieces depending on the style you want.
For the beads, you can use any colors and shapes you like. I love using a combination of small round beads and one or two larger statement beads because it keeps the keychain interesting without making it look too busy.
You can also choose beads based on the person you are making it for. Pastel beads can create a soft and feminine look, while bright colors can make the keychain feel playful and fun.
Check this simple bag charm to make at home : cute Ideas for your bag to get more ideas on making a charm.
What Type of Cord Should You Use?
The cord you choose matters because the finished keychain will be handled frequently.
Elastic cord is convenient because it stretches slightly and is easy to thread through beads. It can work well for lightweight designs, but you need to make sure the knot is secure.
Nylon beading cord is another option. It is strong and comes in different thicknesses. Choose a size that fits comfortably through the holes in your beads.
If you are using jewelry wire, you will usually need crimp beads and pliers to create a secure finish.
For a beginner project, I would choose a cord that is easy to work with and strong enough for the beads you have selected.
I have other diy project Adults can finish at home : You can easily recreate
Choose the Design for Your Keychain
Before cutting your cord, I recommend arranging your beads on a flat surface first.
This makes it easier to see what your finished keychain will look like before you start putting everything together.
You could use two or three colors that complement each other, or choose one main color and add a few neutral beads around it. If you want something more playful, mix different shapes and sizes.
For example, you could create a pink and white keychain with a heart charm, a colorful keychain with smiley-face beads, or a simple neutral design using cream, brown, and gold-toned beads.
Looking for different gifts ideas? check out this Handmade Crafts for Gifts that dosen’t cost a Fortune.
There is no need to follow a strict pattern. The design is completely up to you, and that is what makes handmade keychains so much fun.
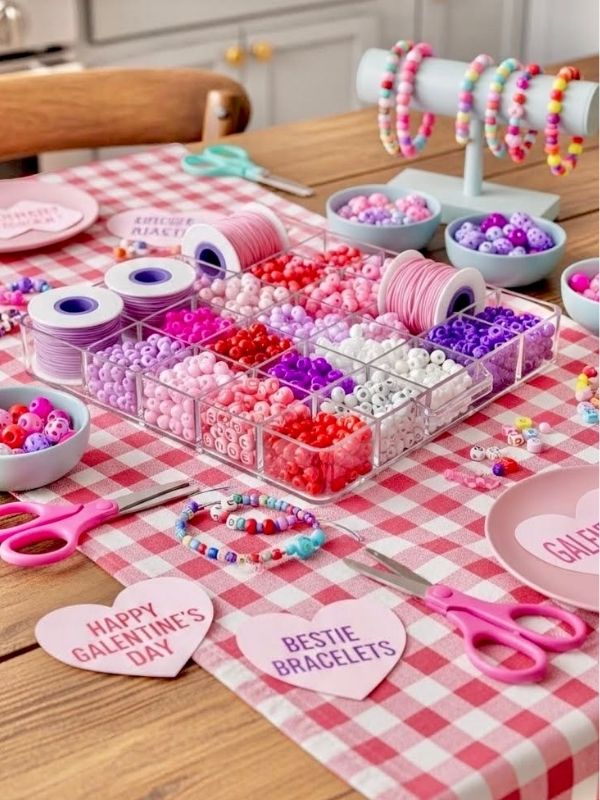
Try Making a Simple Pattern
If you are not sure how to arrange your beads, start with a repeating pattern.
For example:
Pink – white – pink – gold – pink – white – pink
You can repeat the same combination until you reach your desired length.
Another option is to place one larger bead in the center and use smaller beads around it. This creates a focal point and can make the keychain look more professionally designed.
Embroidery can also be useful while making a keychain charm for gift, check out this Embroidery Gift Ideas that turn stitches into a cute Keepsakes.
Use Letter Beads for a Personalized Keychain
Letter beads are one of the easiest ways to make a keychain feel personal.
You can spell:
- A person’s name
- Their initials
- A nickname
- A short word
- A favorite phrase
- A simple positive word such as LOVE or HAPPY
If you are making several keychains as gifts, you can personalize each one instead of making every design identical.
Step 1: Cut Your Cord
Start by cutting a piece of beading cord that is long enough for your design.
I recommend leaving some extra length because it is much easier to trim excess cord later than to discover that your cord is too short.
The amount you need will depend on the number and size of your beads and how you plan to attach the cord to the keychain ring.
If you are using elastic cord, make sure it is strong enough to hold the beads and withstand being carried around with your keys or attached to a bag.
After cutting the cord, fold it in half so you have two ends together. This will help create a loop that can be attached to the keychain ring.
Before moving on, run your fingers along the cord and make sure there are no obvious weak spots or damaged areas.
Check out this Embroidery Hoop wall art: 10 beautiful Ideas To Try.
Step 2: Attach the Cord to the Keychain Ring
Pass the folded end of the cord through the keychain ring.
Once you have a small loop on the other side, bring the loose ends of the cord through that loop and pull gently.
This creates a simple attachment that keeps the beading cord connected to the keychain ring.
Take a moment to make sure the cord is secure before adding your beads. You do not want to finish the entire keychain only to discover that the cord was not attached properly.
You can also use Clay in making your keychain, check out this 9 simple Clay you wont believe is so easy to make.
If you are using a different type of keychain hardware, follow the attachment method appropriate for that hardware.
The connection between the cord and the ring is one of the most important parts of the project because this is where the keychain will experience a lot of pulling.
Step 3: Start Adding Your Beads
Now comes my favorite part: adding the beads.
Begin threading your chosen beads onto the two strands of cord. You can alternate the colors to create a pattern or place them randomly for a more playful look.
I like to start with a few smaller beads before adding a larger decorative bead. This gives the design a little more dimension.
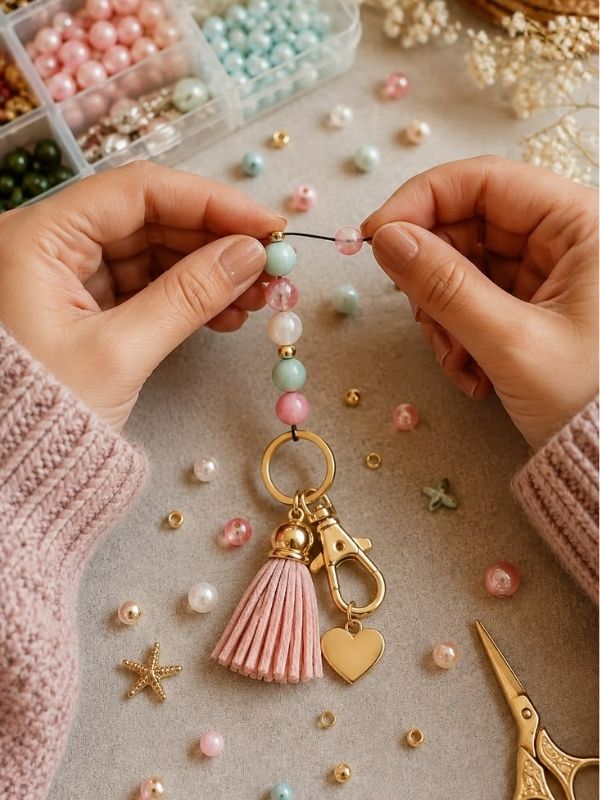
As you add each bead, push it down toward the keychain ring so the beads sit close together.
Keep checking your design as you go. You can remove a bead and replace it with another color if you decide that you prefer a different combination.
If the beads are difficult to thread, check the size of the cord compared with the bead holes. Some decorative beads have very small openings, so a thinner cord may be needed.
Don’t Add Too Many Beads
It can be tempting to keep adding beads because there are so many pretty colors and shapes available.
However, a keychain that is too long or heavy may become uncomfortable to carry.
Leave some space for the charm and hardware, and remember that the finished piece will be attached to keys, a purse, or a backpack.
Step 4: Add a Cute Charm
Once you have added enough beads, attach a small charm to your design.
A heart, flower, star, butterfly, bow, initial, or smiley-face charm can make a simple beaded keychain look much more special.
If your charm has a small loop, use a jump ring to connect it to the keychain.
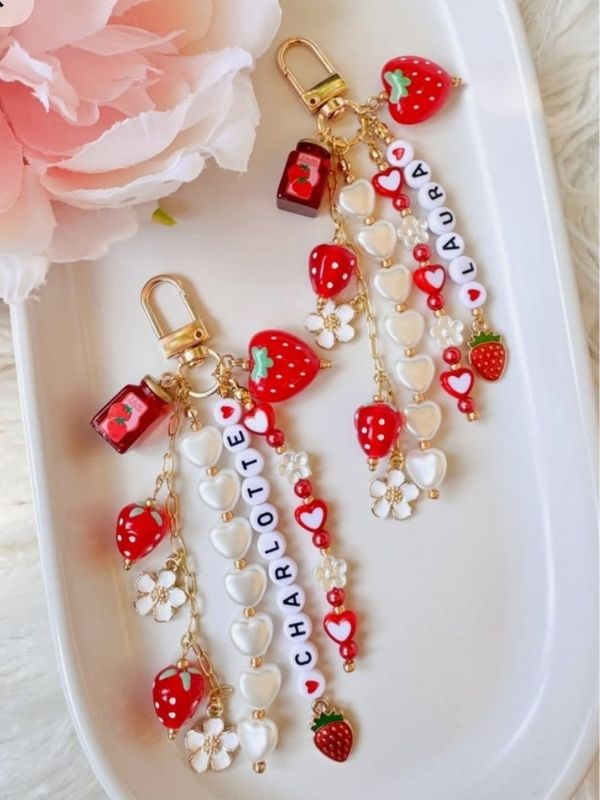
Open the jump ring carefully with your jewelry pliers, attach the charm, and then close the ring securely.
Try to open a jump ring by moving the ends sideways rather than pulling them directly apart. This helps the ring keep its shape.
You can place the charm at the bottom of the keychain or attach it beside the beads. I personally like placing it at the end because it gives the finished keychain a cute little detail that moves when you carry it.
Step 5: Secure the Ends
When you are happy with the length and design, it is time to secure the cord.
If you are using elastic cord, tie several tight knots at the end. You can add a small amount of craft glue to the knot if the glue is suitable for the type of cord you are using.
If you are using jewelry wire, you can use a crimp bead and jewelry pliers to secure the end instead.
Pull gently on the finished keychain to make sure the beads stay in place and the connection to the keychain ring is secure.
Do not skip this step. A pretty keychain is not very useful if the beads fall off the first time you use it.
Allow any adhesive to dry completely before using the keychain.
Step 6: Trim the Extra Cord
After securing the knot or crimp bead, use your scissors or jewelry cutters to carefully trim away the excess cord.
Leave enough of the secured end in place so that you do not accidentally cut through your knot.

If you have a small section of cord showing, you can tuck it between the nearby beads so the finished keychain looks neat.
Take your time with this part. A clean finish can make a simple handmade project look much more polished.
Step 7: Give Your DIY Keychain a Final Check
Before using your new keychain, check every part carefully.
Make sure the beads are secure, the knot is tight, the charm is properly attached, and the keychain ring opens and closes correctly.

Give the keychain a gentle tug to test the connection.
Once everything feels secure, your handmade keychain is ready to use.
I recommend doing this little test every time you make a new keychain, especially if you plan to give it to someone else or sell it.
Cute Ways to Customize Your DIY Keychain
One thing I really enjoy about this project is how easy it is to make the same basic keychain look completely different.
For a soft feminine keychain, try pink, white, pearl, or pastel beads with a heart or flower charm.
For a colorful keychain, combine several bright bead colors and add a fun smiley or rainbow charm.

For a personalized keychain, use letter beads to spell out a name, nickname, initials, or a short word.
You can also make a simple neutral keychain with cream, beige, brown, black, or clear beads. This would look especially nice hanging from a handbag or tote.
If you are making one for a child, colorful beads and fun shapes can make the project more exciting. Just make sure small beads and other small pieces are kept away from young children who could put them in their mouths.
Make a Flower-Themed Keychain
Flower beads are a lovely choice if you want a cute and feminine design.
You could combine small white beads with pink flower beads and add a tiny butterfly charm.
Another option is to use several different flower colors for a bright spring-inspired keychain.
Make a Minimalist Keychain
You do not have to use lots of beads.
Choose one or two colors and use simple round beads with one attractive charm.
A combination such as cream, clear, and gold can create a simple design that works nicely with a handbag or work bag.
Make a Friendship Keychain
Make two similar keychains using the same colors.

You could add each friend’s initial to their own keychain or divide a word between two designs.
This can be a sweet handmade project for a close friend.
How to Make Your Keychain Look More Expensive
The way you combine the pieces can make a bigger difference than the price of the supplies.
Try choosing a small color palette instead of using every color at once. Two or three coordinating colors usually create a more polished look.
You can also combine different bead sizes. Place one larger bead between smaller beads to create a focal point rather than making every bead the same size.
Adding one attractive charm can also make a simple keychain look more finished. A small gold-tone or silver-tone charm paired with coordinating beads can give the project a more put-together appearance.
Another simple trick is to keep your hardware consistent. If you are using gold-tone hardware, matching it with gold-colored accents can create a coordinated look.
Keep the Design Balanced
If you have one large statement bead, you may not need several other large decorations.
Let one piece stand out and use smaller beads around it.
This keeps the keychain from looking crowded.
Pay Attention to the Finish
Even inexpensive beads can look beautiful when the finished piece is neat.
Make sure your knots are secure, your excess cord is trimmed, and your charm is properly attached.
These little details can make a noticeable difference.
How Long Should a DIY Keychain Be?
There is no single correct length for a handmade keychain.
A compact design can be convenient for keys because it does not take up much space.
A slightly longer design can work nicely as a backpack or handbag charm.
Think about where you plan to use the keychain before deciding on its size.
For a keyring, I would keep the design relatively small and lightweight. For a bag charm, you have more freedom to make it longer and more decorative.
Can You Make DIY Keychains Without Beads?
Yes.
Beads are only one option.
You can experiment with:
- Polymer clay
- Shrink plastic
- Embroidery floss
- Macramé cord
- Fabric
- Felt
- Wooden shapes
- Acrylic charms
- Ribbon
- Crochet pieces
- Small handmade clay shapes
Each material gives the finished keychain a completely different look.
For example, a clay keychain can be shaped into flowers, hearts, initials, fruits, or little animals. A macramé keychain can have a soft boho appearance, while a fabric keychain can be colorful and playful.
Can You Make DIY Keychains as Gifts?
Absolutely. Handmade keychains make lovely little gifts because you can customize them for the person receiving them.
You could make one in someone’s favorite color, add their initial, or choose a charm that reminds you of them.
They can also work nicely as small gifts for birthdays, Valentine’s Day, Christmas, graduation celebrations, or even as little handmade additions to a larger gift.
I would also make several different designs if I were preparing them for a group of friends. That way, each person could receive something that feels a little different.

Make a Small Handmade Gift Set
You can also pair a handmade keychain with another small DIY gift.
For example, you could create a little gift box containing:
- A handmade keychain
- A friendship card
- A handmade bookmark
- A small notebook
- A handwritten note
This can turn one inexpensive craft into a thoughtful gift.
Can You Make DIY Keychains to Sell?
Yes, you can also turn simple keychain projects into handmade products.
If you decide to sell them, pay attention to the quality of your materials and the strength of your finished pieces. Customers will expect the keychain to hold together during normal use.
You can create different collections based on colors and themes, such as floral keychains, personalized initial keychains, pastel designs, colorful children’s designs, or minimalist styles.
Good product photos are also important. Take clear pictures in natural light and show the keychain attached to something familiar, such as a handbag, backpack, or set of keys. This helps people understand the size and gives them an idea of how the finished piece can be used.
Create Different Collections
Instead of making every keychain completely different, you could create small collections.
For example:
Pastel Collection: Pink, lavender, baby blue, white, and pearl beads.
Floral Collection: Flower beads, butterfly charms, and soft colors.
Personalized Collection: Letter beads and different color combinations.
Bright Collection: Yellow, orange, pink, green, and blue beads.
This can make your products easier to organize and photograph.
Think About Packaging
If you are selling handmade keychains, simple packaging can make the product feel more finished.
You could place each keychain on a small card with your brand name and package it in a clear bag.
A small thank-you note can also make the order feel more personal.
How to Store Your Beads and Keychain Supplies
If you plan to make several keychains, keeping your supplies organized will save you a lot of time.
Small containers with separate sections work well for beads.

You can organize them by:
- Color
- Size
- Shape
- Material
- Letter
- Theme
Keep your keychain rings, jump rings, charms, and other hardware in separate containers so you can easily find what you need.
Letter beads especially benefit from organization because searching through a mixed container for specific letters can take a lot of time.
Common DIY Keychain Problems and How to Fix Them
The Beads Keep Falling Off
This usually means the cord or knot needs more attention.
Check that you are using strong enough cord and that your knot is properly tightened.
If you are using a crimp bead, make sure it has been firmly secured with the correct pliers.
The Keychain Looks Too Heavy
Remove some of the larger beads or replace them with smaller, lighter ones.
Remember that the finished keychain will be carried around, so it needs to be comfortable to use.
The Cord Keeps Fraying
Some cords naturally fray more than others.
Try using a cord that is appropriate for beadwork and make sure the bead holes are not damaging the material as you thread them.
The Charm Keeps Moving Around
A charm that swings is not necessarily a problem. In fact, movement can make the keychain look cute.
However, if you want the charm to stay in one position, consider changing where you attach it or using an additional connector.
The Keychain Looks Too Plain
Try adding one focal piece rather than adding lots of decorations.
A letter bead, flower, heart, pearl, or colorful charm can completely change the appearance of a simple design.
DIY Keychain Ideas You Can Try Next
Once you have made your first beaded keychain, you can experiment with other materials and techniques.
You could try making a clay keychain, a resin-style keychain, a letter-bead keychain, a friendship-bracelet-style keychain, or a cute animal keychain.
You can also make seasonal designs. For example, pastel flowers would work beautifully for spring, while stars, pumpkins, snowflakes, or Christmas-themed charms could be used for holiday designs.
You could even create keychains based on hobbies and interests.
For example, someone who loves baking might enjoy a tiny cupcake charm. A book lover might like a miniature book charm, while someone who loves flowers might prefer a floral design.
The basic idea stays the same: choose a simple base, add your favorite decorative details, and make the design your own.
Safety Tips When Making DIY Keychains
Some keychain materials are very small, so it is important to work carefully.
Keep beads, jump rings, charms, and other small pieces away from young children and pets because they can be choking hazards.
If you use scissors, jewelry pliers, adhesives, or any other sharp or chemical-based materials, use them carefully.
If your project involves heat, such as melting the end of synthetic cord, follow appropriate safety precautions and keep flammable materials away from the heat source.
When making keychains for children, avoid designs with loose small parts that could easily come off.
Frequently Asked Questions
What is the easiest DIY keychain to make?
A beaded keychain is one of the easiest options for beginners. You mainly need beads, cord, and keychain hardware, and you can personalize the design with different colors and letter beads.
What can I use to make a homemade keychain?
You can use beads, nylon cord, shrink plastic, macramé cord, embroidery floss, charms, clay, fabric, felt, and many other craft materials.
The important thing is to choose materials that can withstand regular handling.
How do I make a keychain without a keychain kit?
You can buy the individual pieces separately, such as a split ring, jump ring, cord, beads, and clasp.
This can also be useful if you already have some craft supplies at home and only need a few hardware pieces.
How do I stop a beaded keychain from coming apart?
Use strong cord, make a secure knot, and reinforce the connection where appropriate. Always test the finished keychain by gently pulling on it before putting it into regular use.
Can I make DIY keychains as gifts?
Absolutely. Personalized keychains are small, affordable handmade gifts. Adding initials, names, favorite colors, or a meaningful charm can make them feel much more personal.
Can children make DIY keychains?
Older children can enjoy making simple keychains with adult supervision. Because beads and charms are small, younger children should not handle them unsupervised.
Choose age-appropriate materials and supervise projects involving scissors, pliers, adhesives, or other tools.
What beads are good for making keychains?
You can use many different types of beads, including acrylic beads, silicone beads, wooden beads, glass beads, letter beads, pearl-style beads, and decorative shaped beads.
Choose beads with holes that are large enough for your chosen cord.
How many beads should I use?
There is no fixed number. It depends on the size of your beads and the length you want.
For a compact keychain, a smaller number of beads may be enough. Larger beads will also fill the space faster than tiny beads.
Can I personalize a keychain with a name?
Yes. Letter beads make this very easy. You can spell out a name, nickname, initials, or short word and combine the letters with colorful decorative beads.
Can I use a DIY keychain on a handbag?
Yes. Handmade keychains can make cute handbag and backpack accessories.
If you are attaching one to a bag, you can make the design slightly longer or more decorative than a keychain intended for everyday keys.
Conclusion
Making a cute DIY keychain at home is one of those crafts that does not require a lot of time or complicated tools, but you can still end up with something that feels personal and special.
I love that you can start with the same basic supplies and create completely different designs simply by changing the beads, colors, and charms.
If you are new to handmade crafts, this is a great little project to start with. Once you get comfortable with the basic technique, you can experiment with different patterns, personalize your designs, and even make a few as gifts.
You can also use this simple project as a starting point for exploring other handmade crafts. Once you become comfortable working with beads and small craft hardware, you can start experimenting with bag charms, bracelets, phone charms, clay projects, and other small accessories.
So gather your favorite beads, choose a cute charm, and have fun creating a keychain that feels like yours.
Which style would you make first? A personalized name keychain, a colorful beaded design, or a simple charm keychain? Let me know in the comments!